Vue集成高德地图

最近在做一个Vue集成高德地图的项目,中间遇到了很多问题,所以记录一下

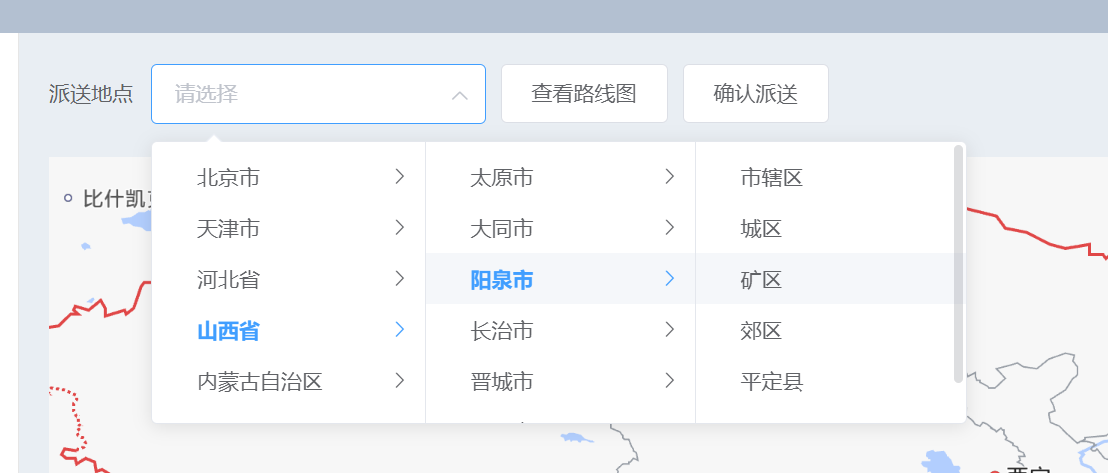
Vue+ElementUi中国省市区/省市,三级/两级联动选择

Vue集成高德地图之前,首先要实现Element UI对各个省市的选择

安装城市数据

1
npm install element-china-area-data -S

省市不带“全部”的二级联动

  1. 导入二级数据

    1
    import { provinceAndCityData } from 'element-china-area-data'
  2. HTML部分

    1
    2
    3
    4
    5
    6
    7
    8
    9
    10
    <template>
    <div id="app">
    <el-cascader
    size="large"
    :options="options"
    v-model="selectedOptions"
    @change="handleChange">
    </el-cascader>
    </div>
    </template>
  3. Js部分

    1
    2
    3
    4
    5
    6
    7
    8
    9
    10
    11
    12
    13
    14
    15
    16
    17
    18
    19
    20
    21
    22
    export default {
    data () {
    return {
    options: provinceAndCityData,
    selectedOptions: []
    }
    },

    methods: {
    handleChange () {
    var loc = "";
    for (let i = 0; i < this.selectedOptions.length; i++) {
    loc += CodeToText[this.selectedOptions[i]];
    }
    console.log(loc)//打印区域码所对应的属性值即中文地址
    }
    }
    //也可以这样写
    handleChange (value) {
    console.log(value)
    }
    }

省市带“全部”的二级联动

  1. 导入二级数据

    1
    import { provinceAndCityDataPlus  } from 'element-china-area-data'
  2. HTML部分

    1
    2
    3
    4
    5
    6
    7
    8
    9
    10
    <template>
    <div id="app">
    <el-cascader
    size="large"
    :options="options"
    v-model="selectedOptions"
    @change="handleChange">
    </el-cascader>
    </div>
    </template>
  3. Js部分

    1
    2
    3
    4
    5
    6
    7
    8
    9
    10
    11
    12
    13
    14
    15
    16
    17
    18
    19
    20
    21
    22
    export default {
    data () {
    return {
    options: provinceAndCityDataPlus ,
    selectedOptions: []
    }
    },

    methods: {
    handleChange () {
    var loc = "";
    for (let i = 0; i < this.selectedOptions.length; i++) {
    loc += CodeToText[this.selectedOptions[i]];
    }
    console.log(loc)//打印区域码所对应的属性值即中文地址
    }
    }
    //也可以这样写
    handleChange (value) {
    console.log(value)
    }
    }

省市不带全部的三级联动

  1. 导入二级数据

    1
    import { regionData } from 'element-china-area-data'
  2. HTML部分

    1
    2
    3
    4
    5
    6
    7
    8
    9
    10
    <template>
    <div id="app">
    <el-cascader
    size="large"
    :options="options"
    v-model="selectedOptions"
    @change="handleChange">
    </el-cascader>
    </div>
    </template>
  3. Js部分

    1
    2
    3
    4
    5
    6
    7
    8
    9
    10
    11
    12
    13
    14
    15
    16
    17
    18
    19
    20
    21
    22
    export default {
    data () {
    return {
    options: regionData,
    selectedOptions: []
    }
    },

    methods: {
    handleChange () {
    var loc = "";
    for (let i = 0; i < this.selectedOptions.length; i++) {
    loc += CodeToText[this.selectedOptions[i]];
    }
    console.log(loc)//打印区域码所对应的属性值即中文地址
    }
    }
    //也可以这样写
    handleChange (value) {
    console.log(value)
    }
    }
  4. 示例

    image-20230217202904143

省市带全部的三级联动

  1. 导入二级数据

    1
    import { regionDataPlus  } from 'element-china-area-data'
  2. HTML部分

    1
    2
    3
    4
    5
    6
    7
    8
    9
    10
    <template>
    <div id="app">
    <el-cascader
    size="large"
    :options="options"
    v-model="selectedOptions"
    @change="handleChange">
    </el-cascader>
    </div>
    </template>
  3. Js部分

    1
    2
    3
    4
    5
    6
    7
    8
    9
    10
    11
    12
    13
    14
    15
    16
    17
    18
    19
    20
    21
    22
    export default {
    data () {
    return {
    options: regionDataPlus ,
    selectedOptions: []
    }
    },

    methods: {
    handleChange () {
    var loc = "";
    for (let i = 0; i < this.selectedOptions.length; i++) {
    loc += CodeToText[this.selectedOptions[i]];
    }
    console.log(loc)//打印区域码所对应的属性值即中文地址
    }
    }
    //也可以这样写
    handleChange (value) {
    console.log(value)
    }
    }

Vue集成高德地图

首先创建一个高德地图的应用

高德地图的官网网址上有很详细的介绍,自行观看。https://lbs.amap.com/api/jsapi-v2/guide/webcli/map-vue1

建议先将官网上的代码跑出来在看下面的。

获取高德地图的api

1
npm i @amap/amap-jsapi-loader --save

实现路线规划

官方api:https://lbs.amap.com/api/javascript-api/guide/services/navigation

1
2
3
4
5
6
7
8
9
10
11
12
13
14
15
16
17
18
19
20
21
22
23
24
25
26
27
28
29
30
31
32
33
34
35
36
37
38
39
40
41
42
43
44
45
46
47
48
49
50
51
52
53
54
55
56
57
58
59
60
61
62
63
64
65
66
67
68
69
70
71
72
73
74
75
76
77
78
79
80
81
82
83
84
85
86
87
88
89
90
91
92
93
94
95
96
97
98
99
100
101
102
103
104
105
106
107
108
109
110
111
112
113
114
115
116
117
118
119
120
121
122
123
124
125
126
127
128
129
130
131
132
133
134
135
136
137
138
139
140
141
142
143
144
145
146
147
148
149
150
151
152
153
154
155
156
157
158
159
<template>
<div>
<el-form :model="diaform" :inline="true" >
<el-form-item label="派送地点" >
<el-cascader
size="large"
:options="diaform.options"
v-model="diaform.selectedOptions"
@change="handleChange">
</el-cascader>
</el-form-item>
<el-form-item>
<el-button @click="goView">
查看路线图
</el-button>
</el-form-item>
<el-form-item>
<el-button>
确认派送
</el-button>
</el-form-item>
</el-form>
<div id="container"></div>
</div>
</template>

<script>
import AMapLoader from '@amap/amap-jsapi-loader'
import { regionData , CodeToText } from 'element-china-area-data'
export default {
name: 'AMapView',
data() {
return {
map: null,
startName: '北京市',
endName: '',
driving: null,
diaform: {
options: regionData ,
selectedOptions: [],
},
}
},
mounted() {
window._AMapSecurityConfig = {
securityJsCode: '22ab9c534d1fef92d2d9b667830f3613' // 申请key对应的秘钥
}
// DOM初始化完成进行地图初始化
this.initMap()
},
methods: {
initMap() {
AMapLoader.load({
key: 'a13639d2a316c45690b8dac7d0cc9428', // 申请好的Web端开发者Key,首次调用 load 时必填
version: '2.0', // 指定要加载的 JSAPI 的版本,缺省时默认为 1.4.15
plugins: ['AMap.ToolBar', 'AMap.Driving', 'AMap.AutoComplete'] // 需要使用的的插件列表,如比例尺'AMap.Scale'等
}).then(AMap => {
this.map = new AMap.Map('container', { // 设置地图容器id
viewMode: '3D', // 是否为3D地图模式
zoom: 5, // 初始化地图级别
center: [105.602725, 37.076636] // 初始化地图中心点位置
})
const autoOptions = {
// city 限定城市,默认全国
city: '全国',
input: 'start'
}
// 实例化AutoComplete
const autoComplete = new AMap.AutoComplete(autoOptions)
const autoOptions2 = {
// city 限定城市,默认全国
city: '全国',
input: 'end'
}
// 实例化AutoComplete
const autoComplete2 = new AMap.AutoComplete(autoOptions2)
// 根据关键字进行搜索
/* autoComplete.search(this.startName, (status, result) => {
// 搜索成功时,result即是对应的匹配数据
console.log(result)
}) */
}).catch(e => {
console.log(e)
})
},
// 根据 startName 和 endName 来选择路线
goView() {
// eslint-disable-next-line no-undef
// 清除上一次规划的路线
if(this.driving){
this.driving.clear()
}
this.driving = new AMap.Driving({

map: this.map,
// 驾车路线规划策略,AMap.DrivingPolicy.LEAST_TIME是最快捷模式
// eslint-disable-next-line no-undef
policy: AMap.DrivingPolicy.LEAST_TIME
})

const points = [
{ keyword: this.startName, city: '全国' },
{ keyword: this.endName, city: '全国' }
]

this.driving.search(points, (status, result) => {
// 未出错时,result即是对应的路线规划方案
console.log('status=', status)
console.log('result=', result)
})
},

// 获取选取的地址
handleChange () {
var loc = "";
for (let i = 0; i < this.diaform.selectedOptions.length; i++) {
loc += CodeToText[this.diaform.selectedOptions[i]];
}
this.endName = loc
console.log(loc)//打印区域码所对应的属性值即中文地址
},
}
}
</script>
<style scoped>

* {
line-height: normal;
text-align: left;
}

#container{
padding:0px;
margin: 0px;
width: 100%;
height: 400px;
}
#panel {
position: fixed;
background-color: white;
max-height: 90%;
overflow-y: auto;
top: 10px;
right: 10px;
width: 280px;
}
#panel .amap-call {
background-color: #009cf9;
border-top-left-radius: 4px;
border-top-right-radius: 4px;
}
#panel .amap-lib-driving {
border-bottom-left-radius: 4px;
border-bottom-right-radius: 4px;
overflow: hidden;
}
</style>


实现存在途径点的路径规划

详细请参考高德地图的api解释https://lbs.amap.com/api/javascript-api/reference/route-search/ 重点在search的参数问题上
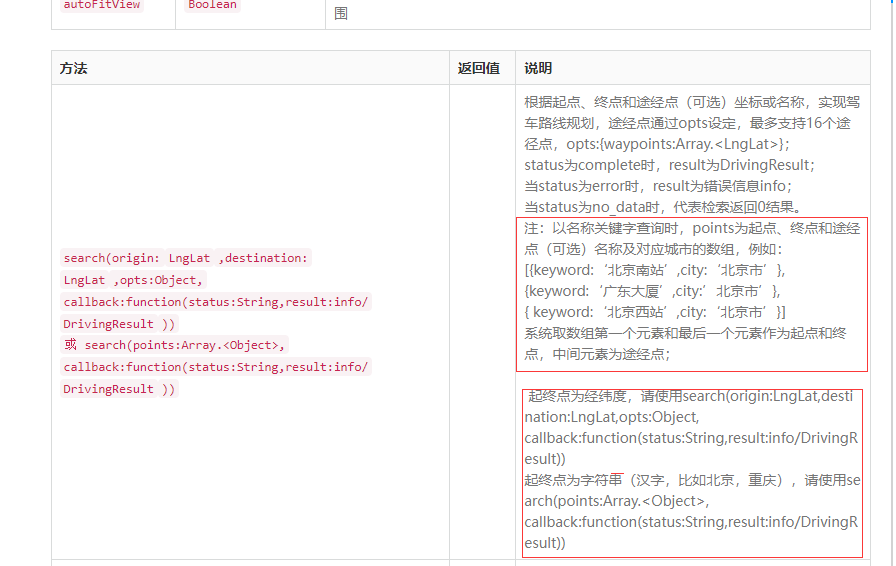
image-20230304204810615

两种方法:

使用 经纬度 / 名称 设置路径点

1
2
3
4
5
6
7
8
9
10
11
12
13
14
15
16
17
18
19
20
21
22
23
24
25
26
27
28
29
30
31
32
33
34
35
36
37
38
39
40
41
42
43
44
45
46
47
48
49
50
51
52
53
54
55
56
57
58
59
60
61
62
63
64
65
66
67
68
69
70
71
72
73
74
75
76
77
78
79
80
81
82
83
84
85
86
87
88
89
90
91
92
93
94
95
96
97
98
99
100
101
102
103
104
105
106
107
108
109
110
111
112
113
114
115
116
117
118
119
120
121
122
123
124
125
126
127
128
129
130
131
132
133
134
135
136
137
138
139
140
141
142
143
144
145
146
147
148
149
150
151
152
153
154
155
156
157
158
159
160
161
162
163
164
165
166
167
168
169
170
171
172
173
174
175
176
177
178
179
180
181
182
183
184
185
186
187
188
189
190
191
192
193
194
<template>
<div>
<el-form :model="diaform" :inline="true" >
<el-form-item label="派送地点" >
<el-cascader
size="large"
:options="diaform.options"
v-model="diaform.selectedOptions"
@change="handleChange">
</el-cascader>
</el-form-item>
<el-form-item>
<el-button @click="goView">
查看路线图
</el-button>
</el-form-item>
<el-form-item>
<el-button>
确认派送
</el-button>
</el-form-item>
</el-form>
<div id="container"></div>
</div>
</template>

<script>
import AMapLoader from '@amap/amap-jsapi-loader'
import { regionData , CodeToText } from 'element-china-area-data'
export default {
name: 'AMapView',
data() {
return {
map: null,
startName: '北京市',
endName: '',
driving: null,
diaform: {
options: regionData ,
selectedOptions: [],
},
optts:[
{Latitude :116.379028, longitude:39.885042},
]
}
},
mounted() {
window._AMapSecurityConfig = {
securityJsCode: '22ab9c534d1fef92d2d9b667830f3613' // 申请key对应的秘钥
}

// DOM初始化完成进行地图初始化
this.initMap()
},
methods: {
initMap() {
AMapLoader.load({
key: 'a13639d2a316c45690b8dac7d0cc9428', // 申请好的Web端开发者Key,首次调用 load 时必填
version: '2.0', // 指定要加载的 JSAPI 的版本,缺省时默认为 1.4.15
plugins: ['AMap.ToolBar', 'AMap.Driving', 'AMap.AutoComplete'] // 需要使用的的插件列表,如比例尺'AMap.Scale'等
}).then(AMap => {
this.map = new AMap.Map('container', { // 设置地图容器id
viewMode: '3D', // 是否为3D地图模式
zoom: 5, // 初始化地图级别
center: [105.602725, 37.076636] // 初始化地图中心点位置
})
const autoOptions = {
// city 限定城市,默认全国
city: '全国',
input: 'start'
}
// 实例化AutoComplete
const autoComplete = new AMap.AutoComplete(autoOptions)
const autoOptions2 = {
// city 限定城市,默认全国
city: '全国',
input: 'end'
}
// 实例化AutoComplete
const autoComplete2 = new AMap.AutoComplete(autoOptions2)
// 根据关键字进行搜索
/* autoComplete.search(this.startName, (status, result) => {
// 搜索成功时,result即是对应的匹配数据
console.log(result)
}) */
}).catch(e => {
console.log(e)
})
},
// 根据 startName 和 endName 来选择路线
goView() {
// eslint-disable-next-line no-undef
// 清除上一次规划的路线
if(this.driving){
this.driving.clear()
}
this.driving = new AMap.Driving({

map: this.map,
// 驾车路线规划策略,AMap.DrivingPolicy.LEAST_TIME是最快捷模式
// eslint-disable-next-line no-undef
policy: AMap.DrivingPolicy.LEAST_TIME
})


// 使用名称作为路径点
const points = [
// { keyword: this.startName, city: '全国' },
// { keyword: this.endName, city: '全国' },
{ keyword: '北京市', city: '全国' },
{ keyword: '上海市', city: '全国' },
{ keyword: '南京市', city: '全国' },
]


// 经纬度作为路径点使用
var startLngLat = [116.379028, 39.865042]
var endLngLat = [116.427281, 39.903719]

const opts = {
// 途经点参数,最多支持传入16个途经点
waypoints: [
new AMap.LngLat(this.optts[0].Latitude, this.optts[0].longitude),
new AMap.LngLat(110.379028, 39.885042),
]
}


// 使用省份名称作为路径点
this.driving.search(points , function(status, result){
// 未出错时,result即是对应的路线规划方案
console.log('status=', status)
console.log('result=', result)
})

// 使用经纬度作为路径点
// this.driving.search(startLngLat, endLngLat , opts, function(status, result) {
// // result 即是对应的驾车导航信息,相关数据结构文档请参考 https://lbs.amap.com/api/javascript-api/reference/route-search#m_DrivingResult
// if (status === 'complete') {
// log.success('绘制驾车路线完成')
// } else {
// log.error('获取驾车数据失败:' + result)
// }
// });
},

// 获取选取的地址
handleChange () {
var loc = "";
for (let i = 0; i < this.diaform.selectedOptions.length; i++) {
loc += CodeToText[this.diaform.selectedOptions[i]];
}
this.endName = loc
console.log(loc)//打印区域码所对应的属性值即中文地址
},
}
}
</script>
<style scoped>

* {
line-height: normal;
text-align: left;
}

#container{
padding:0px;
margin: 0px;
width: 100%;
height: 400px;
}
#panel {
position: fixed;
background-color: white;
max-height: 90%;
overflow-y: auto;
top: 10px;
right: 10px;
width: 280px;
}
#panel .amap-call {
background-color: #009cf9;
border-top-left-radius: 4px;
border-top-right-radius: 4px;
}
#panel .amap-lib-driving {
border-bottom-left-radius: 4px;
border-bottom-right-radius: 4px;
overflow: hidden;
}
</style>


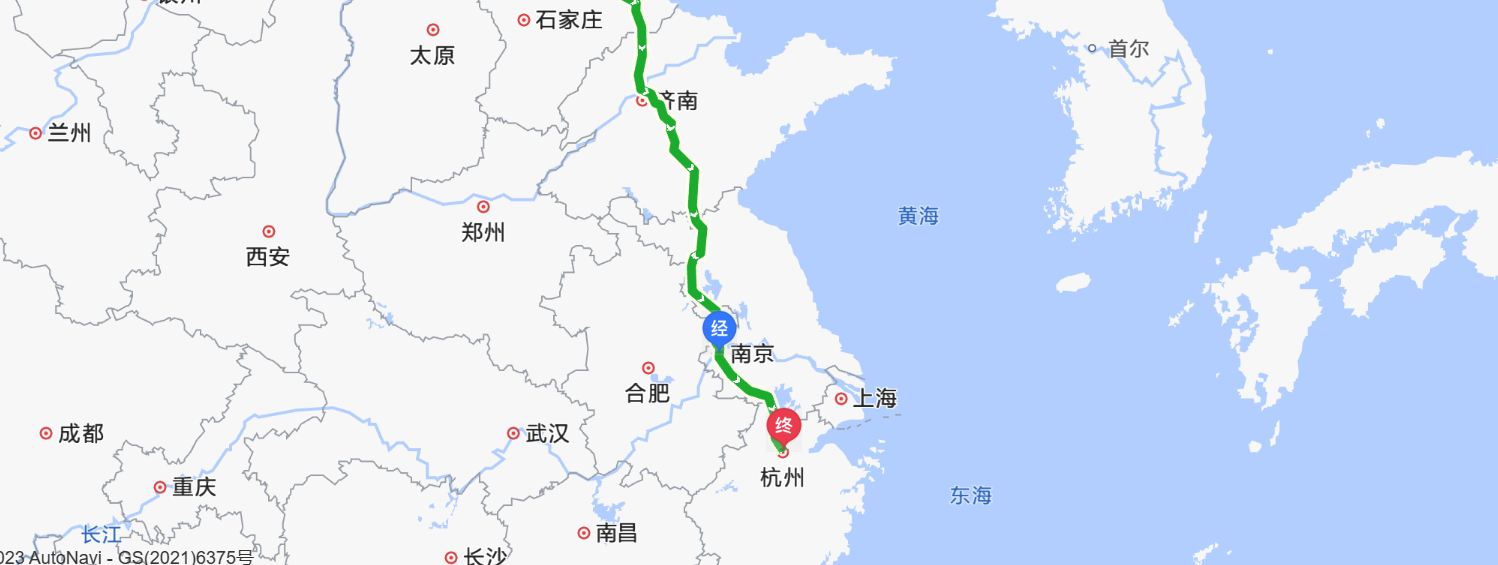
实现效果:

image-20230304204856255