shiro官网:Apache Shiro | Simple. Java. Security.
GitHub网址:GitHub - apache/shiro: Apache Shiro
shiro快速启动 参照网址:https://shiro.apache.org/tutorial.html
GitHub上shiro快速启动: https://github.com/apache/shiro/tree/main/samples/quickstart
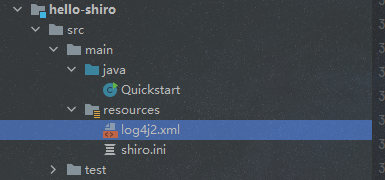
建的是一个普通的maven项目,下图是包位置
pom.xml
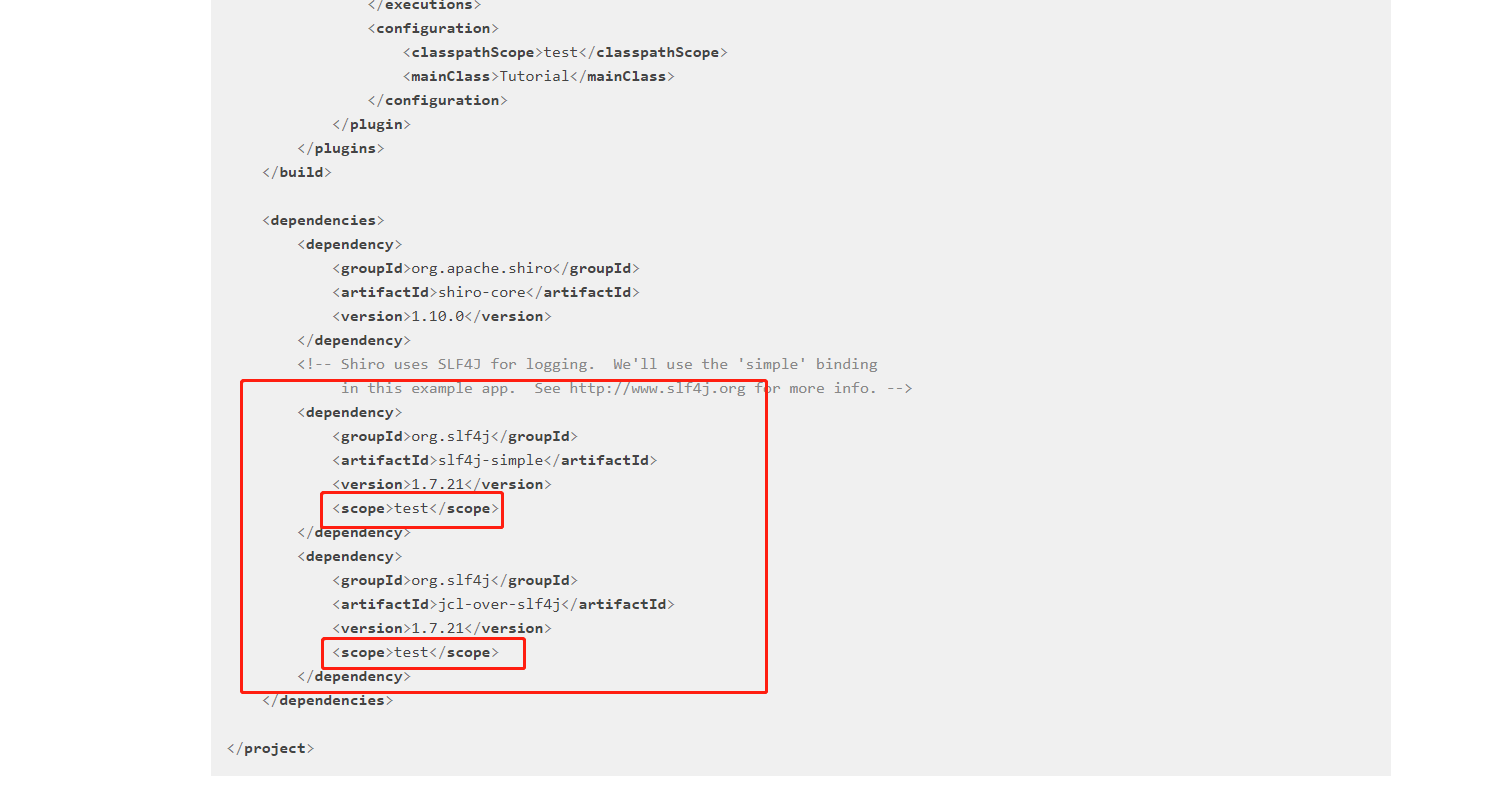
不要使用上面参照网址的pom.xml,参照网址中的是测试使用的,会报错
1 2 3 4 5 6 7 8 9 10 11 12 13 14 15 16 17 18 19 20 21 22 23 24 25 26 27 28 29 30 31 32 33 34 35 36 37 <dependencies > <dependency > <groupId > org.apache.shiro</groupId > <artifactId > shiro-core</artifactId > <version > 1.10.0</version > </dependency > <dependency > <groupId > org.slf4j</groupId > <artifactId > jcl-over-slf4j</artifactId > <version > 1.7.26</version > </dependency > <dependency > <groupId > org.apache.logging.log4j</groupId > <artifactId > log4j-slf4j-impl</artifactId > <version > 2.19.0</version > </dependency > <dependency > <groupId > org.apache.logging.log4j</groupId > <artifactId > log4j-core</artifactId > <version > 2.19.0</version > </dependency > </dependencies >
log4j2.xml
狂神说使用的是log4j,我使用的是官方github上的
1 2 3 4 5 6 7 8 9 10 11 12 13 14 15 16 17 18 19 20 21 22 23 24 25 26 27 28 29 30 31 32 33 34 35 36 37 38 39 40 41 42 43 44 45 46 47 48 49 50 51 52 53 54 55 56 57 58 59 60 61 62 <Configuration name ="ConfigTest" status ="ERROR" monitorInterval ="5" > <Appenders > <Console name ="Console" target ="SYSTEM_OUT" > <PatternLayout pattern ="%d{HH:mm:ss.SSS} [%t] %-5level %logger{36} - %msg%n" /> </Console > </Appenders > <Loggers > <Logger name ="org.springframework" level ="warn" additivity ="false" > <AppenderRef ref ="Console" /> </Logger > <Logger name ="org.apache" level ="warn" additivity ="false" > <AppenderRef ref ="Console" /> </Logger > <Logger name ="net.sf.ehcache" level ="warn" additivity ="false" > <AppenderRef ref ="Console" /> </Logger > <Logger name ="org.apache.shiro.util.ThreadContext" level ="warn" additivity ="false" > <AppenderRef ref ="Console" /> </Logger > <Root level ="info" > <AppenderRef ref ="Console" /> </Root > </Loggers > </Configuration >
shiro.ini 1 2 3 4 5 6 7 8 9 10 11 12 13 14 15 16 17 18 19 20 21 22 23 24 25 [users] root = secret, adminguest = guest, guestpresidentskroob = 12345 , presidentdarkhelmet = ludicrousspeed, darklord, schwartzlonestarr = vespa, goodguy, schwartz[roles] admin = *schwartz = lightsaber:*goodguy = winnebago:drive:eagle5
Quickstart.java 1 2 3 4 5 6 7 8 9 10 11 12 13 14 15 16 17 18 19 20 21 22 23 24 25 26 27 28 29 30 31 32 33 34 35 36 37 38 39 40 41 42 43 44 45 46 47 48 49 50 51 52 53 54 55 56 57 58 59 60 61 62 63 64 65 66 67 68 69 70 71 72 73 74 75 76 77 78 79 80 81 82 83 84 85 86 87 88 89 90 91 92 import org.apache.shiro.SecurityUtils;import org.apache.shiro.authc.*;import org.apache.shiro.config.IniSecurityManagerFactory;import org.apache.shiro.mgt.SecurityManager;import org.apache.shiro.session.Session;import org.apache.shiro.subject.Subject;import org.apache.shiro.util.Factory;import org.slf4j.Logger;import org.slf4j.LoggerFactory;public class Quickstart { private static final transient Logger log = LoggerFactory.getLogger(Quickstart.class); public static void main (String[] args) { log.info("My First Apache Shiro Application" ); Factory<SecurityManager> factory = new IniSecurityManagerFactory ("classpath:shiro.ini" ); SecurityManager securityManager = factory.getInstance(); SecurityUtils.setSecurityManager(securityManager); Subject currentUser = SecurityUtils.getSubject(); Session session = currentUser.getSession(); session.setAttribute("someKey" , "aValue" ); String value = (String) session.getAttribute("someKey" ); if (value.equals("aValue" )) { log.info("subject => session [" + value + "]" ); } if (!currentUser.isAuthenticated()) { UsernamePasswordToken token = new UsernamePasswordToken ("lonestarr" , "vespa" ); token.setRememberMe(true ); try { currentUser.login(token); } catch (UnknownAccountException uae) { log.info("There is no user with username of " + token.getPrincipal()); } catch (IncorrectCredentialsException ice) { log.info("Password for account " + token.getPrincipal() + " was incorrect!" ); } catch (LockedAccountException lae) { log.info("The account for username " + token.getPrincipal() + " is locked. " + "Please contact your administrator to unlock it." ); } catch (AuthenticationException ae) { } } log.info("User [" + currentUser.getPrincipal() + "] logged in successfully." ); if (currentUser.hasRole("schwartz" )) { log.info("May the Schwartz be with you!" ); } else { log.info("Hello, mere mortal." ); } if (currentUser.isPermitted("lightsaber:wield" )) { log.info("You may use a lightsaber ring. Use it wisely." ); } else { log.info("Sorry, lightsaber rings are for schwartz masters only." ); } if (currentUser.isPermitted("winnebago:drive:eagle5" )) { log.info("You are permitted to 'drive' the winnebago with license plate (id) 'eagle5'. " + "Here are the keys - have fun!" ); } else { log.info("Sorry, you aren't allowed to drive the 'eagle5' winnebago!" ); } currentUser.logout(); System.exit(0 ); } }
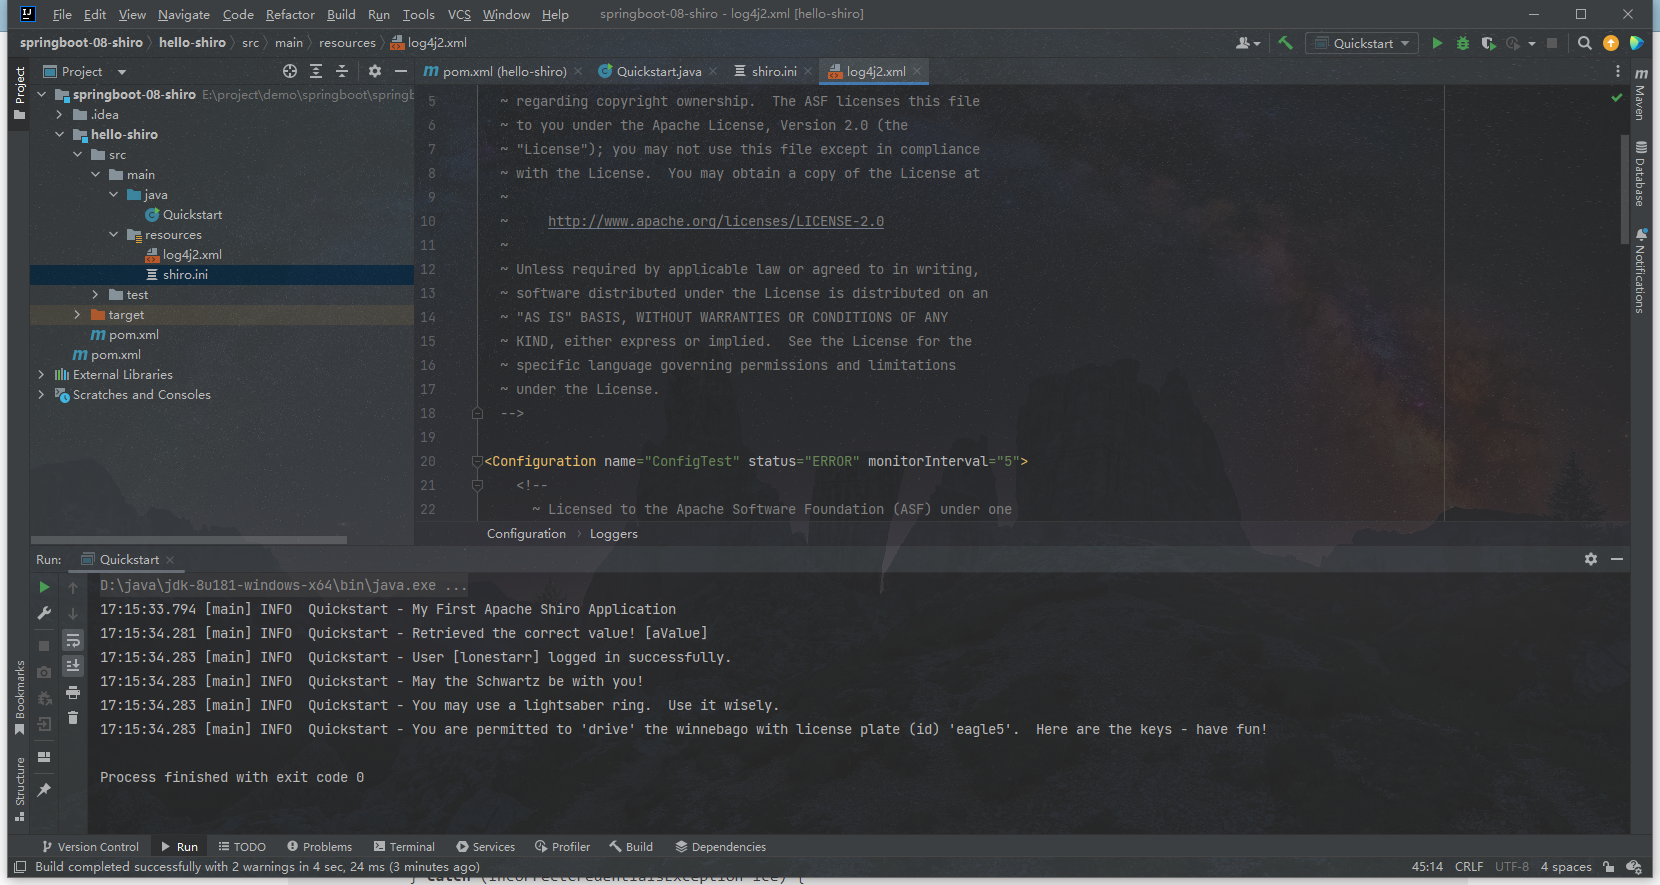
运行结果
分析 1 2 3 4 5 6 7 8 9 10 11 12 13 14 15 16 17 18 19 20 Subject currentUser = SecurityUtils.getSubject();Session session = currentUser.getSession();currentUser.isAuthenticated(); currentUser.getPrincipal(); currentUser.hasRole("schwartz" ); currentUser.isPermitted("lightsaber:wield" ); currentUser.logout();
springboot集成shiro 搭建环境 导入shiro和thymeleaf依赖 1 2 3 4 5 6 7 8 9 10 11 12 13 14 15 16 17 18 19 20 21 22 23 <dependency > <groupId > org.apache.shiro</groupId > <artifactId > shiro-spring</artifactId > <version > 1.10.0</version > </dependency > <dependency > <groupId > org.springframework.boot</groupId > <artifactId > spring-boot-starter-thymeleaf</artifactId > </dependency > <dependency > <groupId > org.springframework.boot</groupId > <artifactId > spring-boot-starter-web</artifactId > </dependency >
编写shiro的两个核心配置 ShiroConfig 1 2 3 4 5 6 7 8 9 10 11 12 13 14 15 16 17 18 19 20 21 22 23 24 25 26 27 28 29 30 31 32 33 34 35 36 37 38 39 40 41 package com.li.config;import org.apache.shiro.spring.web.ShiroFilterFactoryBean;import org.apache.shiro.web.mgt.DefaultWebSecurityManager;import org.springframework.beans.factory.annotation.Qualifier;import org.springframework.context.annotation.Bean;import org.springframework.context.annotation.Configuration;@Configuration public class ShiroConfig { @Bean public ShiroFilterFactoryBean getShiroFilterFactoryBean (@Qualifier("securityManager") DefaultWebSecurityManager defaultWebSecurityManager) { ShiroFilterFactoryBean bean = new ShiroFilterFactoryBean (); bean.setSecurityManager(defaultWebSecurityManager); return bean; } @Bean(name = "securityManager") public DefaultWebSecurityManager getDefaultWebSecurityManager (@Qualifier("userRealm") UserRealm userRealm) { DefaultWebSecurityManager securityManager = new DefaultWebSecurityManager (); securityManager.setRealm(userRealm); return securityManager; } @Bean public UserRealm userRealm () { return new UserRealm (); } }
UserRealm 1 2 3 4 5 6 7 8 9 10 11 12 13 14 15 16 17 18 19 20 21 22 23 24 25 package com.li.config;import org.apache.shiro.authc.AuthenticationException;import org.apache.shiro.authc.AuthenticationInfo;import org.apache.shiro.authc.AuthenticationToken;import org.apache.shiro.authz.AuthorizationInfo;import org.apache.shiro.realm.AuthorizingRealm;import org.apache.shiro.subject.PrincipalCollection;public class UserRealm extends AuthorizingRealm { @Override protected AuthorizationInfo doGetAuthorizationInfo (PrincipalCollection principalCollection) { System.out.println("执行了授权doGetAuthorizationInfo" ); return null ; } @Override protected AuthenticationInfo doGetAuthenticationInfo (AuthenticationToken authenticationToken) throws AuthenticationException { System.out.println("执行了认证doGetAuthorizationInfo" ); return null ; } }
shiro实现登录拦截 修改ShiroConfig的代码 1 2 3 4 5 6 7 8 9 10 11 12 13 14 15 16 17 18 19 20 21 22 23 24 25 26 27 28 29 30 31 32 @Bean public ShiroFilterFactoryBean getShiroFilterFactoryBean (@Qualifier("securityManager") DefaultWebSecurityManager defaultWebSecurityManager) { ShiroFilterFactoryBean bean = new ShiroFilterFactoryBean (); bean.setSecurityManager(defaultWebSecurityManager); Map<String, String> filterMap = new LinkedHashMap <>(); filterMap.put("/user/*" ,"authc" ); bean.setFilterChainDefinitionMap(filterMap); bean.setLoginUrl("/toLogin" ); return bean; }
配置登录界面及其controller 1 2 3 4 5 6 7 @Controller public class MyController { @RequestMapping("/toLogin") public String toLogin () { return "login" ; } }
用户认证 在controller中进行验证,获取数据
1 2 3 4 5 6 7 8 9 10 11 12 13 14 15 16 17 18 19 @RequestMapping("/login") public String login (String username, String password, Model model) { Subject subject = SecurityUtils.getSubject(); UsernamePasswordToken token = new UsernamePasswordToken (username, password); try { subject.login(token); return "index" ; }catch (UnknownAccountException e){ model.addAttribute("msg" ,"用户名错误" ); return "login" ; }catch (IncorrectCredentialsException e){ model.addAttribute("msg" ,"密码错误" ); return "login" ; } }
修改UserRealm中认证的代码
1 2 3 4 5 6 7 8 9 10 11 12 13 14 15 16 17 18 19 20 @Override protected AuthenticationInfo doGetAuthenticationInfo (AuthenticationToken Token) throws AuthenticationException { System.out.println("执行了认证doGetAuthorizationInfo" ); String name = "root" ; String password = "123456" ; UsernamePasswordToken userToken = (UsernamePasswordToken) Token; if (!userToken.getUsername().equals(name)){ return null ; } return new SimpleAuthenticationInfo ("" ,password,"" ); }
login.html
1 2 3 4 5 6 7 8 9 10 11 12 13 14 15 16 17 18 19 <!DOCTYPE html > <html lang ="en" xmlns:th ="http://www.thymeleaf.org" > <head > <meta charset ="UTF-8" > <title > Title</title > </head > <body > <h1 > 登录</h1 > <hr > <p th:text ="${msg}" style ="color: red" > </p > <form th:action ="@{/login}" > <p > 用户名:<input type ="text" name ="username" > </p > <p > 密码:<input type ="text" name ="password" > </p > <p > <input type ="submit" > </p > </form > </body > </html >
整合Mybatis 导入mysql,log4j,mybatis依赖 1 2 3 4 5 6 7 8 9 10 11 12 13 14 15 16 17 18 <dependency > <groupId > log4j</groupId > <artifactId > log4j</artifactId > <version > 1.2.17</version > </dependency > <dependency > <groupId > mysql</groupId > <artifactId > mysql-connector-java</artifactId > </dependency > <dependency > <groupId > org.mybatis.spring.boot</groupId > <artifactId > mybatis-spring-boot-starter</artifactId > <version > 2.2.2</version > </dependency > <dependency > <groupId > org.projectlombok</groupId > <artifactId > lombok</artifactId > </dependency >
配置properties 1 2 3 4 5 6 7 8 9 10 11 12 13 14 15 16 spring.mvc.format.date =yyyy-MM-dd spring.datasource.driver-class-name =com.mysql.cj.jdbc.Driver spring.datasource.url =jdbc:mysql://localhost:3306/mybatis?serverTimezone=UTC&useUnicode=false&characterEncoding=utf-8 spring.datasource.username =root spring.datasource.password =123456 mybatis.type-aliases-package =com.li.pojo mybatis.mapper-locations =classpath:mybatis/mapper/*.xml
剩下的就是pojo, mapper,service的编写了,就不详细描写了。
shiro使用md5 加盐加密
上面已经配置好mybatis了,但是用户认证使用的是自己模拟的密码,我们这里修改成数据库中的密码,同时实现shiro的md5加盐加密
如果要使用md5加盐加密,需要在ShiroConfig中添加密码加密的方法
在ShiroConfig中添加加密的方法 1 2 3 4 5 6 7 8 9 10 11 12 13 14 15 16 17 18 19 20 21 22 23 24 25 26 27 28 29 30 31 32 33 34 35 36 37 38 39 40 41 42 43 44 45 46 47 48 49 50 51 52 53 54 55 56 57 58 59 60 61 62 63 64 65 66 67 68 69 70 @Configuration public class ShiroConfig { @Bean public ShiroFilterFactoryBean getShiroFilterFactoryBean (@Qualifier("securityManager") DefaultWebSecurityManager defaultWebSecurityManager) { ShiroFilterFactoryBean bean = new ShiroFilterFactoryBean (); bean.setSecurityManager(defaultWebSecurityManager); Map<String, String> filterMap = new LinkedHashMap <>(); filterMap.put("/user/*" ,"authc" ); bean.setFilterChainDefinitionMap(filterMap); bean.setLoginUrl("/toLogin" ); return bean; } @Bean(name = "securityManager") public DefaultWebSecurityManager getDefaultWebSecurityManager (@Qualifier("userRealm") UserRealm userRealm) { DefaultWebSecurityManager securityManager = new DefaultWebSecurityManager (); securityManager.setRealm(userRealm); return securityManager; } @Bean public UserRealm userRealm (@Qualifier("matcher") HashedCredentialsMatcher matcher) { UserRealm userRealm = new UserRealm (); userRealm.setCredentialsMatcher(matcher); return userRealm; } @Bean(name = "matcher") public HashedCredentialsMatcher getHashedCredentialsMatcher () { HashedCredentialsMatcher matcher = new HashedCredentialsMatcher (); matcher.setHashAlgorithmName("md5" ); matcher.setHashIterations(10 ); return matcher; } }
修改 UserRealm的代码 1 2 3 4 5 6 7 8 9 10 11 12 13 14 15 16 17 18 19 20 21 22 23 24 25 26 27 28 29 30 31 32 33 34 35 36 37 38 39 40 41 42 43 44 45 46 47 48 49 50 51 package com.li.config;import com.li.pojo.User;import com.li.service.UserService;import org.apache.shiro.SecurityUtils;import org.apache.shiro.authc.*;import org.apache.shiro.authz.AuthorizationInfo;import org.apache.shiro.realm.AuthorizingRealm;import org.apache.shiro.subject.PrincipalCollection;import org.apache.shiro.subject.Subject;import org.apache.shiro.util.ByteSource;import org.springframework.beans.factory.annotation.Autowired;public class UserRealm extends AuthorizingRealm { @Autowired UserService userService; @Override protected AuthorizationInfo doGetAuthorizationInfo (PrincipalCollection principalCollection) { System.out.println("执行了授权doGetAuthorizationInfo" ); return null ; } @Override protected AuthenticationInfo doGetAuthenticationInfo (AuthenticationToken Token) throws AuthenticationException { System.out.println("执行了认证doGetAuthorizationInfo" ); UsernamePasswordToken userToken = (UsernamePasswordToken) Token; User user = userService.queryUserByName(userToken.getUsername()); if (user == null ){ return null ; } ByteSource salt = ByteSource.Util.bytes(user.getName()); return new SimpleAuthenticationInfo ( user, user.getPwd(), salt, getName() ); } }
出现问题
运行之后,Shiro异常java.lang.IllegalArgumentException: Odd number of characters
原因:我们在使用MD5加盐加密的时候,验证登录密码时,数据库中的密码没有经过加密,还是之前设置的密码,所以会爆出一场。
解决办法:将数据库中的密码也进行加密,然后就可以验证成功
下面这个方法可以查看加密后的密码,以便修改数据库中的密码
1 2 3 4 5 6 7 8 9 10 11 12 13 14 15 16 17 18 19 20 21 @Test void contextLoads () { User user = userService.queryUserByName("平安" ); System.out.println(userService.queryUserByName("平安" )); System.out.println(md5(user.getPwd(), user.getName())); } public static final String md5 (String password, String salt) { String hashAlgorithmName = "MD5" ; ByteSource byteSalt = ByteSource.Util.bytes(salt); Object source = password; int hashIterations = 10 ; SimpleHash result = new SimpleHash (hashAlgorithmName, source, byteSalt, hashIterations); return result.toString(); }
运行后结果
用户授权 在ShiroConfig中进行权限的限定 1 2 3 4 5 6 7 8 9 10 11 12 13 14 15 16 17 18 19 20 21 22 23 24 25 26 27 28 29 30 31 32 33 34 @Bean public ShiroFilterFactoryBean getShiroFilterFactoryBean (@Qualifier("securityManager") DefaultWebSecurityManager defaultWebSecurityManager) { ShiroFilterFactoryBean bean = new ShiroFilterFactoryBean (); bean.setSecurityManager(defaultWebSecurityManager); Map<String, String> filterMap = new LinkedHashMap <>(); filterMap.put("/user/add" ,"perms[user:add]" ); filterMap.put("/user/*" ,"authc" ); bean.setFilterChainDefinitionMap(filterMap); bean.setLoginUrl("/toLogin" ); bean.setUnauthorizedUrl("/noauth" ); return bean; }
修改UserRealm中的代码,进行授权 1 2 3 4 5 6 7 8 9 10 11 12 13 14 15 16 17 18 19 20 21 22 23 24 25 26 27 28 29 30 31 32 33 34 35 36 37 38 39 40 41 @Override protected AuthorizationInfo doGetAuthorizationInfo (PrincipalCollection principalCollection) { System.out.println("执行了授权doGetAuthorizationInfo" ); SimpleAuthorizationInfo info = new SimpleAuthorizationInfo (); Subject subject = SecurityUtils.getSubject(); User currentUser = (User) subject.getPrincipal(); info.addStringPermission(currentUser.getPerms()); return info; } @Override protected AuthenticationInfo doGetAuthenticationInfo (AuthenticationToken Token) throws AuthenticationException { System.out.println("执行了认证doGetAuthorizationInfo" ); UsernamePasswordToken userToken = (UsernamePasswordToken) Token; User user = userService.queryUserByName(userToken.getUsername()); if (user == null ){ return null ; } ByteSource salt = ByteSource.Util.bytes(user.getName()); return new SimpleAuthenticationInfo ( user, user.getPwd(), salt, getName() ); }
controller设置未授权界面 1 2 3 4 @RequestMapping("/noauth") public String Unauthorized () { return "401" ; }
整合Thymeleaf
将目前完成的项目整合thymeleaf
导入依赖 1 2 3 4 5 6 <dependency > <groupId > com.github.theborakompanioni</groupId > <artifactId > thymeleaf-extras-shiro</artifactId > <version > 2.1.0</version > </dependency >
在ShiroConfig中设置thymeleaf 1 2 3 4 5 @Bean public ShiroDialect getShiroDialect () { return new ShiroDialect (); }
在UserRealm中设置session 在session中设置字符,表示登录成功
1 2 3 4 Subject subject1 = SecurityUtils.getSubject();Session session = subject1.getSession();session.setAttribute("loginUser" ,user);
index.html1 2 3 4 5 6 7 8 9 10 11 12 13 14 <h1 > 首页</h1 > <p th:text ="${msg}" > </p > <div th:if ="${session.loginUser == null}" > <a th:href ="@{/toLogin}" > 登录</a > </div > <hr > <div shiro:hasPermission ="user:add" > <a th:href ="@{/user/add}" > add</a > </div > <div shiro:hasPermission ="user:update" > <a th:href ="@{/user/update}" > update</a > </div >
springboot集成shiro整合多个Realm
由于在实际项目开发的过程中,不可能只有一个实体类,一定会有多个权限,所以整合多个Realm是一个十分重要的事情
pom.xml我们之前已经配置好了,所以这里就不在赘述了。
配置工具类,编写登录类型的枚举
重写UsernamePasswordToken类
自定义认证器,继承ModularRealmAuthenticator
修改具体的每个UserRealm类
修改ShiroConfig
修改controller
配置工具类,编写登录类型的枚举 1 2 3 4 5 6 7 8 9 10 11 12 13 14 15 16 17 package com.li.config.shiroUtils;public enum LoginType { USER("User" ), ADMIN("Admin" ); private String type; private LoginType (String type) { this .type=type; } @Override public String toString () { return this .type.toString(); } }
重写UsernamePasswordToken类 1 2 3 4 5 6 7 8 9 10 11 12 13 14 15 16 17 18 19 20 21 22 23 24 package com.li.config.shiroUtils;import org.apache.shiro.authc.UsernamePasswordToken;public class CustomToken extends UsernamePasswordToken { private String loginType; public CustomToken (String userName,String password,String loginType) { super (userName,password); this .loginType=loginType; } public void setLoginType (String loginType) { this .loginType = loginType; } public String getLoginType () { return loginType; } }
自定义认证器 1 2 3 4 5 6 7 8 9 10 11 12 13 14 15 16 17 18 19 20 21 22 23 24 25 26 27 28 29 30 31 32 33 34 35 36 37 38 39 40 41 42 43 44 45 46 47 48 49 50 51 52 package com.li.config.shiroUtils;import org.apache.shiro.authc.AuthenticationException;import org.apache.shiro.authc.AuthenticationInfo;import org.apache.shiro.authc.AuthenticationToken;import org.apache.shiro.authc.pam.ModularRealmAuthenticator;import org.apache.shiro.realm.Realm;import org.slf4j.Logger;import org.slf4j.LoggerFactory;import java.util.ArrayList;import java.util.Collection;public class CustomModularRealmAuthenticator extends ModularRealmAuthenticator { private static final Logger logger = LoggerFactory.getLogger(CustomModularRealmAuthenticator.class); @Override protected AuthenticationInfo doAuthenticate (AuthenticationToken authenticationToken) throws AuthenticationException { assertRealmsConfigured(); CustomToken customToken=(CustomToken)authenticationToken; String loginType = customToken.getLoginType(); Collection<Realm> realms = getRealms(); Collection<Realm> typeRealms=new ArrayList <>(); for (Realm realm:realms){ if (realm.getName().contains(loginType.toString())){ typeRealms.add(realm); } } if (typeRealms.size()==1 ){ logger.info("doSingleRealmAuthentication" ); return doSingleRealmAuthentication(typeRealms.iterator().next(),customToken); }else { logger.info("doMultiRealmAuthentication" ); return doMultiRealmAuthentication(typeRealms,customToken); } } }
修改UserRealm 1 2 3 4 5 6 7 8 9 10 11 12 13 14 15 16 17 18 19 20 21 22 23 24 25 26 27 28 29 30 31 32 33 34 35 36 37 38 39 40 41 42 43 44 45 46 47 48 49 50 51 52 53 54 55 56 57 58 59 60 61 62 63 64 65 66 67 68 69 package com.li.config;import com.li.pojo.User;import com.li.service.UserService;import org.apache.shiro.SecurityUtils;import org.apache.shiro.authc.*;import org.apache.shiro.authz.AuthorizationInfo;import org.apache.shiro.authz.SimpleAuthorizationInfo;import org.apache.shiro.realm.AuthorizingRealm;import org.apache.shiro.session.Session;import org.apache.shiro.subject.PrincipalCollection;import org.apache.shiro.subject.Subject;import org.apache.shiro.util.ByteSource;import org.springframework.beans.factory.annotation.Autowired;public class UserRealm extends AuthorizingRealm { @Autowired UserService userService; @Override protected AuthorizationInfo doGetAuthorizationInfo (PrincipalCollection principalCollection) { SimpleAuthorizationInfo info = new SimpleAuthorizationInfo (); if (principalCollection.getPrimaryPrincipal() instanceof User){ Subject subject = SecurityUtils.getSubject(); User currentUser = (User) subject.getPrincipal(); info.addStringPermission(currentUser.getPerms()); return info; }else return null ; } @Override protected AuthenticationInfo doGetAuthenticationInfo (AuthenticationToken Token) throws AuthenticationException { UsernamePasswordToken userToken = (UsernamePasswordToken) Token; User user = userService.queryUserByName(userToken.getUsername()); if (user == null ){ return null ; } Subject subject1 = SecurityUtils.getSubject(); Session session = subject1.getSession(); session.setAttribute("loginUser" ,user); ByteSource salt = ByteSource.Util.bytes(user.getName()); return new SimpleAuthenticationInfo ( user, user.getPwd(), salt, getName() ); } }
修改AdminRealm 1 2 3 4 5 6 7 8 9 10 11 12 13 14 15 16 17 18 19 20 21 22 23 24 25 26 27 28 29 30 31 32 33 34 35 36 37 38 39 40 41 42 43 44 45 46 47 48 49 50 51 52 53 54 55 56 57 58 59 60 61 62 63 package com.li.config;import com.li.config.shiroUtils.CustomToken;import com.li.pojo.Admin;import com.li.service.AdminService;import org.apache.shiro.SecurityUtils;import org.apache.shiro.authc.*;import org.apache.shiro.authz.AuthorizationInfo;import org.apache.shiro.authz.SimpleAuthorizationInfo;import org.apache.shiro.realm.AuthorizingRealm;import org.apache.shiro.session.Session;import org.apache.shiro.subject.PrincipalCollection;import org.apache.shiro.subject.Subject;import org.apache.shiro.util.ByteSource;import org.springframework.beans.factory.annotation.Autowired;public class AdminRealm extends AuthorizingRealm { @Autowired AdminService adminService; @Override protected AuthorizationInfo doGetAuthorizationInfo (PrincipalCollection principalCollection) { SimpleAuthorizationInfo info = new SimpleAuthorizationInfo (); if (principalCollection.getPrimaryPrincipal() instanceof Admin){ Subject subject = SecurityUtils.getSubject(); Admin currentAdmin = (Admin) subject.getPrincipal(); info.addStringPermission(currentAdmin.getPerms()); return info; }else return null ; } @Override protected AuthenticationInfo doGetAuthenticationInfo (AuthenticationToken Token) throws AuthenticationException { CustomToken adminToken = (CustomToken) Token; Admin admin = adminService.queryAdminByName(adminToken.getUsername()); if (admin == null ){ return null ; } Subject subject1 = SecurityUtils.getSubject(); Session session = subject1.getSession(); session.setAttribute("loginUser" ,admin); ByteSource salt = ByteSource.Util.bytes(admin.getName()); return new SimpleAuthenticationInfo ( admin, admin.getPassword(), salt, getName() ); } }
修改ShiroConfig 1 2 3 4 5 6 7 8 9 10 11 12 13 14 15 16 17 18 19 20 21 22 23 24 25 26 27 28 29 30 31 32 33 34 35 36 37 38 39 40 41 42 43 44 45 46 47 48 49 50 51 52 53 54 55 56 57 58 59 60 61 62 63 64 65 66 67 68 69 70 71 72 73 74 75 76 77 78 79 80 81 82 83 84 85 86 87 88 89 90 91 92 93 94 95 96 97 98 99 100 101 102 103 104 105 106 107 108 109 110 111 112 113 114 115 116 117 118 119 120 121 122 123 124 125 126 127 package com.li.config;import at.pollux.thymeleaf.shiro.dialect.ShiroDialect;import com.li.config.shiroUtils.CustomModularRealmAuthenticator;import com.li.config.shiroUtils.RoleOrFilter;import org.apache.shiro.authc.credential.HashedCredentialsMatcher;import org.apache.shiro.realm.Realm;import org.apache.shiro.spring.web.ShiroFilterFactoryBean;import org.apache.shiro.web.mgt.DefaultWebSecurityManager;import org.springframework.beans.factory.annotation.Qualifier;import org.springframework.context.annotation.Bean;import org.springframework.context.annotation.Configuration;import javax.servlet.Filter;import java.util.*;@Configuration public class ShiroConfig { @Bean public ShiroFilterFactoryBean getShiroFilterFactoryBean (@Qualifier("securityManager") DefaultWebSecurityManager defaultWebSecurityManager) { ShiroFilterFactoryBean bean = new ShiroFilterFactoryBean (); bean.setSecurityManager(defaultWebSecurityManager); RoleOrFilter roleOrFilter = new RoleOrFilter (); Map<String, Filter> myFilterMap = new HashMap <>(); myFilterMap.put("e-perms" , roleOrFilter); bean.setFilters(myFilterMap); Map<String, String> filterMap = new LinkedHashMap <>(); filterMap.put("/user/add" ,"e-perms[add|admin]" ); filterMap.put("/user/update" ,"e-perms[update|admin]" ); filterMap.put("/admin" ,"e-perms[admin]" ); filterMap.put("/user/*" ,"authc" ); bean.setFilterChainDefinitionMap(filterMap); bean.setLoginUrl("/toLogin" ); bean.setUnauthorizedUrl("/noauth" ); return bean; } @Bean(name = "securityManager") public DefaultWebSecurityManager getDefaultWebSecurityManager () { DefaultWebSecurityManager securityManager = new DefaultWebSecurityManager (); securityManager.setAuthenticator(authenticator()); List<Realm> realms = new ArrayList <Realm>(); realms.add(userRealm()); realms.add(adminRealm()); securityManager.setRealms(realms); return securityManager; } @Bean public UserRealm userRealm () { UserRealm userRealm = new UserRealm (); userRealm.setCredentialsMatcher(getHashedCredentialsMatcher()); return userRealm; } @Bean public AdminRealm adminRealm () { AdminRealm adminRealm = new AdminRealm (); adminRealm.setCredentialsMatcher(getHashedCredentialsMatcher()); return adminRealm; } @Bean(name = "matcher") public HashedCredentialsMatcher getHashedCredentialsMatcher () { HashedCredentialsMatcher matcher = new HashedCredentialsMatcher (); matcher.setHashAlgorithmName("md5" ); matcher.setHashIterations(10 ); return matcher; } @Bean public CustomModularRealmAuthenticator authenticator () { CustomModularRealmAuthenticator authenticator = new CustomModularRealmAuthenticator (); return authenticator; } @Bean public ShiroDialect getShiroDialect () { return new ShiroDialect (); } }
修改controller 1 2 3 4 5 6 7 8 9 10 11 12 13 14 15 16 17 18 19 20 21 22 23 24 25 26 27 28 29 30 31 32 33 34 35 36 37 38 39 40 41 42 43 44 45 46 47 48 49 50 51 52 53 54 55 56 57 58 59 60 61 package com.li.controller;import com.li.config.shiroUtils.CustomToken;import com.li.config.shiroUtils.LoginType;import org.apache.shiro.SecurityUtils;import org.apache.shiro.authc.IncorrectCredentialsException;import org.apache.shiro.authc.UnknownAccountException;import org.apache.shiro.subject.Subject;import org.springframework.stereotype.Controller;import org.springframework.ui.Model;import org.springframework.web.bind.annotation.RequestMapping;@Controller public class MyController { private static final String LOGIN_TYPE_user= LoginType.USER.toString(); private static final String LOGIN_TYPE_admin= LoginType.ADMIN.toString(); @RequestMapping("/login") public String login (String username, String password, Model model) { Subject subject = SecurityUtils.getSubject(); CustomToken userToken = new CustomToken (username, password,LOGIN_TYPE_user); try { subject.login(userToken); return "index" ; }catch (UnknownAccountException e){ model.addAttribute("msg" ,"用户名错误" ); return "login" ; }catch (IncorrectCredentialsException e){ model.addAttribute("msg" ,"密码错误" ); return "login" ; } } @RequestMapping("/login2") public String login2 (String username, String password, Model model) { CustomToken adminToken = new CustomToken (username, password,LOGIN_TYPE_admin); Subject subject = SecurityUtils.getSubject(); try { subject.login(adminToken); return "index" ; }catch (UnknownAccountException e){ model.addAttribute("msg2" ,"用户名错误" ); return "login" ; }catch (IncorrectCredentialsException e){ model.addAttribute("msg2" ,"密码错误" ); return "login" ; } } }
登录的界面 1 2 3 4 5 6 7 8 9 10 11 12 13 14 15 16 17 18 19 20 21 22 23 24 25 26 <!DOCTYPE html > <html lang ="en" xmlns:th ="http://www.thymeleaf.org" > <head > <meta charset ="UTF-8" > <title > Title</title > </head > <body > <h1 > 登录</h1 > <hr > <p th:text ="${msg}" style ="color: red" > </p > <form th:action ="@{/login}" > <p > 用户名:<input type ="text" name ="username" > </p > <p > 密码:<input type ="text" name ="password" > </p > <p > <input type ="submit" > </p > </form > <p th:text ="${msg2}" style ="color: red" > </p > <form th:action ="@{/login2}" > <p > 用户名:<input type ="text" name ="username" > </p > <p > 密码:<input type ="text" name ="password" > </p > <p > <input type ="submit" > </p > </form > </body > </html >
实现添加多个权限 自定义一个过滤器来实现RoleOrFilter 1 2 3 4 5 6 7 8 9 10 11 12 13 14 15 16 17 18 19 20 21 22 23 24 25 26 27 28 29 30 31 32 33 34 35 36 37 38 39 40 41 42 43 44 45 46 47 48 49 50 51 52 53 54 55 56 57 58 59 60 61 62 63 64 65 66 67 68 69 package com.li.config.shiroUtils;import org.apache.shiro.subject.Subject;import org.apache.shiro.web.filter.authz.AuthorizationFilter;import javax.servlet.ServletRequest;import javax.servlet.ServletResponse;public class RoleOrFilter extends AuthorizationFilter { @Override protected boolean isAccessAllowed (ServletRequest request, ServletResponse response, Object mappedValue) throws Exception { Subject subject = this .getSubject(request, response); String[] perms = (String[]) ((String[]) mappedValue); boolean isPermitted = true ; if (perms != null && perms.length > 0 ) { if (perms.length == 1 ) { if (!isOneOfPermitted(perms[0 ], subject)) { isPermitted = false ; } } else if (!isAllPermitted(perms,subject)) { isPermitted = false ; } } return isPermitted; } private boolean isAllPermitted (String[] permStrArray, Subject subject) { boolean isPermitted = true ; for (int index = 0 , len = permStrArray.length; index < len; index++) { if (!isOneOfPermitted(permStrArray[index], subject)) { isPermitted = false ; } } return isPermitted; } private boolean isOneOfPermitted (String permStr, Subject subject) { boolean isPermitted = false ; String[] permArr = permStr.split("\\|" ); if (permArr.length > 0 ) { for (int index = 0 , len = permArr.length; index < len; index++) { if (subject.isPermitted(permArr[index])) { isPermitted = true ; } } } return isPermitted; } }
在ShiroConfig中进行引用 ShiroFilterFactoryBean 中
1 2 3 4 5 6 RoleOrFilter roleOrFilter = new RoleOrFilter ();Map<String, Filter> myFilterMap = new HashMap <>(); myFilterMap.put("e-perms" , roleOrFilter); bean.setFilters(myFilterMap);
遇到的问题 两个Realm的数据串了
第一次配置的时候,没有对每一个Realm类的授权进行验证,由于shiro会一次进入到每一个realm中,所以一直报错 Admin类 无法 转化为 User类(类似是这个,没有截图,所以大致说一下)
解决办法:每次进入授权时都进行验证
1 2 3 4 5 6 7 8 9 10 11 12 13 14 15 @Override protected AuthorizationInfo doGetAuthorizationInfo (PrincipalCollection principalCollection) { SimpleAuthorizationInfo info = new SimpleAuthorizationInfo (); if (principalCollection.getPrimaryPrincipal() instanceof Admin){ Subject subject = SecurityUtils.getSubject(); Admin currentAdmin = (Admin) subject.getPrincipal(); info.addStringPermission(currentAdmin.getPerms()); return info; }else return null ; }
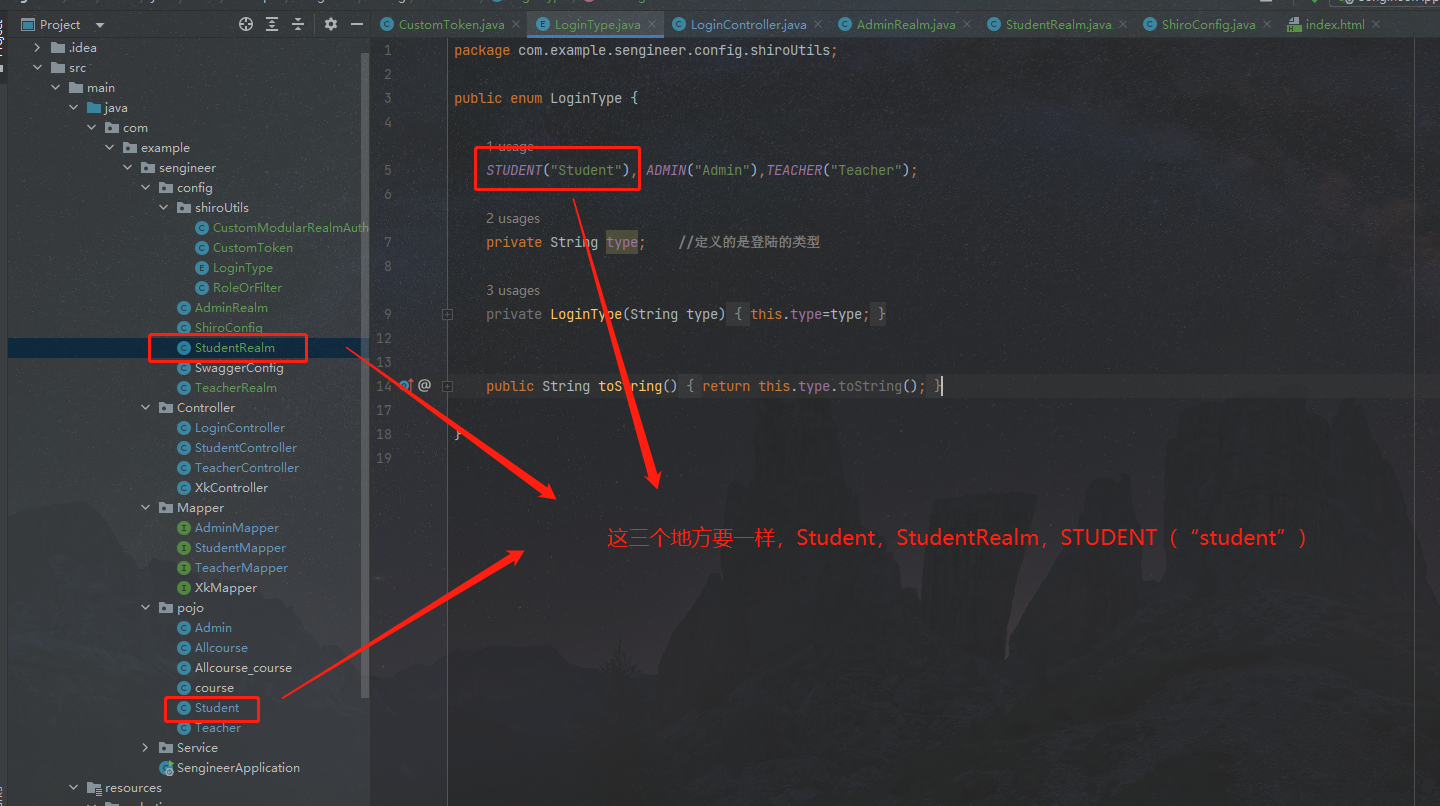
在新的项目中添加shiro进行登录验证的时候,发现一直报一个错误Authentication token of type [class com.example.sengineer.config.shiroUtils.CustomToken] could not be authenticated by any configured realms. Please ensure that at least one realm can authenticate these tokens.
原因:使用的shiro的时候,Logintype中的type和realm中的不一致。
解决办法:将pojo中的Student,StudentRealm,LoginType中的STUDENT(“Student”)三个的名字改为一样的(重点是Student)
当然,真的原因可能只是 StudentRealm和LoginType的不一致(我没有细细研究,只是发现这样能够解决问题,如果你有兴趣可以自己去测试),但是为了代码的一致性,所以建议pojo类也跟上面一致
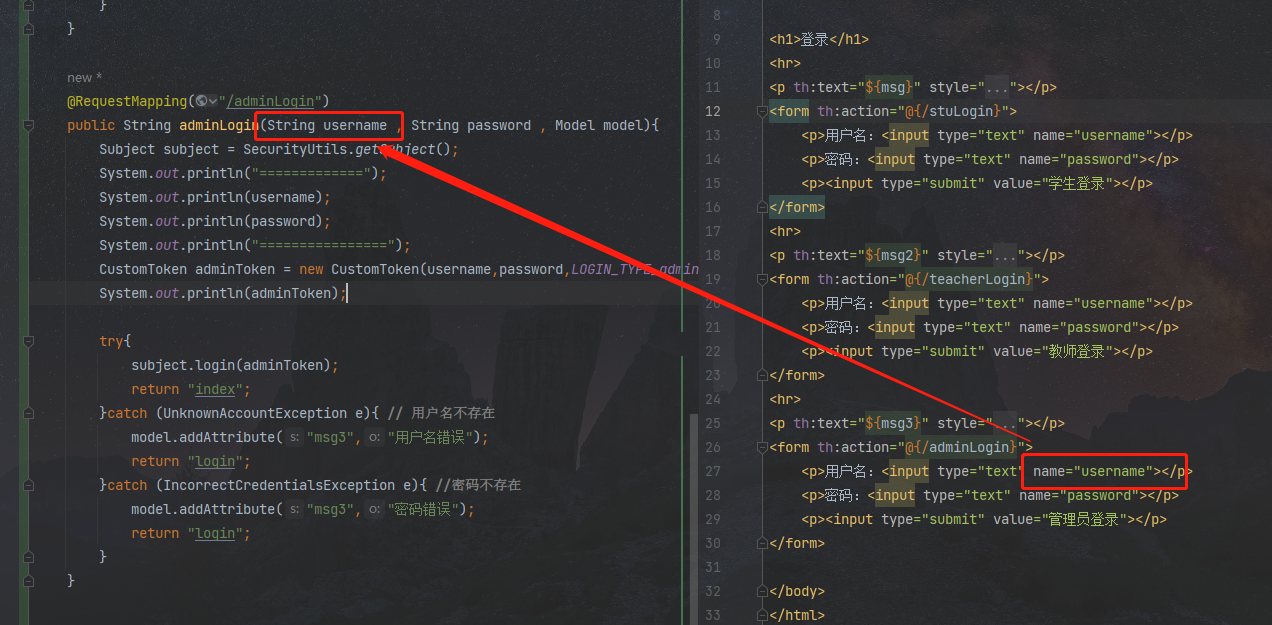
在测试的时候发现thymeleaf的登录账号无法获取
原因:form表单中的 name 和 controller 中的参数名字不一致
解决办法:将两个地方的名字改为一致的
