Vue

Vue2

基础方法

事件的基本使用

绑定监听

  • 使用 v-on:xxx 或者 @xxx 绑定事件, xxx是事件名
  • 事件的回调需要配置在methods对象中
  • @click = "demo"@click = "demo($event)"效果一样,后者可以传参

事件修饰符

  1. prevent: 阻止事件的默认行为 event.preventDefault()
  2. stop : 停止事件冒泡 event.stopPropagation()
  3. once:事件只触发一次
  4. capture:使用事件的捕获模式
  5. self:只有event.target当前操作的元素才是触发事件
  6. passive:事件的默认行为立即执行,无需等待回调事件执行完毕

使用方法: @click.prevent ,可以同时写多个

按键修饰

Vue中常用的按键别名

  • 回车 ==> enter
  • 删除 ==> delete
  • 退出 ==> esc
  • 空格 ==> space
  • 换行 ==> tab(特殊,必须配合 keydown 使用)
  • 上,下,左,右 ==> up , down , left , right

系统修饰键 需要配合 keydown 使用

使用: @keyup.enter = "demo"

计算属性

1
2
3
4
5
6
7
8
9
10
11
12
13
14
15
16
17
18
19
20
data:{
firstName:'张',
lastName:'三'
},
computed:{
fullName:{
// get 有什么作用? 当有人在读取fullName时,get就会被调用,且它的返回值就作为fullName的值
// get什么时候调用?1.初次读取fullName时。 2.所依赖的数据发生变化时
get(){
// 这里面的this是vm
return this.firstName + '-' + this.lastName
},
// set什么时候调用?当fullName被修改时
set(value){
cosnt arr = value.split('-');
this.firstName = arr[0]
this.lastName = arr[1]
}
}
}

简写(只有get)

1
2
3
4
5
computed:{
fullName(){
return this.firstName + '-' + this.lastName
}
}

监视属性

1
2
3
4
5
6
7
8
9
10
11
12
13
14
15
16
17
18
watch:{
isHot:{
immediate:true , // 初始化时让handler调用一下
// handler什么时候调用?当isHot发生变化时
handler(newValue , oldValue){

}
}
}


其他方式
vm.$watch('isHot',{
immediate:true ,
handler(newValue , oldValue){

}
})

深度监视

1
2
3
4
5
6
7
8
9
10
watch:{
numbers:{
deep:true, // 开启深度监视

// handler什么时候调用?当isHot发生变化时
handler(newValue , oldValue){

}
},
}

监视属性的简写形式

1
2
3
4
5
6
7
8
9
10
11
12
13
14
15
16
17
18
19
20
21
22
23
24
25
26
27
28
29
watch:{
// 正常写法
numbers:{
deep:true, // 开启深度监视
immediate:true, // 初始时调用
// handler什么时候调用?当isHot发生变化时
handler(newValue , oldValue){

}
},
// 简写形式
numbers(newValue , oldValue){
console.log('numbers被修改了'newValue, oldValue)
}
}


其他方式
vm.$watch('isHot',{
immediate:true ,
handler(newValue , oldValue){

}
})

简写
vm.$watch('isHot',function(newValue , oldValue){
console.log('isHot被修改了'newValue, oldValue)
})

计算属性和监视属性对比

  • 计算属性不能开启异步任务,监视属性可以
  • computed能完成的,watch都可以完成
  • 两个重要的小原则
    • 被Vue所管理的函数最好写成普通函数,这样this才是指向 vm的 或 组件实例对象
    • 所有不被Vue所管理的函数(定时器的回调函数,ajax的回调函数),最好写成箭头函数,这样this的指向才是vm 或 组件实例对象

条件渲染

  • v-ifv-else

  • v-show

列表渲染

遍历数组:v-for / index

1
v-for = "(p,index) in persons" :key = "index"

遍历对象:v-for / key

1
v-for = "(value,key) of car" :key = "key"

也可以遍历字符串,遍历指定次数

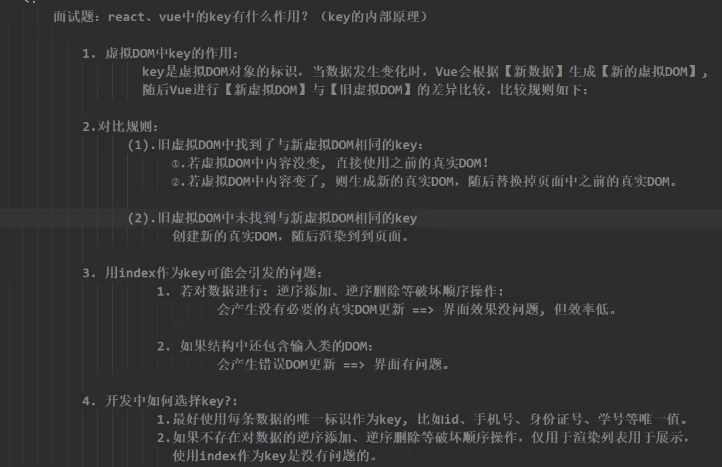
image-20230109193451919

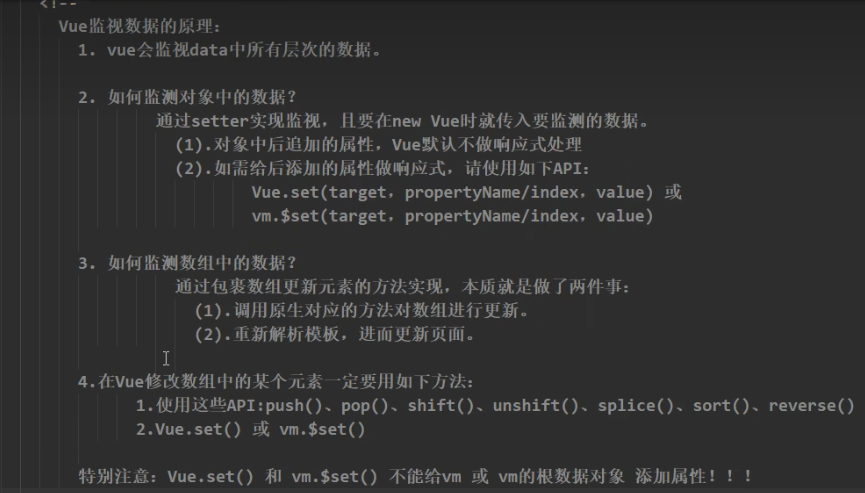
vue检测数据的原理

image-20230110112316514

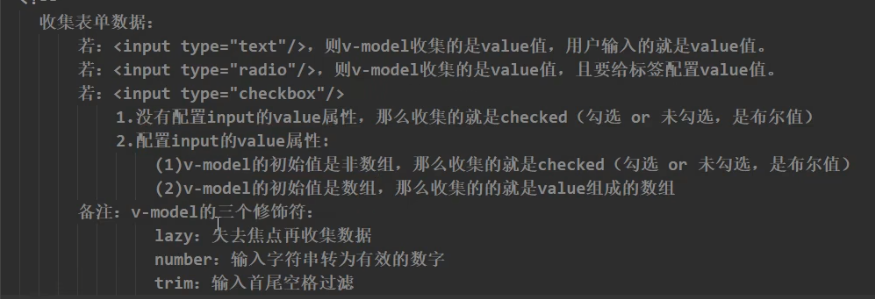
收集表单数据

image-20230110114409236

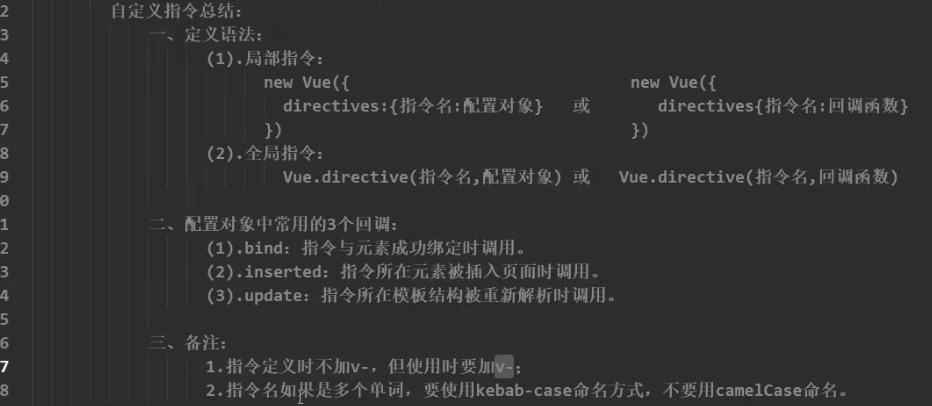
自定义指令

1
2
3
4
5
6
7
8
9
10
11
12
13
14
15
16
17
18
19
20
21
22
23
24
25
26
directives:{
// 需求:定义一个 v-fbind指令,和v-bind功能类似,但可以让绑定的input元素默认获取焦点
//第一种写法
fbind:{
// 指令与元素成功绑定时
bind(element,binding){
element.value = binding.value
},
// 指令所在元素插入界面时
inserted(element,binding){
element.focus()
},
// 指令所在的模板被重新解析时
update(element,binding){
element.value = binding.value
}
}

// 需求:定义一个 v-big指令,和v-text功能类似,但是把绑定的值放大十倍

// 第二种写法 element:真实的dom元素, binding:绑定对象
// big函数何时会被调用? 1.指令与元素成功绑定时(初始化)。2.指令所在的模板被重新解析时
big(element,binding){
element.innerText = binding.value * 10
}
}

注意:如果使用驼峰命名,比如bigNumber

使用的指令:v-big-number

directives中的命名:'big-number'(){}

image-20230112114713543

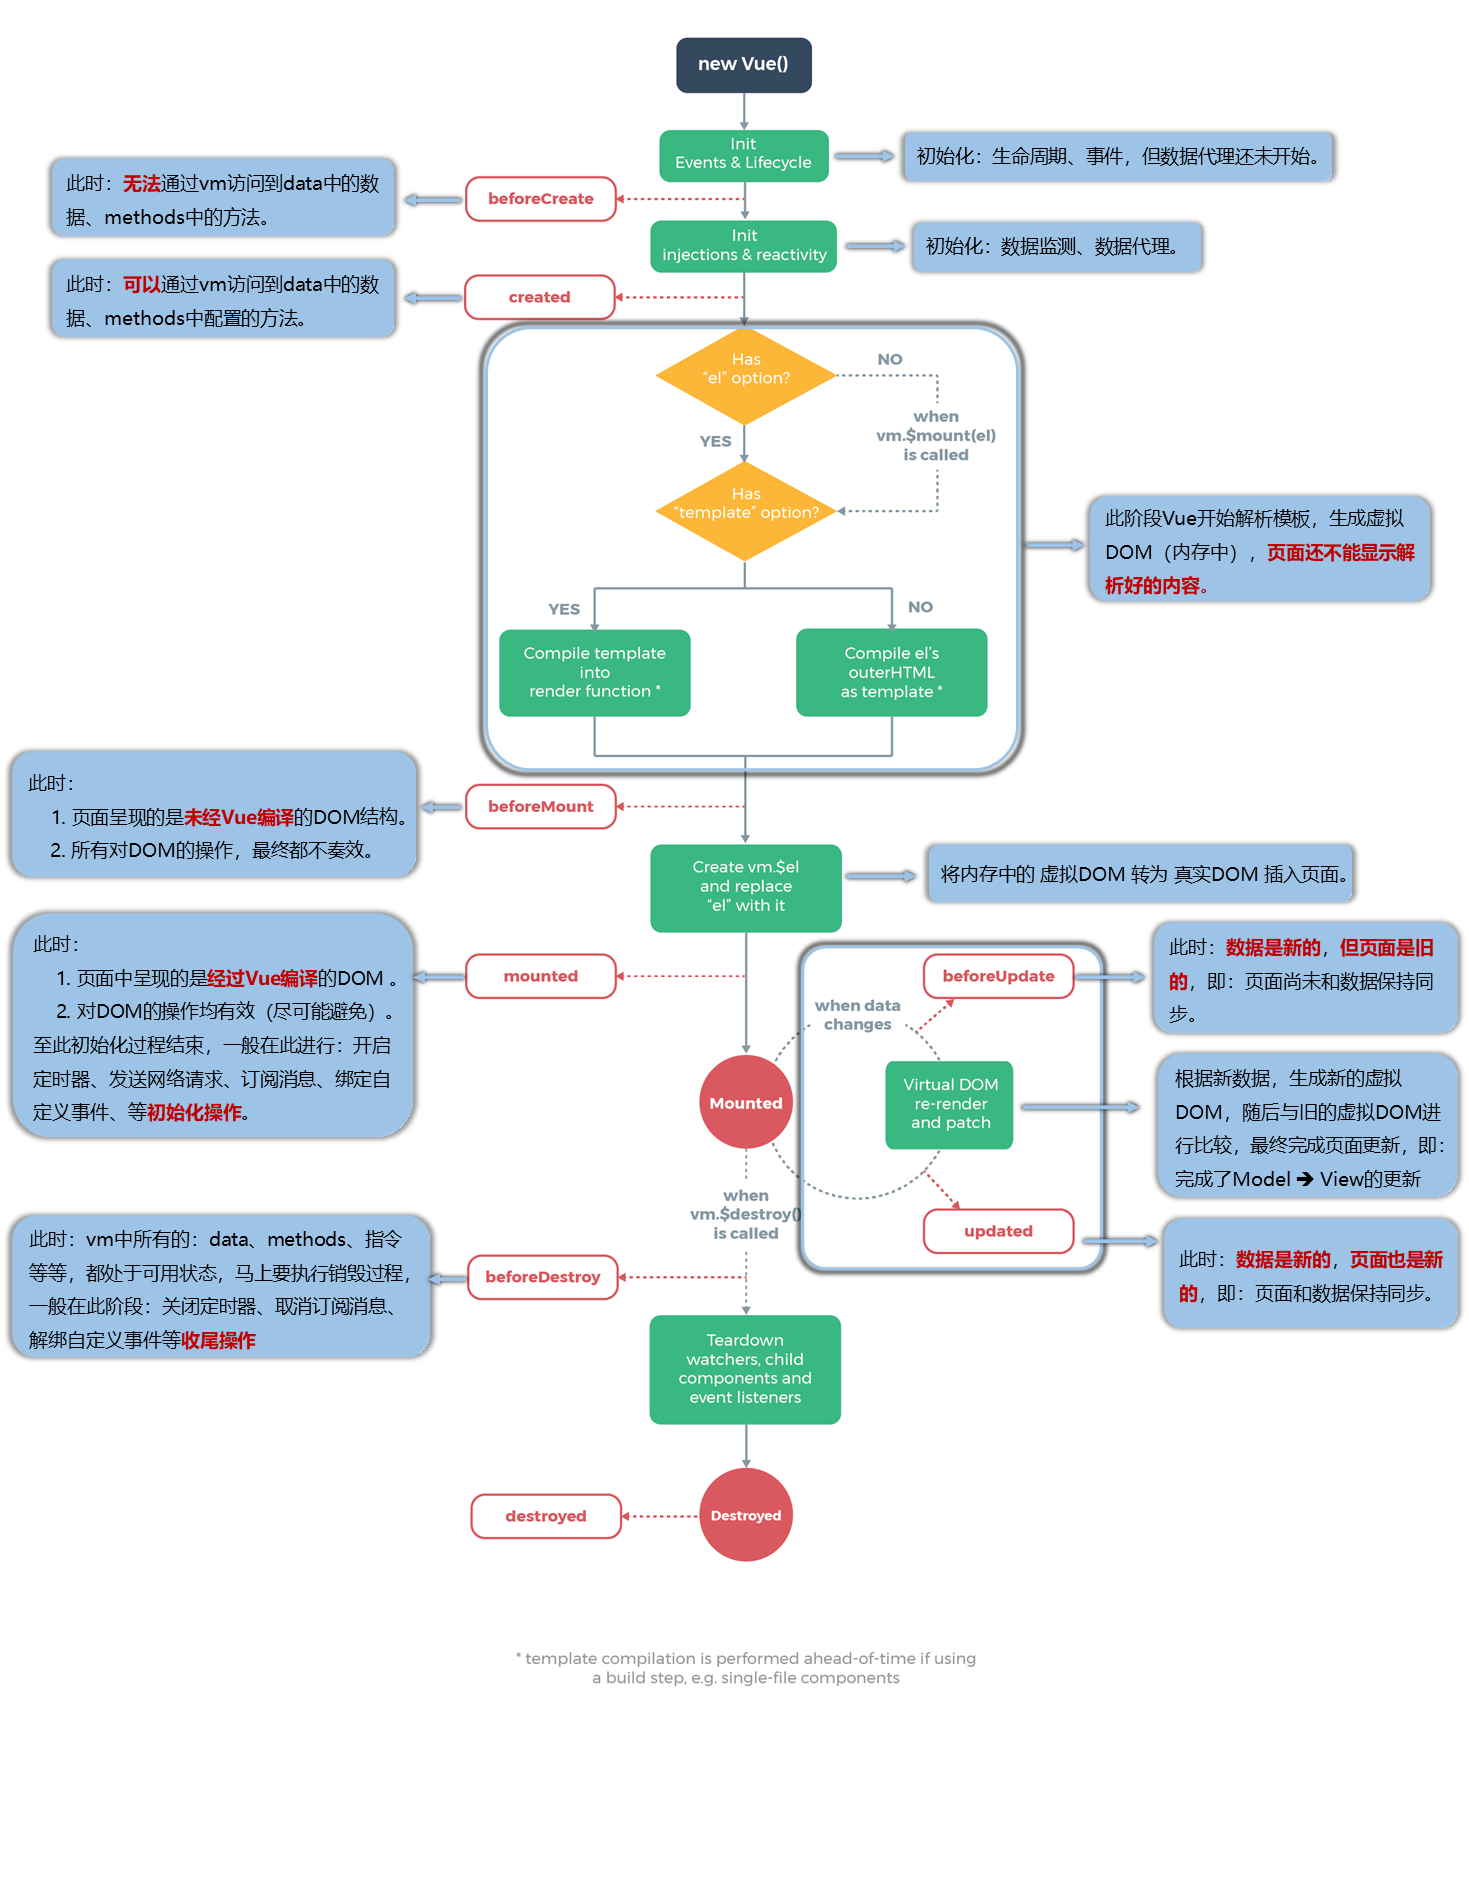
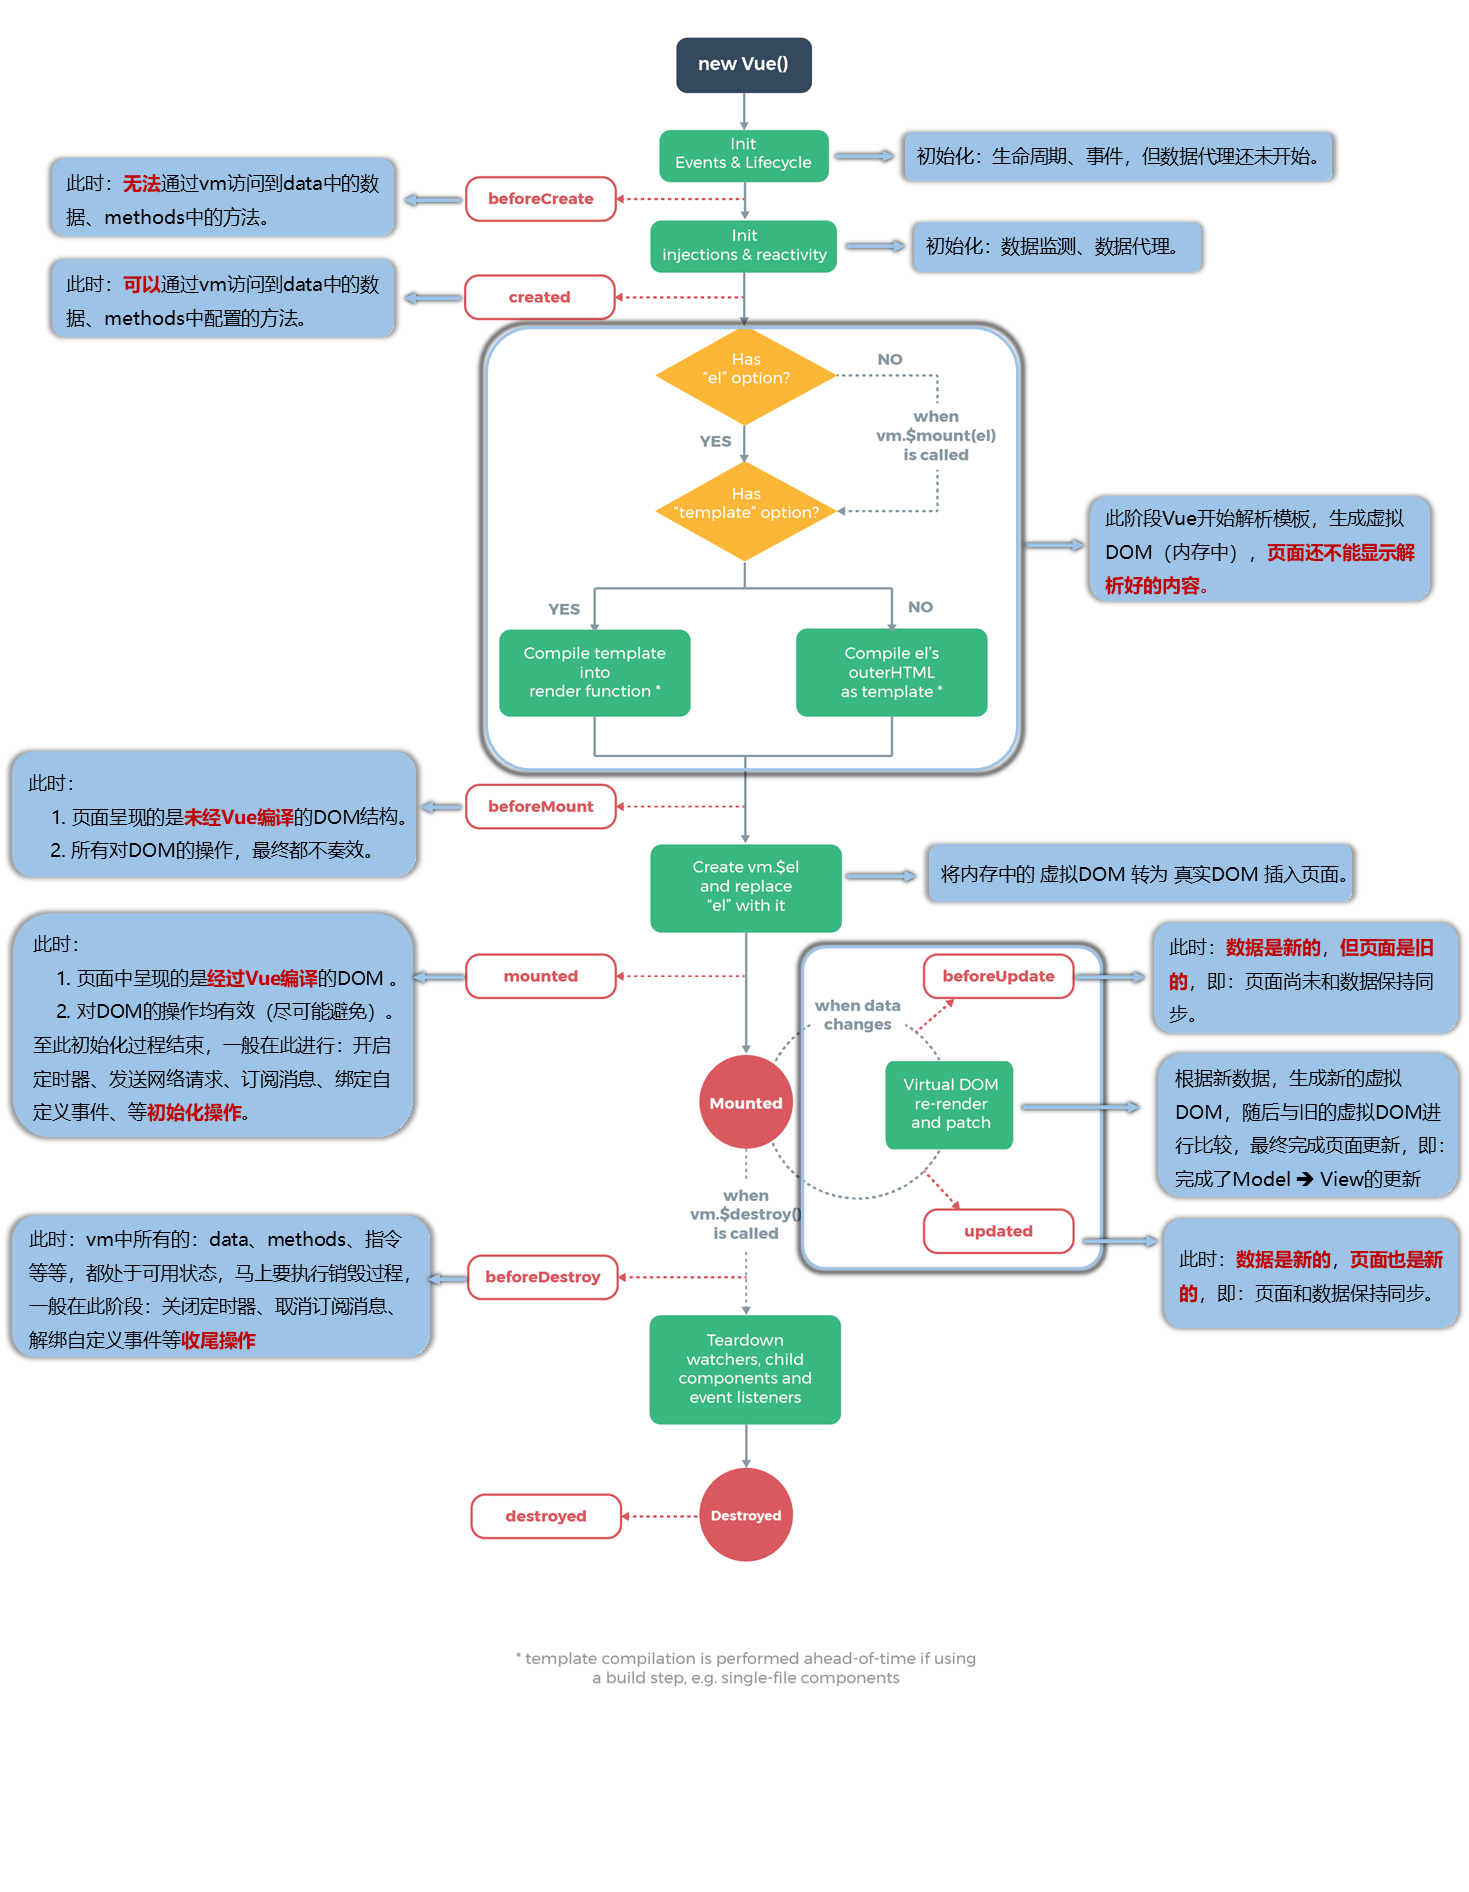
生命周期

image-20230112121536046

image-20230112142537708

Vue脚手架

组件的自定义事件

1
2
3
$emit('绑定的自定义事件','传递的参数') 自定义事件的触发
$on('绑定的自定义事件','方法') 绑定自定义事件
$off(['自定义事件','自定义事件']) 解绑自定义事件

个人对于 $emit $on $off 的理解:

首先要使用这三个,需要有一个函数

$on:将函数设置为全局可触发函数,同时给这个函数取一个别名

$off 将函数取消绑定

$emit:在其他组件中,使用了$on绑定的函数,同时向这个函数传递参数,然后在绑定该函数的组件中收到 回调的数据

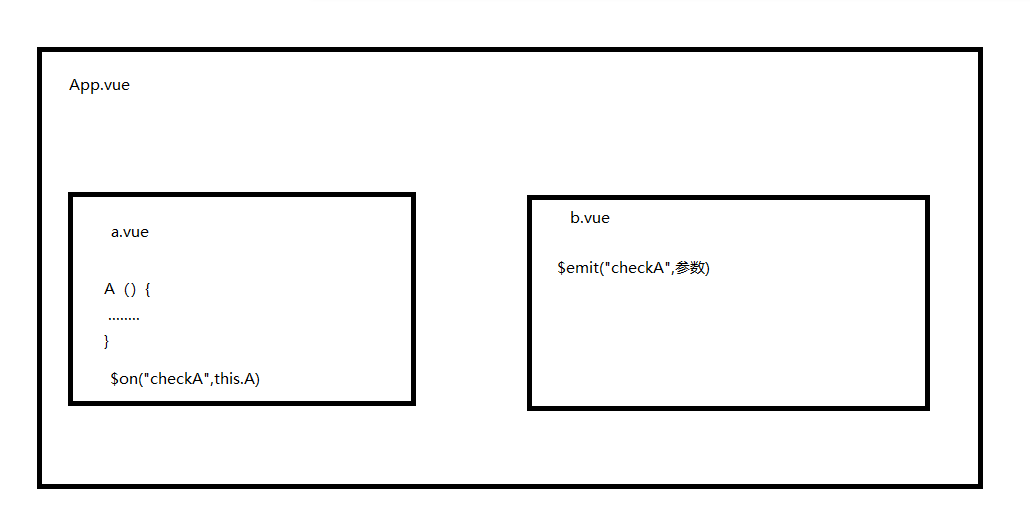
以下面这个图为例子

image-20230211224858693

a组件中有一个A函数,a组件将其绑定为自定义事件checkA,然后b组件可以触发checkA并传递参数,然后函数A就会收到参数并调用,回调在a组件中

  • 一种组件间通信的方式,适用于:子组件 ==> 父组件

  • 使用场景:A是父组件,B是子组件,B想给A传数据,那么就要在A中给B绑定自定义事件(事件的回调在A中)

  • 绑定自定义事件:

    • 第一种方式,在父组件中:<Demo @atguigu="test"/><Demo v-on:atguigu="test"/>

    • 第二种方式,在父组件中:

1
2
3
4
5
<Demo ref="demo"/>
...
mounted(){
this.$refs.demo.$on('atguigu',data)
}
  • 若想让自定义事件只能触发一次,可以使用once修饰符,或$once方法

  • 触发自定义事件:this.$emit('atguigu',数据)

  • 解绑自定义事件:this.$off('atguigu')

  • 组件上也可以绑定原生DOM事件,需要使用native修饰符

  • 注意:通过this.$refs.xxx.$on('atguigu',回调)绑定自定义事件时,回调要么配置在methods中,要么用箭头函数,否则this指向会出问题!

全局事件总线

  1. 一种组件之间通信的方式,适用于任意组件间通信

  2. 安装全局事件总线(在 main.js 中):

    1
    2
    3
    4
    5
    6
    7
    new Vue({
    ...
    beforeCreate() {
    Vue.prototype.$bus = this //安装全局事件总线,$bus就是当前应用的vm
    },
    ...
    })
  3. 使用事件总线:

    1. 接收数据:A组件想接收数据,则在A组件中给$bus绑定自定义事件,事件的回调留在A组件自身

      1
      2
      3
      4
      5
      6
      7
      8
      9
      export default {
      methods(){
      demo(data){...}
      }
      ...
      mounted() {
      this.$bus.$on('xxx',this.demo)
      }
      }
    2. 提供数据:this.$bus.$emit('xxxx',数据)

  4. 最好在beforeDestroy钩子中,用$off解绑当前组件所用到的事件

消息订阅与发布(pubsub)

  1. 一种组件之间通信的方式,适用于任意组件间通信

  2. 使用步骤:

    1. 安装pubsub:npm i pubsub-js

    2. 引入:import pubsub from 'pubsub-js'

    3. 接收数据:A组件想要接受数据,则在A组件中订阅消息,订阅的回调留在A组件自身

      1
      2
      3
      4
      5
      6
      7
      methods(){
      demo(data){........}
      }
      ......
      mounted(){
      this.pid = pubsub.subscribe('xxx',this.demo)// 订阅消息
      }
    4. 提供数据:pubsub.publish('xxx',数据)

    5. 最好在beforeDestroy钩子中,用PubSub.unsubscribe(pid)去取消订阅

nextTick

  1. 语法:this.$nextTick(回调函数)
  2. 作用:在写一次DOM更新结束后执行其指定的回调
  3. 什么时候用:当改变数据后,要基于更新后的DOM进行某些操作时,要在nextTick所指定的回调函数中执行

Vue的动画效果

使用css动画

1
2
3
4
5
6
7
8
9
10
11
12
13
14
15
16
17
18
19
20
21
22
23
24
25
26
27
28
29
30
31
32
33
34
35
36
37
38
39
40
41
42
<template>
<div>
<button @click="isShow = !isShow">显示/隐藏</button>
<transition name="fir" :appear="true">
<h1 v-show="isShow">你好啊!</h1>
</transition>
</div>
</template>

<script>
export default {
name: "Test",
data() {
return {
isShow: true
}
}
}
</script>

<style scoped>
h1 {
background-color: orange;
}
/*fir对应上面 transition的 name*/
.fir-enter-active {
animation: atguigu 1s;
}
.fir-leave-active {
animation: atguigu 1s reverse;
}

/*动画*/
@keyframes atguigu {
from{
transform: translateX(-100%);
}
to{
transform: translateX(0px);
}
}
</style>

使用Vue提供的三种方法

1
2
3
4
5
6
7
8
9
10
11
12
13
14
15
16
17
18
19
20
21
22
23
24
25
26
27
28
29
30
31
32
33
34
35
36
37
38
39
<template>
<div>
<button @click="isShow = !isShow">显示/隐藏</button>
<transition-group name="hello" :appear="true">
<h1 v-show="isShow" key="1">你好啊!</h1>
<h1 v-show="!isShow" key="2">北京</h1>
</transition-group>
</div>
</template>

<script>
export default {
name: "Test",
data() {
return {
isShow: true
}
}
}
</script>

<style scoped>
h1 {
background-color: orange;
}
/*进入的起点,离开的终点*/
.hello-enter,.hello-leave-to {
transform: translateX(-100%);
}
/*进入,离开的过程*/
.hello-enter-active,.hello-leave-active{
transition: 1s;
}
/*进入的终点,离开的起点*/
.hello-enter-to ,.hello-leave {
transform: translateX(0);
}

</style>

使用第三方库

使用的是animate.css:https://animate.style/

首先下载库 npm install animate.css --save

transition-group中引入,script中添加 import 'animate.css'

第三行:引入的animate.css的样式

第四行:在animate.css中找到的出现动画样式

第五行: 离开的动画样式

1
2
3
4
5
6
7
8
9
<transition-group
:appear="true"
name="animate__animated animate__bounce"
enter-active-class="animate__backInDown"
leave-active-class="animate__backOutDown"
>
<h1 v-show="isShow" key="1">你好啊!</h1>
<h1 v-show="!isShow" key="2">北京</h1>
</transition-group>

Vue中的ajax

Vue配置代理

使用axios,下载 npm i axios

1
2
3
4
5
6
7
8
9
10
11
12
13
14
15
16
17
18
19
20
21
22
23
24
25
26
27
28
29
30
31
32
33
34
35
<template>
<div>
<button @click="getStudents">获取学生信息</button>
<button @click="getCars">获取汽车信息</button>
</div>
</template>

<script>
import axios from 'axios'
export default {
name: "App",
methods : {
getStudents(){
axios.get('http://localhost:8080/api/students').then(
response => {
console.log('请求成功了',response.data)
},
error => {
console.log('请求失败了',error.message)
}
)
},
getCars(){
axios.get('http://localhost:8080/foo/cars').then(
response => {
console.log('请求成功了',response.data)
},
error => {
console.log('请求失败了',error.message)
}
)
}
}
}
</script>

解决axios的跨域问题:

在vue.config.js添加如下代码

1
2
3
4
5
6
7
8
9
10
11
12
13
14
15
16
17
18
19
20
21
22
23
24
module.exports = {
lintOnSave: false,
//开启代理服务器(方式一)
// devServer: {
// proxy: 'http://localhost:5000'
// }
// 开启代理服务器(方式二)
devServer: {
proxy: {
'/api': {
target: 'http://localhost:5000',
pathRewrite:{'^/api':''},
ws: true, // 用于支持websocket
changeOrigin: true // 用于控制请求头中的host值
},
'/foo': {
target: 'http://localhost:5001',
pathRewrite: {'^/foo':''},
ws: true,
changeOrigin: true
}
}
}
}

方式一: 只能开启单个代理服务器,不能灵活的控制是否代理

一般使用方式二

GitHub案例演示

静态资源包在尚硅谷的vue视频下方领取 视频

数据接口地址(GitHub免费提供的接口): https://api.github.com/search/users?q=xxx

main.js添加 $bus

1
2
3
4
5
6
7
8
9
10
11
import Vue from 'vue'
import App from './App.vue'

Vue.config.productionTip = false

new Vue({
render: h => h(App),
beforeCreate() {
Vue.prototype.$bus = this
}
}).$mount('#app')

App.Vue

1
2
3
4
5
6
7
8
9
10
11
12
13
14
15
16
17
18
19
20
<template>
<div class="container">
<Search/>
<List/>
</div>
</template>

<script>
import List from "@/component/List";
import Search from "@/component/Search";
export default {
name: "App",
components: {Search, List},

}
</script>

<style >

</style>

Search.vue

1
2
3
4
5
6
7
8
9
10
11
12
13
14
15
16
17
18
19
20
21
22
23
24
25
26
27
28
29
30
31
32
33
34
35
36
37
38
39
40
41
<template>
<section class="jumbotron">
<h3 class="jumbotron-heading">Search Github Users</h3>
<div>
<input type="text" placeholder="enter the name you search" v-model="keyword"/>&nbsp;
<button @click="searchUsers">Search</button>
</div>
</section>
</template>

<script>
import axios from "axios";
export default {
name: "Search",
data(){
return{
keyword:''
}
},
methods:{
searchUsers(){
this.$bus.$emit('updateListData',{isFirst:false , isLoding:true,errMsg:'',users:[]})
axios.get(`https://api.github.com/search/users?q=${this.keyword}`).then(
response => {
//请求成功后更新list的数据
this.$bus.$emit('updateListData',{ isLoding:false,errMsg:'',users:response.data.items})
console.log('获取')
},
error => {
//请求失败后更新list的数据
this.$bus.$emit('updateListData',{ isLoding:false,errMsg:error.message,users:[]})
}
)
}
}
}
</script>

<style scoped>

</style>

List.vue

1
2
3
4
5
6
7
8
9
10
11
12
13
14
15
16
17
18
19
20
21
22
23
24
25
26
27
28
29
30
31
32
33
34
35
36
37
38
39
40
41
42
43
44
45
46
47
48
49
50
51
52
53
54
55
56
57
58
59
60
61
62
63
64
65
66
67
68
<template>
<div class="row">
<!-- 展示用户列表-->
<div v-show="info.users.length" class="card" v-for="user in info.users" :key="user.login">
<a :href="user.html_url" target="_blank">
<img :src="user.avatar_url" style='width: 100px'/>
</a>
<p class="card-text">{{user.login}}}</p>
</div>
<!-- 展示加载中-->
<h1 v-show="info.isLoding">加载中......</h1>
<!-- 展示欢迎词-->
<h1 v-show="info.isFirst">欢迎使用</h1>
<!-- 展示错误信息-->
<h1 v-show="info.errMsg" v-text="info.errMsg"></h1>

</div>
</template>

<script>

export default {
name: "List",
data() {
return {
info:{
users:[],
isFirst:true,
isLoding:false,
errMsg:'',
}
}
},
mounted() {
this.$bus.$on('updateListData',(dataObj) => {
console.log('我是list组件,收到了数据',dataObj)
this.info = {...this.info,...dataObj}
})
}
}
</script>

<style scoped>
.album {
min-height: 50rem; /* Can be removed; just added for demo purposes */
padding-top: 3rem;
padding-bottom: 3rem;
background-color: #f7f7f7;
}

.card {
float: left;
width: 33.333%;
padding: .75rem;
margin-bottom: 2rem;
border: 1px solid #efefef;
text-align: center;
}

.card > img {
margin-bottom: .75rem;
border-radius: 100px;
}

.card-text {
font-size: 85%;
}
</style>

运行界面

初始界面

image-20220920223006433

搜索结果出来之前

image-20220920222952661

搜索结果出来后

image-20220920222905099

错误信息

image-20220920222919496

插槽

作用:让父组件可以向子组件指定位置插入html结构,也是组件通讯的一种方式,适用于 父组件 ==> 子组件

分类: 默认插槽,具名插槽,作用域插槽

默认插槽

1
2
3
4
5
6
7
8
9
10
11
12
13
14
15
16
父组件
<template>
<div class="container">
<Category title="美食">
<img src="xxxx" alt="">
</Category>
</template>

子组件
<template>
<div class="category">
<h3 v-text="title + '分类'"></h3>
<!-- 定义一个插槽,让组件的使用者进行填充-->
<slot>我是默认值,如果有填充,我就不显示</slot>
</div>
</template>

具名插槽

1
2
3
4
5
6
7
8
9
10
11
12
13
14
15
16
17
18
19
20
21
22
23
24
25
26
父组件
<template>
<div class="container">
<Category title="电影">
<video slot="center" controls src="xxxxx"></video>
<template v-slot:footer>
<div class="foot">
<a href="xxxx">经典</a>
<a href="xxxx">热门</a>
<a href="xxxx">推荐</a>
</div>
<h4 ></h4>
</template>
</Category>
</div>
</template>

子组件
<template>
<div class="category">
<h3 v-text="title + '分类'"></h3>
<!-- 定义一个插槽,让组件的使用者进行填充-->
<slot name="center">我是默认值,如果有填充,我就不显示</slot>
<slot name="footer">我是默认值,如果有填充,我就不显示</slot>
</div>
</template>

作用域插槽

数据在子组件中,但是根据数据生成的结构又组件的使用者决定(games数据在Category组件中,但是用数据所遍历出来的结构由app组件决定)

1
2
3
4
5
6
7
8
9
10
11
12
13
14
15
16
17
18
19
20
21
22
23
24
25
26
27
28
29
30
父组件
<template>
<div class="container">
<Category title="游戏">
<template scope="category">
<ul>
<li v-for="(item,index) in category.games" :key="index" v-text="item"></li>
</ul>
</template>
</Category>

<Category title="游戏">
<template scope="{games}">
<ol>
<li v-for="(item,index) in games" :key="index" v-text="item"></li>
</ol>
</template>
</Category>

</div>
</template>

子组件
<template>
<div class="category">
<h3 v-text="title + '分类'"></h3>
<!-- 定义一个插槽,让组件的使用者进行填充-->
<slot :games = "games" ></slot>
</div>
</template>

Vuex

使用Vuex

  • npm i vuex
  • Vue.use(Vuex)
  • store
  • vc ==> store

搭建vue环境

下载vuex

npm i vuex

使用vuex

在src下面创建一个store文件夹,并创建一个index.js文件,index文件用来写vuex核心的store配置 /src/store/index.js

image-20220922084339586

index.js内容

1
2
3
4
5
6
7
8
9
10
11
12
13
14
15
16
17
18
19
20
21
// 该文件用于创建vuex最核心的store

//引入vuex
import Vuex from "vuex";
import Vue from "vue";
// 使用vuex
Vue.use(Vuex)

// 准备actions,用于想用组件中的动作
const actions = {}
// 准备mutations,用于操作数据(state)
const mutations = {}
// 准备state,用于存储数据
const state = {}

//创建并暴露 store
export default new Vuex.Store({
actions,
mutations,
state
})

在main.js中使用store

1
2
3
4
5
6
7
8
9
10
11
12
13
14
import Vue from 'vue'
import App from './App.vue'
//导入vuex的store
import store from "@/store";

Vue.config.productionTip = false

new Vue({
render: h => h(App),
store, // 引入vuex中的store
beforeCreate() {
Vue.prototype.$bus = this
}
}).$mount('#app')

vuex的基本使用

初始化数据,配置actions,配置mutations,操作文件store.js

1
2
3
4
5
6
7
8
9
10
11
12
13
14
15
16
17
18
19
20
21
22
23
24
25
26
27
28
29
30
31
32
33
34
35
36
37
38
39
40
41
// 该文件用于创建vuex最核心的store

//引入vuex
import Vuex from "vuex";
import Vue from "vue";
// 使用vuex
Vue.use(Vuex)

// 准备actions,用于想用组件中的动作
const actions = {
jiaOdd(context,value){
if(context.state.sum % 2){
context.commit('JIA',value)
}
},
jiaWait(context,value){
setTimeout(() => {
context.commit('JIA',value)
},500)
},
}
// 准备mutations,用于操作数据(state)
const mutations = {
JIA(state,value){
state.sum += value
},
JIAN(state,value){
state.sum -= value
}
}
// 准备state,用于存储数据
const state = {
sum:0
}

//创建并暴露 store
export default new Vuex.Store({
actions,
mutations,
state
})

组件中读取vuex中的数据:$store.state.sum

组件中修改vuex中的数据:$store.dispatch ('action中的方法名',数据) $store.commit('mutations中的方法名',数据)

备注:若没有网络请求或其他业务逻辑,组件中可以直接越过actions,即直接编写commit

getters的使用

当state中的数据需要经过加工后再使用后,可以使用getters加工

store.js中追加getters配置

1
2
3
4
5
6
7
8
9
10
11
12
13
14
......

// 准备getters,用于将state中的数据进行加工
const getters = {
bigSum(state){
return state.sum * 10
}
}

//创建并暴露 store
export default new Vuex.Store({
.......
getters
})

组件中读取数据 $store.getters.bigSum

四个map方法的使用

  1. mapState方法: 用于帮助我们映射state中的数据为计算属性

    1
    2
    3
    4
    5
    6
    7
    computed:{
    // 借助mapState生成计算属性,从state中读取数据 对象写法
    // ...mapState({sum:'sum',school:'school',subject:'subject'}),

    // 借助mapState生成计算属性,从state中读取数据 数组写法
    ...mapState(['sum','school','subject']),
    }
  2. mapGetters方法:用于帮助我们映射getters中的数据为计算属性

    1
    2
    3
    4
    5
    6
    7
    computed:{
    // 借助mapGetters生成计算属性,从Getters中读取数据 对象写法
    // ...mapGetters({bigSum:'bigSum'}),

    // 借助mapGetters生成计算属性,从Getters中读取数据 数组写法
    ...mapGetters(['bigSum'])
    }
  3. mapActions方法:用于帮助我们生成和 actions对话的方法,即包含$store.dispatch(xxx)的函数

    1
    2
    3
    4
    5
    6
    7
    methods:{
    // 借助mapActions生成对应的方法,方法中调用dispatch去联系Actions 对象写法
    ...mapActions({incrementOdd:'jiaOdd',incrementWait:'jiaWait'}),

    // 借助mapActions生成对应的方法,方法中调用dispatch去联系Actions 数组写法
    // ...mapActions(['jiaOdd','jiaWait']),
    }
  4. mapMutations方法:用于帮助我们生成与mutations对话的方法,即包含$store.commie(xxxx)的函数

    1
    2
    3
    4
    5
    6
    7
    methods:{
    // 借助mapMutataions生成对应的方法,方法中调用commit去联系mutations 对象写法
    ...mapMutations({increment:'JIA',decrement:'JIAN'}),

    // 借助mapMutataions生成对应的方法,方法中调用commit去联系mutations 数组写法
    // ...mapMutations(['JIA','JIAN']),
    }

备注: mapActions和mapMutations使用时,若是传递参数需要,在模板的绑定时间是传递好参数,否则参数是事件对象

模块化+命名空间

目的:为了让代码更好维护

具体使用

修改store.js

1
2
3
4
5
6
7
8
9
10
11
12
13
14
15
16
17
18
19
20
21
22
23
24
25
26
27
28
29
30
31
32
33
34
35
36
37
38
39
40
41
42
43
44
45
46
47
48
49
50
51
52
53
54
55
56
57
58
59
60
61
62
63
64
65
66
67
68
69
70
71
72
73
74
75
76
77
78
79
80
// 该文件用于创建vuex最核心的store

//引入vuex
import Vuex from "vuex";
import Vue from "vue";
// 使用vuex
Vue.use(Vuex)


// 求和功能相关的配置
const countOptions = {
namespaced:true,
actions:{
jiaOdd(context,value){
if(context.state.sum % 2){
context.commit('JIA',value)
}
},
jiaWait(context,value){
setTimeout(() => {
context.commit('JIA',value)
},500)
},
},
mutations:{
JIA(state,value){
state.sum += value
},
JIAN(state,value){
state.sum -= value
},
},
state:{
sum:0,
school:'嵩阳高中',
subject:'前端',},
getters:{
bigSum(state){
return state.sum * 10
}
},
}

// 人员管理相关配置
const personOptions = {
namespaced:true,
actions:{
addPresonWang(context,value){
if(value.name.indexOf('王') === 0){
context.commit('ADD_PERSON',value)
}else {
alert("请输入一个姓王的人")
}
}
},
mutations:{
ADD_PERSON(state,value){
state.personList.unshift(value)
}
},
state:{
personList:[
{id:'001',name:'张三'}
]
},
getters:{
firstPersonName(state){
return state.personList[0].name
}
},
}

//创建并暴露 store
export default new Vuex.Store({
modules:{
countAbout:countOptions,
personAbout:personOptions,
}
})

注意开启命名空间 namespaced:true,

组件获取数据

  1. 开启命名空间后,组件读取state数据
1
2
3
4
//方式一,直接自己读取
this.$store.state.personAbout.personList
//方式二,借助mapState读取
...mapState('countAbout',['sum','school','subject']),
  1. 开启命名空间后,组件读取getters数据
1
2
3
4
//方式一,直接自己读取
this.$store.getters['personAbout/firstPersonName']
//方式二,借助mapGetters读取
...mapGetters('countAbout',['bigSum'])
  1. 开启命名空间后,组件调用dispatch
1
2
3
4
//方式一,直接自己dispatch
this.$store.dispatch('personAbout/addPresonWang',personObj)
//方式二,借助mapActions读取
...mapActions('countAbout',{incrementOdd:'jiaOdd',incrementWait:'jiaWait'}),
  1. 开启命名空间后,组件调用commit
1
2
3
4
//方式一,直接自己commit
this.$store.commit('personAbout/ADD_PERSON',personObj)
//方式二,借助mapMutations读取
...mapMutations('countAbout',{increment:'JIA',decrement:'JIAN'}),

store组件化案例

main.js
1
2
3
4
5
6
7
8
9
10
11
12
13
14
import Vue from 'vue'
import App from './App.vue'
import store from "@/store";

Vue.config.productionTip = false

new Vue({
render: h => h(App),
store,
beforeCreate() {
Vue.prototype.$bus = this
}
}).$mount('#app')

App.vue
1
2
3
4
5
6
7
8
9
10
11
12
13
14
15
16
17
<template>
<div class="container">
<Count/>
<hr>
<Person/>
</div>
</template>

<script>
import Count from "@/component/Count";
import Person from "@/component/Person";
export default {
name: "App",
components: {Count,Person},
}
</script>

Count.vue
1
2
3
4
5
6
7
8
9
10
11
12
13
14
15
16
17
18
19
20
21
22
23
24
25
26
27
28
29
30
31
32
33
34
35
36
37
38
39
40
41
42
43
44
<template>
<div>
<h1>当前求和为:{{sum}}</h1>
<h3>放大十倍{{bigSum}}</h3>
<h3>我在{{school}},学习{{subject}}</h3>
<h3>下方组件的总人数:{{personList.length}}</h3>
<select v-model.number="n" name="" id="">
<option value="1">1</option>
<option value="2">2</option>
<option value="3">3</option>
</select>
<button @click="increment(n)">+</button>
<button @click="decrement(n)">-</button>
<button @click="incrementOdd(n)">当前求和为奇数再加</button>
<button @click="incrementWait(n)">等一等再加</button>
</div>
</template>

<script>
import {mapState,mapGetters,mapMutations,mapActions} from 'vuex'
export default {
name: "Count",
data() {
return {
n:1,
}
},
computed:{
...mapState('countAbout',['sum','school','subject']),
...mapState('personAbout',['personList']),
...mapGetters('countAbout',['bigSum'])
},
methods:{
...mapMutations('countAbout',{increment:'JIA',decrement:'JIAN'}),
...mapActions('countAbout',{incrementOdd:'jiaOdd',incrementWait:'jiaWait'}),
},
}
</script>

<style scoped>
button {
margin-left: 5px;
}
</style>
Person.vue
1
2
3
4
5
6
7
8
9
10
11
12
13
14
15
16
17
18
19
20
21
22
23
24
25
26
27
28
29
30
31
32
33
34
35
36
37
38
39
40
41
42
43
44
45
46
47
48
49
50
51
52
53
54
55
56
57
58
59
60
61
62
63
64
65
66
67
68
69
70
<template>
<div>
<h1>人员列表</h1>
<h2>上方的组件求和为:{{sum}}</h2>
<h3>列表中第一个人的名字:{{firstPersonName}}</h3>
<input type="text" placeholder="请输入名字" v-model="name">
<button @click="add">添加</button>
<!-- 使用mapMutations使用如下的方法,在data中创建一个id,并且放上名字-->
<!-- <button @click="add({id:id,name:name})">添加</button>-->
<button @click="wang">添加一个姓王的人</button>
<button @click="addPersonServer">随机添加一个姓王的人</button>
<ul>
<li v-for="(p) in personList" v-text="p.name" :key="p.id"></li>
</ul>
</div>
</template>

<script>
// import {mapMutations} from "vuex";
import {nanoid} from "nanoid";

export default {
name: "Person",
data(){
return {
name:'',
}
},
computed:{
// ...mapState('personAbout',['personList']),
// ...mapState('countAbout',['sum']),
//
sum(){
return this.$store.state.countAbout.sum
},
personList(){
return this.$store.state.personAbout.personList
},
firstPersonName() {
return this.$store.getters['personAbout/firstPersonName']
}

},
methods:{
add(){
const personObj = {id:nanoid(),name:this.name}
this.$store.commit('personAbout/ADD_PERSON',personObj)
this.name = ''
},

// ...mapMutations('personAbout',{add:'ADD_PERSON'}),

wang(){
const personObj = {id:nanoid(),name:this.name}
console.log(personObj)
this.$store.dispatch('personAbout/addPresonWang',personObj)
this.name = ''
},
addPersonServer() {
this.$store.dispatch('personAbout/addPersonServer')
}
}
}
</script>

<style scoped>
li {
text-decoration: none;
}
</style>
store文件夹下的index.js
1
2
3
4
5
6
7
8
9
10
11
12
13
14
15
16
17
// 该文件用于创建vuex最核心的store

//引入vuex
import Vuex from "vuex";
import Vue from "vue";
import count from "@/store/count";
import person from "@/store/person";
// 使用vuex
Vue.use(Vuex)

//创建并暴露 store
export default new Vuex.Store({
modules:{
countAbout:count,
personAbout:person,
}
})
store文件夹下的count.js
1
2
3
4
5
6
7
8
9
10
11
12
13
14
15
16
17
18
19
20
21
22
23
24
25
26
27
28
29
30
31
32
33
// 求和功能相关的配置
export default {
namespaced:true,
actions:{
jiaOdd(context,value){
if(context.state.sum % 2){
context.commit('JIA',value)
}
},
jiaWait(context,value){
setTimeout(() => {
context.commit('JIA',value)
},500)
},
},
mutations:{
JIA(state,value){
state.sum += value
},
JIAN(state,value){
state.sum -= value
},
},
state:{
sum:0,
school:'嵩阳高中',
subject:'前端',},
getters:{
bigSum(state){
return state.sum * 10
}
},
}
store文件夹下的person.js
1
2
3
4
5
6
7
8
9
10
11
12
13
14
15
16
17
18
19
20
21
22
23
24
25
26
27
28
29
30
31
32
33
34
35
36
37
38
39
40
// 人员管理相关配置
import axios from "axios";
import {nanoid} from "nanoid";
export default {
namespaced:true,
actions:{
addPresonWang(context,value){
if(value.name.indexOf('王') === 0){
context.commit('ADD_PERSON',value)
}else {
alert("请输入一个姓王的人")
}
},
addPersonServer(context){
axios.get('https://api.uixsj.cn/hitokoto/get?type=social').then(
response => {
context.commit('ADD_PERSON',{id:nanoid(),name:response.data})
},
error => {
console.log(error.message)
}
)
}
},
mutations:{
ADD_PERSON(state,value){
state.personList.unshift(value)
}
},
state:{
personList:[
{id:'001',name:'张三'}
]
},
getters:{
firstPersonName(state){
return state.personList[0].name
}
},
}

vue-router

是vue的一个插件库 npm i vue-router

什么是路由:一个路由就是一组映射关系

基本路由

基本使用

  1. 安装vue-router,命令 npm i vue-router

  2. 应用插件:Vue.use(VueRouter)

  3. 编写router配置项

    1
    2
    3
    4
    5
    6
    7
    8
    9
    10
    11
    12
    13
    14
    15
    16
    17
    18
    19
    20
    //该文件专门用于创建整个应用的路由器
    // 引入 VueRouter
    import VueRouter from "vue-router";
    //引入 组件
    import About from "@/component/About";
    import Home from "@/component/Home";

    // 创建一个路由器
    export default new VueRouter({
    routes:[
    {
    path:'/about',
    component:About
    },
    {
    path:'/home',
    component:Home
    }
    ]
    })
  4. 实现切换(active-class 可以设置高亮样式)

1
<router-link class="list-group-item" active-class="active" to="/about">About</router-link>
  1. 指定展示位置
1
<router-view></router-view>

几个注意点

  • 路由组件一般放在page文件夹中,一般组件通常存放在components文件夹中
  • 通过切换,“隐藏”的路由组件,默认是被销毁的,需要的时候再去挂载
  • 每个组件都有自己的$route属性,里面存储自己得路由信息
  • 整个应用只有一个router,可以通过组件的 $router 属性获取到

嵌套路由

配置多级路由使用children配置项

1
2
3
4
5
6
7
8
9
10
11
12
13
14
15
16
17
18
19
20
21
22
23
24
25
26
27
28
29
30
31
//该文件专门用于创建整个应用的路由器
// 引入路由
import VueRouter from "vue-router";
import About from "@/pages/About";
import Home from "@/pages/Home";
import News from "@/pages/News";
import Message from "@/pages/Message";

// 创建一个路由器
export default new VueRouter({
routes:[
{
path:'/about',
component:About
},
{
path:'/home',
component:Home,
children:[
{
path:'news',
component:News
},
{
path:'message',
component:Message
}
]
}
]
})

跳转(要写完整路径)

1
<router-link class="list-group-item" active-class="active" to="/home/news"  >News</router-link>

路由传参

query传参

1
2
3
4
5
6
7
8
9
10
11
12
13
14
15
<li v-for="m in messageList" :key="m.id">
<!--跳转路由并携带query参数,to的字符串写法(不建议)-->
<router-link :to="`/home/message/Detail?id=${m.id}&title=${m.title}`">{{m.title}}</router-link>

<!--跳转路由并携带query参数,to的对象写法-->
<router-link :to="{
path:'/home/message/Detail',
query:{
id:m.id,
title:m.title
}
}">
{{m.title}}
</router-link>
</li>

接收参数

1
2
$route.query.id
$route.query.title

命名路由

1
2
3
4
5
6
7
8
9
10
11
12
13
14
15
16
17
18
19
20
21
22
// 创建一个路由器
export default new VueRouter({
routes:[
{
path:'/home',
component:Home,
children:[
{
path:'message',
component:Message,
children:[
{
name:'xiangqing', // 给路由命名
path:'detail',
component:Detail
}
]
}
]
}
]
})

使用命名的路由,to一定要换为 :to,使用name:'xiangqing'即可设置跳转

1
2
3
4
5
6
7
8
9
<router-link 
:to="{
name:'xiangqing', <!--使用这个name进行跳转-->
query:{
id:m.id,
title:m.title
}
}">
</router-link>

params传参

配置路由,声明接受params参数

1
2
3
4
5
6
7
8
9
10
11
12
13
14
15
16
17
18
19
path:'/home',
component:Home,
children:[
{
path:'news',
component:News
},
{
path:'message',
component:Message,
children:[
{
name:'xiangqing',
path:'detail/:id/:title', //使用占位符声明接受params参数
component:Detail
}
]
}
]

传递参数

1
2
3
4
5
6
7
8
9
10
11
<!--跳转路由并携带params参数,to的字符串写法-->
<!--<router-link :to="`/home/message/Detail/${m.id}/${m.title}`">{{m.title}}</router-link>&nbsp;&nbsp;-->

<!--跳转路由并携带params参数,to的对象写法-->
<router-link :to="{
name:'xiangqing',
params:{
id:m.id,
title:m.title
}
}">

接收参数

1
$route.params.id

注意:路由又params传递参数时,若使用to的对象写法,则不能使用path配置项,必须使用name配置

路由的props配置

作用:让路由组件更加方便的收集参数

1
2
3
4
5
6
7
8
9
10
11
12
13
14
15
16
17
18
19
20
21
22
23
24
25
26
27
{
name: 'xiangqing',
path: 'detail',
component: Detail,
//props的第一种写法,值为对象,该对象中的所有key-value都会以props的形式传给Detail组件,一般不用
// props:{a:1,b:'hello'}

//props的第二种写法,值为布尔值,若布尔值为真,就会把该路由组件收到的所有params参数,以props的形式传给Detail组件
// props:true

//props的第三种写法,值为函数
props($route){
return {
id:$route.query.id,
title:$route.query.title
}
}

// 结构赋值
// props({query}){
// return {
// id: query.id,
// title : query.title
// }
}

}

编程式路由导航

作用:不借助 router-link实现路由的跳转,让路由跳转更加灵活

具体编码

1
2
3
4
5
6
7
8
9
10
11
12
13
14
15
16
17
18
19
// $outer的两个API
this.$router.push({
name:'xiangqing',
query:{
id:m.id,
title:m.title
}
})
this.$router.replace({
name:'xiangqing',
query:{
id:m.id,
title:m.title
}
})

this.$router.forward() // 前进
this.$router.back(); // 后退
this.$router.go(2); // 可前进可后退

缓存路由组件

作用:让不展示的路由组件保持挂在,不被销毁

具体编码:

1
2
3
4
5
6
7
8
9
<!--缓存使用的是组件名-->
<keep-alive include="News">
<router-view></router-view>
</keep-alive>

<!--缓存多个组件,使用数组-->
<keep-alive :include="['News','Message']">
<router-view></router-view>
</keep-alive>

路由的生命周期钩子

作用:路由组件所独有的两个钩子,用于捕获路由组件的激活状态

具体名字:

  1. activated路由组件被激活时触发
  2. deactivated路由组件失活时触发

路由守卫

作用:对路由进行权限控制

分类:全局守卫,独享守卫,组件内守卫

全局守卫

1
2
3
4
5
6
7
8
9
10
11
12
13
14
15
16
17
18
//全局前置路由守卫,每次路由切换之前被调用
// to 目标路由 from 来自哪个路由 , next 放行
router.beforeEach((to, from, next) => {
if(to.meta.isAuth){ // 判断是否需要鉴定权限
if(localStorage.getItem('school') === '嵩阳高中'){
next()
}else {
alert('无权限访问')
}
}else {
next()
}
})

//后置路由守卫 ,每次路由切换后被调用
router.afterEach((to, from) => {
document.title = to.meta.title || '硅谷系统'
})

独享守卫

1
2
3
4
5
6
7
8
9
10
11
12
13
14
15
16
17
children:[
{
path:'news',
component:News,
meta:{title:'新闻',isAuth:true},
beforeEnter:((to, from, next) => {
if(to.meta.isAuth){ // 判断是否需要鉴定权限
if(localStorage.getItem('school') === '嵩阳高中'){
next()
}else {
alert('无权限访问')
}
}else {
next()
}
})
},

组件内守卫

1
2
3
4
5
6
// 通过路由规则进入该组件时调用
beforeRouteEnter(to,from, next){
},
// 通过路由规则离开该组件时调用
beforeRouteLeave(to, from ,next){
}

路由器工作的两种方式

  1. hash模式
    1. 地址中永远带着 # 号,不美观
    2. 以后将地址通过第三方手机app分享,若app校验严格,则地址会被标记为不合法
    3. 兼容性好
  2. history模式
    1. 地址干净,美观
    2. 兼容性和hash模式相比略差
    3. 应用部署上线时需要后端人员的支持,解决刷新界面服务404的问题

Vue UI 组件库

移动端:

PC 端

注意:

按需引入 Element UI,babel.config.js应该如下所示,官网上有所不对

1
2
3
4
5
6
7
8
9
10
11
12
13
14
15
16
module.exports = {
presets: [
'@vue/cli-plugin-babel/preset',
["@babel/preset-env", { "modules": false }]
],
"plugins": [
[
"component",
{
"libraryName": "element-ui",
"styleLibraryName": "theme-chalk"
}
]
]
}

Vue3

Vue3快速上手

1.Vue3简介

2.Vue3带来了什么

1.性能的提升

  • 打包大小减少41%

  • 初次渲染快55%, 更新渲染快133%

  • 内存减少54%

    ……

2.源码的升级

  • 使用Proxy代替defineProperty实现响应式

  • 重写虚拟DOM的实现和Tree-Shaking

    ……

3.拥抱TypeScript

  • Vue3可以更好的支持TypeScript

4.新的特性

  1. Composition API(组合API)

    • setup配置
    • ref与reactive
    • watch与watchEffect
    • provide与inject
    • ……
  2. 新的内置组件

    • Fragment
    • Teleport
    • Suspense
  3. 其他改变

    • 新的生命周期钩子
    • data 选项应始终被声明为一个函数
    • 移除keyCode支持作为 v-on 的修饰符
    • ……

一、创建Vue3.0工程

1.使用 vue-cli 创建

官方文档:https://cli.vuejs.org/zh/guide/creating-a-project.html#vue-create

1
2
3
4
5
6
7
8
9
## 查看@vue/cli版本,确保@vue/cli版本在4.5.0以上
vue --version
## 安装或者升级你的@vue/cli
npm install -g @vue/cli
## 创建
vue create vue_test
## 启动
cd vue_test
npm run serve

2.使用 vite 创建

官方文档:https://v3.cn.vuejs.org/guide/installation.html#vite

vite官网:https://vitejs.cn

  • 什么是vite?—— 新一代前端构建工具。
  • 优势如下:
    • 开发环境中,无需打包操作,可快速的冷启动。
    • 轻量快速的热重载(HMR)。
    • 真正的按需编译,不再等待整个应用编译完成。
  • 传统构建 与 vite构建对比图
1
2
3
4
5
6
7
8
## 创建工程
npm init vite-app <project-name>
## 进入工程目录
cd <project-name>
## 安装依赖
npm install
## 运行
npm run dev

二、常用 Composition API

官方文档: https://v3.cn.vuejs.org/guide/composition-api-introduction.html

1.拉开序幕的setup

  1. 理解:Vue3.0中一个新的配置项,值为一个函数。
  2. setup是所有Composition API(组合API)“ 表演的舞台 ”
  3. 组件中所用到的:数据、方法等等,均要配置在setup中。
  4. setup函数的两种返回值:
    1. 若返回一个对象,则对象中的属性、方法, 在模板中均可以直接使用。(重点关注!)
    2. 若返回一个渲染函数:则可以自定义渲染内容。(了解)
  5. 注意点:
    1. 尽量不要与Vue2.x配置混用
      • Vue2.x配置(data、methos、computed…)中可以访问到setup中的属性、方法。
      • 但在setup中不能访问到Vue2.x配置(data、methos、computed…)。
      • 如果有重名, setup优先。
    2. setup不能是一个async函数,因为返回值不再是return的对象, 而是promise, 模板看不到return对象中的属性。(后期也可以返回一个Promise实例,但需要Suspense和异步组件的配合)

2.ref函数

  • 作用: 定义一个响应式的数据
  • 语法: const xxx = ref(initValue)
    • 创建一个包含响应式数据的引用对象(reference对象,简称ref对象)
    • JS中操作数据: xxx.value
    • 模板中读取数据: 不需要.value,直接:<div>{{xxx}}</div>
  • 备注:
    • 接收的数据可以是:基本类型、也可以是对象类型。
    • 基本类型的数据:响应式依然是靠Object.defineProperty()getset完成的。
    • 对象类型的数据:内部 “ 求助 ” 了Vue3.0中的一个新函数—— reactive函数。

3.reactive函数

  • 作用: 定义一个对象类型的响应式数据(基本类型不要用它,要用ref函数)
  • 语法:const 代理对象= reactive(源对象)接收一个对象(或数组),返回一个代理对象(Proxy的实例对象,简称proxy对象)
  • reactive定义的响应式数据是“深层次的”。
  • 内部基于 ES6 的 Proxy 实现,通过代理对象操作源对象内部数据进行操作。

4.Vue3.0中的响应式原理

vue2.x的响应式

  • 实现原理:

    • 对象类型:通过Object.defineProperty()对属性的读取、修改进行拦截(数据劫持)。

    • 数组类型:通过重写更新数组的一系列方法来实现拦截。(对数组的变更方法进行了包裹)。

      1
      2
      3
      4
      Object.defineProperty(data, 'count', {
      get () {},
      set () {}
      })
  • 存在问题:

    • 新增属性、删除属性, 界面不会更新。
    • 直接通过下标修改数组, 界面不会自动更新。

Vue3.0的响应式

5.reactive对比ref

  • 从定义数据角度对比:
    • ref用来定义:基本类型数据
    • reactive用来定义:对象(或数组)类型数据
    • 备注:ref也可以用来定义对象(或数组)类型数据, 它内部会自动通过reactive转为代理对象
  • 从原理角度对比:
    • ref通过Object.defineProperty()getset来实现响应式(数据劫持)。
    • reactive通过使用Proxy来实现响应式(数据劫持), 并通过Reflect操作源对象内部的数据。
  • 从使用角度对比:
    • ref定义的数据:操作数据需要.value,读取数据时模板中直接读取不需要.value
    • reactive定义的数据:操作数据与读取数据:均不需要.value

6.setup的两个注意点

  • setup执行的时机

    • 在beforeCreate之前执行一次,this是undefined。
  • setup的参数

    • props:值为对象,包含:组件外部传递过来,且组件内部声明接收了的属性。
    • context:上下文对象
      • attrs: 值为对象,包含:组件外部传递过来,但没有在props配置中声明的属性, 相当于 this.$attrs
      • slots: 收到的插槽内容, 相当于 this.$slots
      • emit: 分发自定义事件的函数, 相当于 this.$emit

7.计算属性与监视

1.computed函数

  • 与Vue2.x中computed配置功能一致

  • 写法

    1
    2
    3
    4
    5
    6
    7
    8
    9
    10
    11
    12
    13
    14
    15
    16
    17
    18
    19
    20
    import {computed} from 'vue'

    setup(){
    ...
    //计算属性——简写
    let fullName = computed(()=>{
    return person.firstName + '-' + person.lastName
    })
    //计算属性——完整
    let fullName = computed({
    get(){
    return person.firstName + '-' + person.lastName
    },
    set(value){
    const nameArr = value.split('-')
    person.firstName = nameArr[0]
    person.lastName = nameArr[1]
    }
    })
    }

2.watch函数

  • 与Vue2.x中watch配置功能一致

  • 两个小“坑”:

    • 监视reactive定义的响应式数据时:oldValue无法正确获取、强制开启了深度监视(deep配置失效)。
    • 监视reactive定义的响应式数据中某个属性时:deep配置有效。
    1
    2
    3
    4
    5
    6
    7
    8
    9
    10
    11
    12
    13
    14
    15
    16
    17
    18
    19
    20
    21
    22
    23
    24
    25
    26
    27
    28
    29
    30
    31
    32
    //情况一:监视ref定义的响应式数据
    watch(sum,(newValue,oldValue)=>{
    console.log('sum变化了',newValue,oldValue)
    },{immediate:true})

    //情况二:监视多个ref定义的响应式数据
    watch([sum,msg],(newValue,oldValue)=>{
    console.log('sum或msg变化了',newValue,oldValue)
    })

    /* 情况三:监视reactive定义的响应式数据
    若watch监视的是reactive定义的响应式数据,则无法正确获得oldValue!!
    若watch监视的是reactive定义的响应式数据,则强制开启了深度监视
    */
    watch(person,(newValue,oldValue)=>{
    console.log('person变化了',newValue,oldValue)
    },{immediate:true,deep:false}) //此处的deep配置不再奏效

    //情况四:监视reactive定义的响应式数据中的某个属性
    watch(()=>person.job,(newValue,oldValue)=>{
    console.log('person的job变化了',newValue,oldValue)
    },{immediate:true,deep:true})

    //情况五:监视reactive定义的响应式数据中的某些属性
    watch([()=>person.job,()=>person.name],(newValue,oldValue)=>{
    console.log('person的job变化了',newValue,oldValue)
    },{immediate:true,deep:true})

    //特殊情况
    watch(()=>person.job,(newValue,oldValue)=>{
    console.log('person的job变化了',newValue,oldValue)
    },{deep:true}) //此处由于监视的是reactive素定义的对象中的某个属性,所以deep配置有效

3.watchEffect函数

  • watch的套路是:既要指明监视的属性,也要指明监视的回调。

  • watchEffect的套路是:不用指明监视哪个属性,监视的回调中用到哪个属性,那就监视哪个属性。

  • watchEffect有点像computed:

    • 但computed注重的计算出来的值(回调函数的返回值),所以必须要写返回值。
    • 而watchEffect更注重的是过程(回调函数的函数体),所以不用写返回值。
    1
    2
    3
    4
    5
    6
    //watchEffect所指定的回调中用到的数据只要发生变化,则直接重新执行回调。
    watchEffect(()=>{
    const x1 = sum.value
    const x2 = person.age
    console.log('watchEffect配置的回调执行了')
    })

8.生命周期
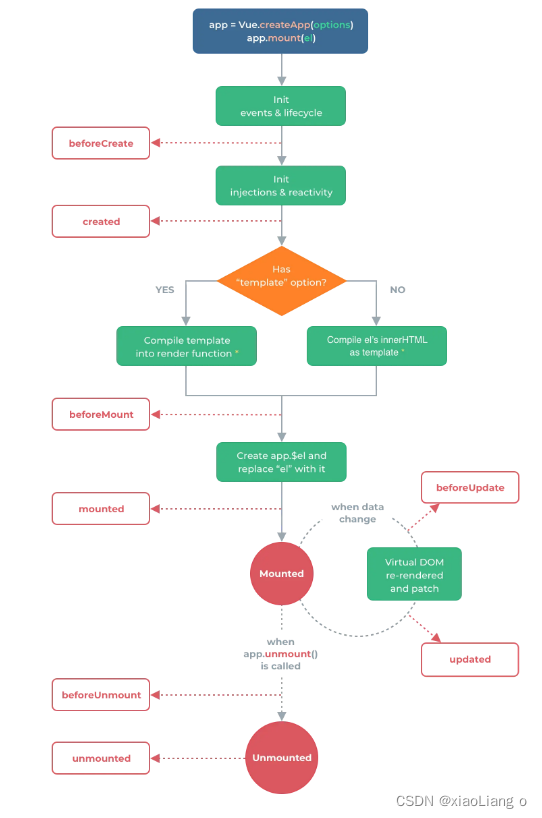
生命周期

img

1

  • Vue3.0中可以继续使用Vue2.x中的生命周期钩子,但有有两个被更名:
    • beforeDestroy改名为 beforeUnmount
    • destroyed改名为 unmounted
  • Vue3.0也提供了 Composition API 形式的生命周期钩子,与Vue2.x中钩子对应关系如下:
    • beforeCreate===>setup()
    • created=======>setup()
    • beforeMount ===>onBeforeMount
    • mounted=======>onMounted
    • beforeUpdate===>onBeforeUpdate
    • updated =======>onUpdated
    • beforeUnmount ==>onBeforeUnmount
    • unmounted =====>onUnmounted

9.自定义hook函数

  • 什么是hook?—— 本质是一个函数,把setup函数中使用的Composition API进行了封装。

  • 类似于vue2.x中的mixin。

  • 自定义hook的优势: 复用代码, 让setup中的逻辑更清楚易懂。

10.toRef

  • 作用:创建一个 ref 对象,其value值指向另一个对象中的某个属性。

  • 语法:const name = toRef(person,'name')

  • 应用: 要将响应式对象中的某个属性单独提供给外部使用时。

  • 扩展:toRefstoRef功能一致,但可以批量创建多个 ref 对象,语法:toRefs(person)

三、其它 Composition API

1.shallowReactive 与 shallowRef

  • shallowReactive:只处理对象最外层属性的响应式(浅响应式)。

  • shallowRef:只处理基本数据类型的响应式, 不进行对象的响应式处理。

  • 什么时候使用?

    • 如果有一个对象数据,结构比较深, 但变化时只是外层属性变化 ===> shallowReactive。
    • 如果有一个对象数据,后续功能不会修改该对象中的属性,而是生新的对象来替换 ===> shallowRef。

2.readonly 与 shallowReadonly

  • readonly: 让一个响应式数据变为只读的(深只读)。
  • shallowReadonly:让一个响应式数据变为只读的(浅只读)。
  • 应用场景: 不希望数据被修改时。

3.toRaw 与 markRaw

  • toRaw:
    • 作用:将一个由reactive生成的响应式对象转为普通对象
    • 使用场景:用于读取响应式对象对应的普通对象,对这个普通对象的所有操作,不会引起页面更新。
  • markRaw:
    • 作用:标记一个对象,使其永远不会再成为响应式对象。
    • 应用场景:
      1. 有些值不应被设置为响应式的,例如复杂的第三方类库等。
      2. 当渲染具有不可变数据源的大列表时,跳过响应式转换可以提高性能。

4.customRef

  • 作用:创建一个自定义的 ref,并对其依赖项跟踪和更新触发进行显式控制。

  • 实现防抖效果:

    1
    2
    3
    4
    5
    6
    7
    8
    9
    10
    11
    12
    13
    14
    15
    16
    17
    18
    19
    20
    21
    22
    23
    24
    25
    26
    27
    28
    29
    30
    31
    32
    33
    34
    35
    36
    37
    38
    <template>
    <input type="text" v-model="keyword">
    <h3>{{keyword}}</h3>
    </template>

    <script>
    import {ref,customRef} from 'vue'
    export default {
    name:'Demo',
    setup(){
    // let keyword = ref('hello') //使用Vue准备好的内置ref
    //自定义一个myRef
    function myRef(value,delay){
    let timer
    //通过customRef去实现自定义
    return customRef((track,trigger)=>{
    return{
    get(){
    track() //告诉Vue这个value值是需要被“追踪”的
    return value
    },
    set(newValue){
    clearTimeout(timer)
    timer = setTimeout(()=>{
    value = newValue
    trigger() //告诉Vue去更新界面
    },delay)
    }
    }
    })
    }
    let keyword = myRef('hello',500) //使用程序员自定义的ref
    return {
    keyword
    }
    }
    }
    </script>

5.provide 与 inject

  • 作用:实现祖与后代组件间通信

  • 套路:父组件有一个 provide 选项来提供数据,后代组件有一个 inject 选项来开始使用这些数据

  • 具体写法:

    1. 祖组件中:

      1
      2
      3
      4
      5
      6
      setup(){
      ......
      let car = reactive({name:'奔驰',price:'40万'})
      provide('car',car)
      ......
      }
    2. 后代组件中:

      1
      2
      3
      4
      5
      6
      setup(props,context){
      ......
      const car = inject('car')
      return {car}
      ......
      }

6.响应式数据的判断

  • isRef: 检查一个值是否为一个 ref 对象
  • isReactive: 检查一个对象是否是由 reactive 创建的响应式代理
  • isReadonly: 检查一个对象是否是由 readonly 创建的只读代理
  • isProxy: 检查一个对象是否是由 reactive 或者 readonly 方法创建的代理

四、Composition API 的优势

1.Options API 存在的问题

使用传统OptionsAPI中,新增或者修改一个需求,就需要分别在data,methods,computed里修改 。


2.Composition API 的优势

我们可以更加优雅的组织我们的代码,函数。让相关功能的代码更加有序的组织在一起。


五、新的组件

1.Fragment

  • 在Vue2中: 组件必须有一个根标签
  • 在Vue3中: 组件可以没有根标签, 内部会将多个标签包含在一个Fragment虚拟元素中
  • 好处: 减少标签层级, 减小内存占用

2.Teleport

  • 什么是Teleport?—— Teleport 是一种能够将我们的组件html结构移动到指定位置的技术。

    1
    2
    3
    4
    5
    6
    7
    8
    <teleport to="移动位置">
    <div v-if="isShow" class="mask">
    <div class="dialog">
    <h3>我是一个弹窗</h3>
    <button @click="isShow = false">关闭弹窗</button>
    </div>
    </div>
    </teleport>

3.Suspense

  • 等待异步组件时渲染一些额外内容,让应用有更好的用户体验

  • 使用步骤:

    • 异步引入组件

      1
      2
      import {defineAsyncComponent} from 'vue'
      const Child = defineAsyncComponent(()=>import('./components/Child.vue'))
    • 使用Suspense包裹组件,并配置好defaultfallback

      1
      2
      3
      4
      5
      6
      7
      8
      9
      10
      11
      12
      13
      <template>
      <div class="app">
      <h3>我是App组件</h3>
      <Suspense>
      <template v-slot:default>
      <Child/>
      </template>
      <template v-slot:fallback>
      <h3>加载中.....</h3>
      </template>
      </Suspense>
      </div>
      </template>

六、其他

1.全局API的转移

  • Vue 2.x 有许多全局 API 和配置。

    • 例如:注册全局组件、注册全局指令等。

      1
      2
      3
      4
      5
      6
      7
      8
      9
      10
      11
      12
      //注册全局组件
      Vue.component('MyButton', {
      data: () => ({
      count: 0
      }),
      template: '<button @click="count++">Clicked {{ count }} times.</button>'
      })

      //注册全局指令
      Vue.directive('focus', {
      inserted: el => el.focus()
      }
  • Vue3.0中对这些API做出了调整:

    • 将全局的API,即:Vue.xxx调整到应用实例(app)上

      2.x 全局 API(Vue 3.x 实例 API (app)
      Vue.config.xxxx app.config.xxxx
      Vue.config.productionTip 移除
      Vue.component app.component
      Vue.directive app.directive
      Vue.mixin app.mixin
      Vue.use app.use
      Vue.prototype app.config.globalProperties

2.其他改变

  • data选项应始终被声明为一个函数。

  • 过度类名的更改:

    • Vue2.x写法

      1
      2
      3
      4
      5
      6
      7
      8
      .v-enter,
      .v-leave-to {
      opacity: 0;
      }
      .v-leave,
      .v-enter-to {
      opacity: 1;
      }
    • Vue3.x写法

      1
      2
      3
      4
      5
      6
      7
      8
      9
      .v-enter-from,
      .v-leave-to {
      opacity: 0;
      }

      .v-leave-from,
      .v-enter-to {
      opacity: 1;
      }
  • 移除keyCode作为 v-on 的修饰符,同时也不再支持config.keyCodes

  • 移除v-on.native修饰符

    • 父组件中绑定事件

      1
      2
      3
      4
      <my-component
      v-on:close="handleComponentEvent"
      v-on:click="handleNativeClickEvent"
      />
    • 子组件中声明自定义事件

      1
      2
      3
      4
      5
      <script>
      export default {
      emits: ['close']
      }
      </script>
  • 移除过滤器(filter)

    过滤器虽然这看起来很方便,但它需要一个自定义语法,打破大括号内表达式是 “只是 JavaScript” 的假设,这不仅有学习成本,而且有实现成本!建议用方法调用或计算属性去替换过滤器。

  • ……