springboot application.properties中文乱码
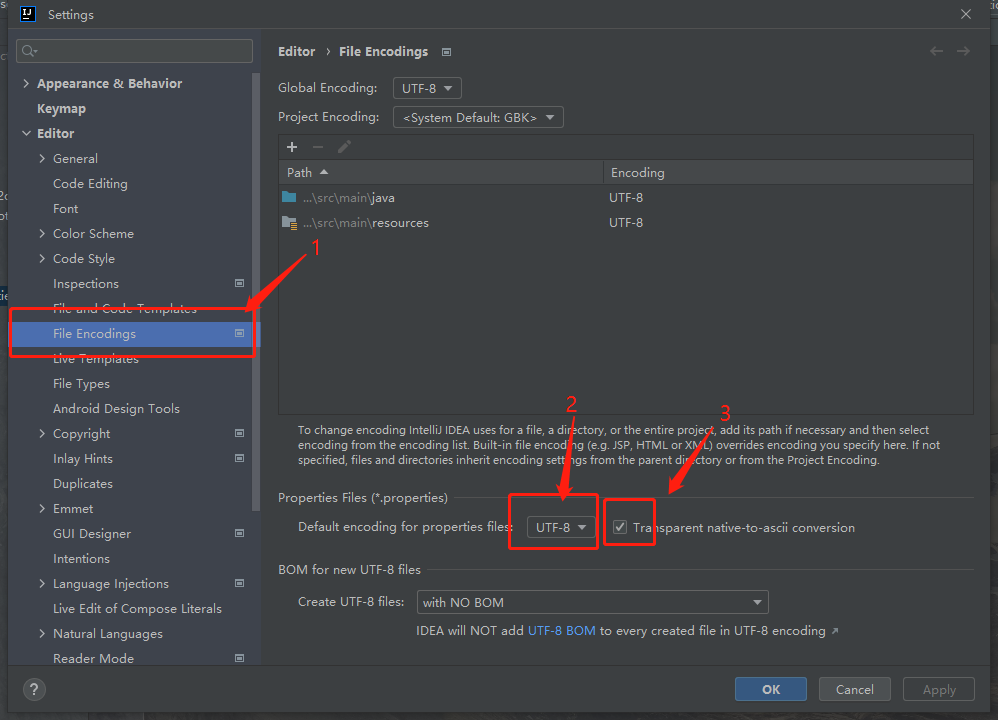
使用idea新建一个项目application.properties中文注释出现乱码
解决办法 :打开setting –> Editor –> File Encodings
上面的全局encoding也要改为utf-8
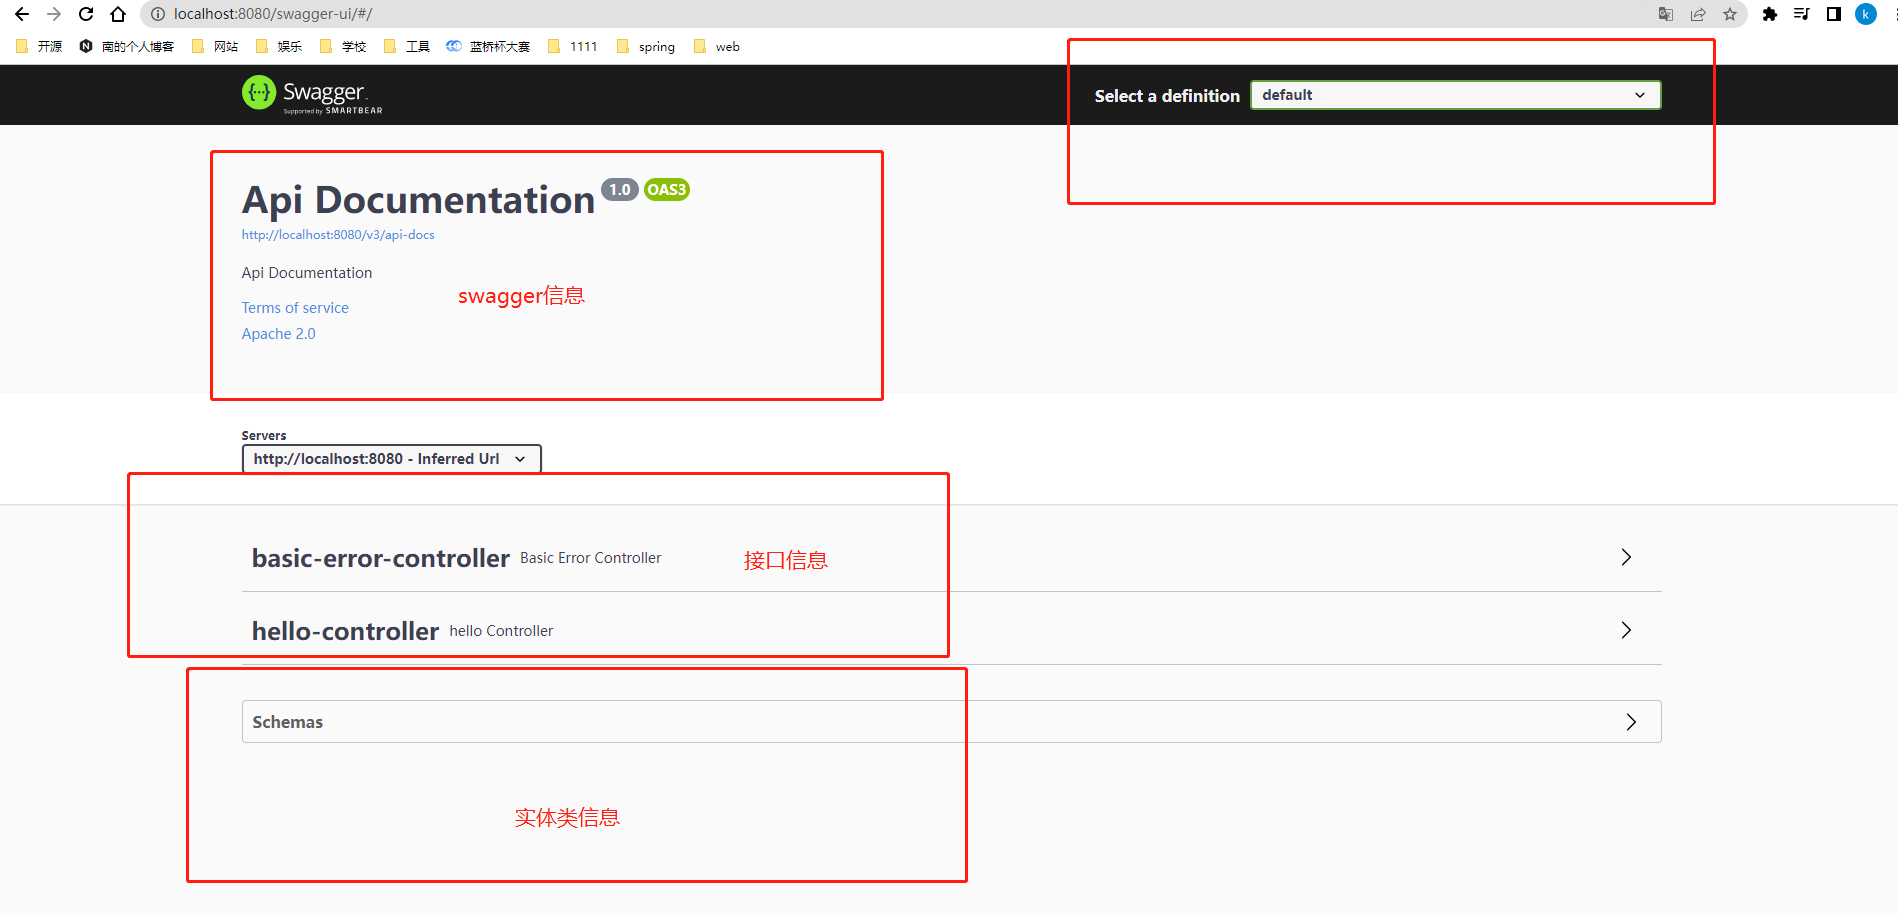
配置完swagger无法访问 原因:狂神使用的是 2.9.2的版本,最新版3.0不支持之前的url地址
3.0需要的依赖
1 2 3 4 5 6 7 8 9 10 11 12 13 14 15 16 17 <dependency > <groupId > io.springfox</groupId > <artifactId > springfox-swagger2</artifactId > <version > 3.0.0</version > </dependency > <dependency > <groupId > io.springfox</groupId > <artifactId > springfox-swagger-ui</artifactId > <version > 3.0.0</version > </dependency > <dependency > <groupId > io.springfox</groupId > <artifactId > springfox-boot-starter</artifactId > <version > 3.0.0</version > </dependency >
访问的地址变为:
http://localhost:8080/swagger-ui/或者
http://localhost:8080/swagger-ui/index.html
Redis-server闪退 解决方法:
1-win+R 打开命令行
2-cd至redis目录,例如D:\redis>
3-输入
redis-server.exe redis.windows.conf
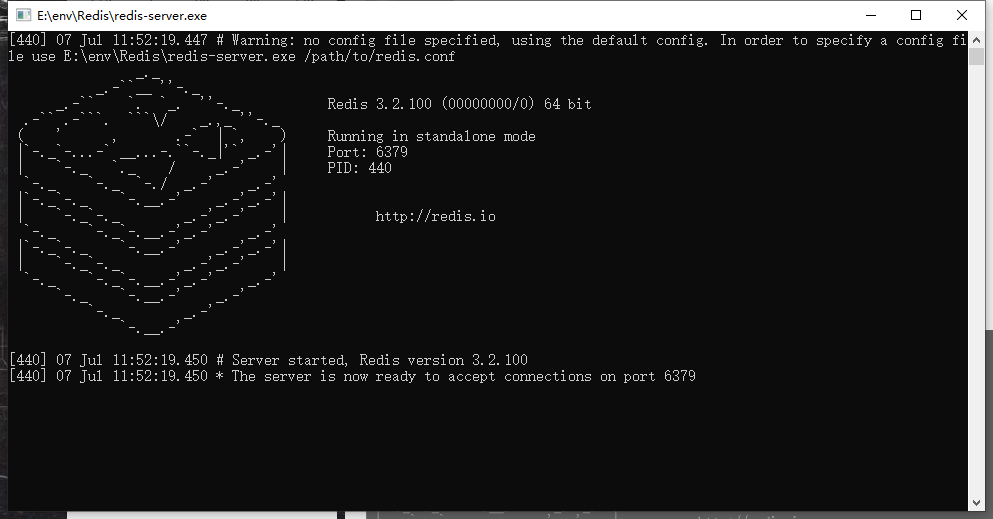
观察是否如图1:至此,已成功;否则,继续进行如下操作:
4-若启动redis出现
[]
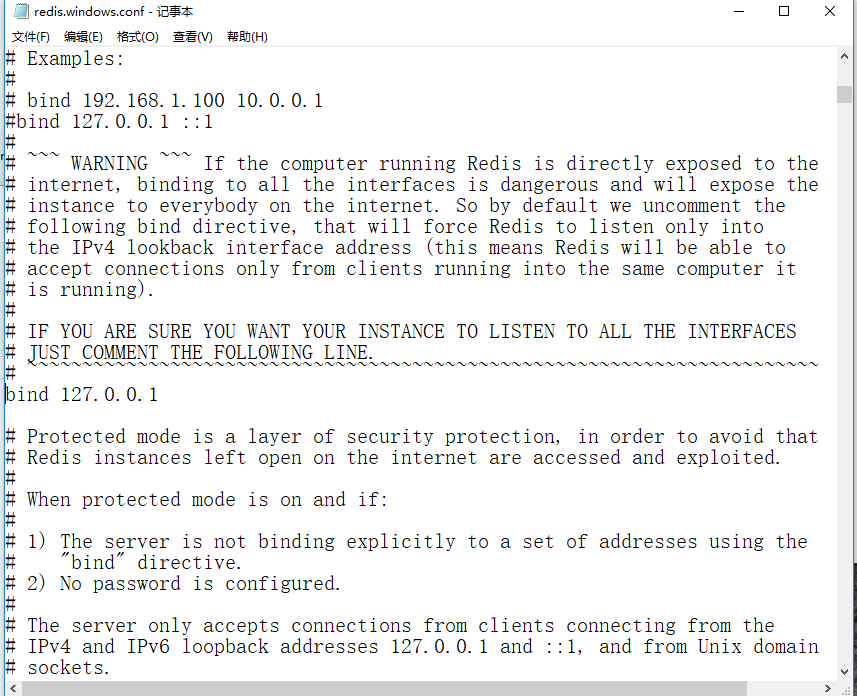
更改redis文件夹中的 redis.windows.conf
#bind 127.0.0.1 去掉#
重新执行命令行
D:\redis>redis-server.exe redis.windows.conf
若仍报以下错误:
Creating Server TCP listening socket 127.0.0.1:6379: bind: No error
按顺序输入如下命令就可以连接成功
redis-cli.exe shutdown exit redis-server.exe redis.windows.conf
zookeeper 下载地址: https://archive.apache.org/dist/zookeeper/
如果下载高版本,bin.tar.gz 是编译过的版本,未编译过的的版本不能使用。低版本下载 tar.gz 即可
第一次运行zkServer.cmd可能会出现闪退问题
解决办法:将conf下的zoo_sample.cfg复制一份改名为zoo.cfg即可。
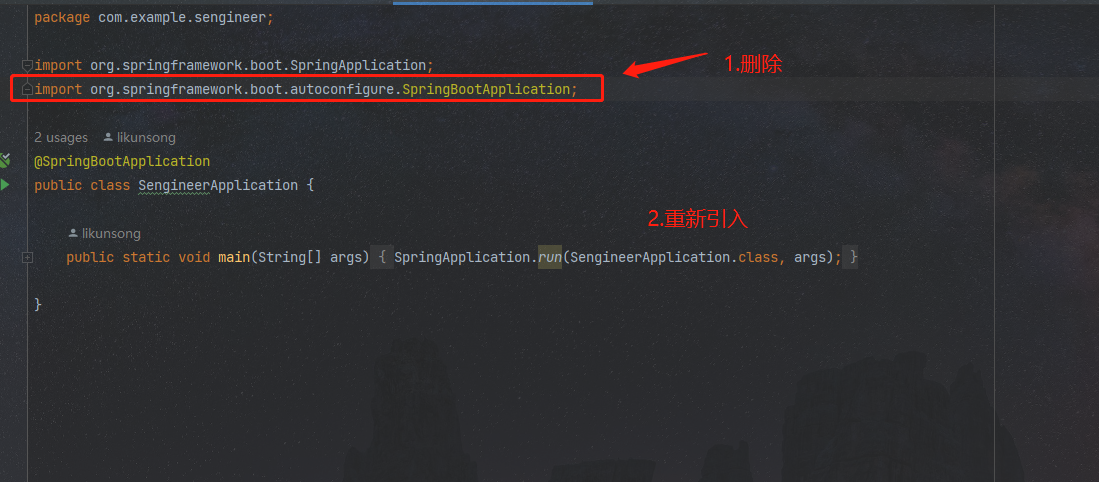
运行springboot项目时,运行类上有红色叉号
解决办法:
删除启动类上的 @SpringBootpplication引入的包,然后重新引入即可;
nested exception is org.apache.ibatis.binding.BindingException: Parameter ‘XXX’ not found
问题原因:在Mapper接口声明中有多个参数,但是没有使用 @Param注解
解决办法:加上 @Param 注解
@AutoWired无法装配1 2 @Autowired private static StudentMapper studentMapper;
今天使用@Autowired 自动装配Mapper,但是传入参数报空指针错误,后来发现不小心将实例字段设置为静态字段(static)。
下面是原因:
静态字段问题:@Autowired注解通常用于实例字段的注入,而不是静态字段。由于静态字段是类级别的,它们与实例化的Bean无关。如果你需要在静态上下文中注入依赖项,可以考虑使用@Autowired注解的替代方案,例如在静态方法中手动进行依赖注入。
解决办法: 删除static
@Component作用及使用 @Component的作用是把普通POJO实例化到Spring容器中,相当于配置文件中的,@Component 是一个泛化的概念,仅仅表示一个组件 (Bean) ,可以作用在任何层次。基于@Component注解有三个扩展,分别是:@Repository 、@Service、 @Controller。被他们四个标注的类,会被纳入到Spring容器中进行管理
使用直接使用 @Autowired对@Component注解的类进行装配即可。
Maven 从外部导入jar包到pom中 1 2 3 4 mvn install:install-file -Dfile=jar包的位置 -DgroupId=上面的groupId -DartifactId=上面的artifactId -Dversion=上面的version -Dpackaging=jar 例如 mvn install:install-file -Dfile=E:\project\本科生\jar包\json-lib-2 -DgroupId=net.net.sf.json-lib -DartifactId=json-lib -Dversion=2.4 -Dpackaging=jar
maven会自动帮你打包
NPM
在进行npm下载东西的时候,会出现run npm fund for details
解决办法:
在下载的时候添加后缀即可 --no-fund
Vue 启动项目报错
Error: error:0308010C:digital envelope routines::unsupported
问题原因:
node v17版本以后,使用了新的OpenSSL3.0,OpenSSL3.0对允许算法和密钥大小增加了严格的限制,可能会对生态系统造成一些影响。故此以前的项目在升级 nodejs 版本后会报错。
解决办法:
修改package.json,在相关构建命令之前加入set NODE_OPTIONS=–openssl-legacy-provider
1 2 3 4 "scripts" : { "serve" : "SET NODE_OPTIONS=--openssl-legacy-provider && vue-cli-service serve" , "build" : "SET NODE_OPTIONS=--openssl-legacy-provider && vue-cli-service build" } ,
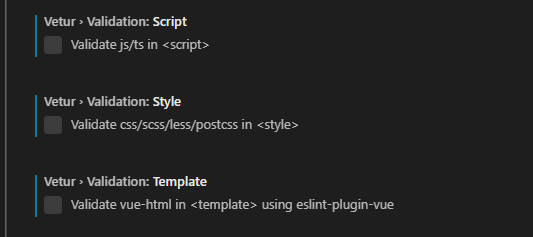
使用vscode插件vetur创建vue文件报错
Cannot find name 'script',Cannot find name 'style' 检测语法script 解决办法
首选项 –> 设置 –> 搜索(vetur)
全部取消勾选即可
注意:使用vue的时候尽量使用驼峰命名
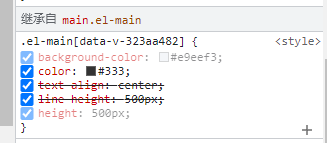
element ui 组件默认居中的问题
使用组件下拉菜单和选择框会出现默认居中的问题,导致不能正确的摆放位置
原因: 默认继承了el-main 的居中和行高,导致出现问题
解决办法 :在css中限定即可
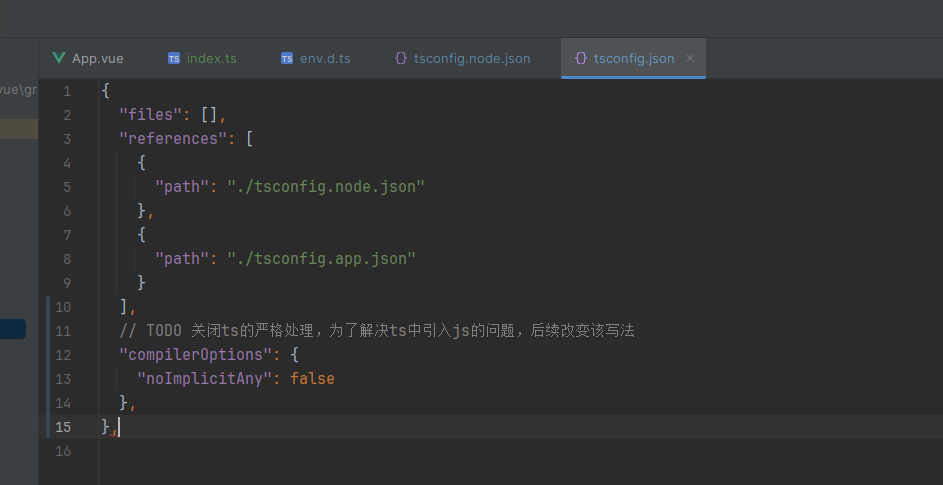
vue3中ts引入js无法正常引入的问题 原因:ts中严格的类型限制,直接引入js会出现 implicitly has an ‘any’ type隐式any类型
解决办法(目前,最好应该引入的js重写为ts文件)在tsconfig.json中加入以下代码:
1 2 3 "compilerOptions" : { "noImplicitAny" : false } ,
根据时间演变的数据可视化
实现代码:
1 2 3 4 5 6 7 8 9 10 11 12 13 14 15 16 17 18 19 20 21 22 23 24 25 26 27 28 29 30 31 32 33 34 35 36 37 38 39 40 41 42 43 44 45 46 47 48 49 50 51 52 53 54 55 56 57 58 59 60 61 62 63 64 65 66 67 68 69 70 71 72 73 74 75 76 77 78 79 80 81 82 83 84 85 86 87 88 89 90 91 92 93 94 95 96 97 98 99 100 101 102 103 104 105 106 107 108 109 110 111 112 113 114 115 116 117 118 119 120 121 122 123 124 125 126 127 128 129 130 131 132 133 134 135 136 137 138 139 140 141 142 143 144 145 146 147 148 149 150 151 152 153 154 155 156 157 158 159 160 161 162 163 164 165 166 167 168 169 170 171 172 173 174 175 176 177 178 179 180 181 182 183 184 185 186 187 188 189 190 191 192 193 194 195 196 197 198 199 200 201 202 203 204 205 206 207 208 209 210 211 212 213 214 215 216 217 218 219 220 221 222 223 224 225 226 227 228 229 230 231 232 233 234 235 236 237 238 239 240 241 242 243 244 245 246 247 248 249 250 251 252 253 254 255 256 257 258 259 260 <template> <div class="fir"> <div class="table-container"> <table class="custom-table"> <!-- <thead>--> <!-- <tr>--> <!-- <th>Message</th>--> <!-- <th>操作</th>--> <!-- </tr>--> <!-- </thead>--> <transition-group name="list" tag="tbody"> <tr v-for="(row) in sortedTableData" :key="row.createdAt" :class="{ 'pinned': row.isPinned }" class="row" > <td :title="row.message" class="message-cell">{{ row.message }}</td> <td> <el-button style="width: 50px" v-if="!row.isPinned" link type="primary" size="small" @click="pinItem(row)"> 置顶 </el-button> <el-button style="width: 50px" v-else link type="primary" size="small" @click="unpinItem(row)" > 取消置顶 </el-button> </td> </tr> </transition-group> </table> </div> <el-button type="primary" @click="addNewRow" style = "margin-top: 20px;" > 模拟新增数据 </el-button> </div> </template> <script setup lang="ts"> import { ref } from 'vue' import { computed } from 'vue' interface Info { name: string message: string createdAt: number // 用于记录原始索引 isPinned?: boolean // 是否被置顶,即是否是重要事件置顶 pinTime?: number // 记录最后一次置顶的时间 } // 后续可以将数据存放在localStorage 中 const tableData = ref<Info[]>([ { name: 'Tom', message: '我是社会主义接班人我是社会主义接班人我是社会主义接班人我是社会主义接班人', createdAt: Date.now() - 4000, isPinned: false, }, { name: 'Tom', message: 'No. 189, Grove St, Los Angeles', createdAt: Date.now() - 3000, isPinned: false, }, { name: 'Tom', message: 'No. 189, Grove St, Los Angeles', createdAt: Date.now() - 2000, isPinned: false, }, { name: 'Tom', message: 'No. 189, Grove St, Los Angeles', createdAt: Date.now() - 1000, isPinned: false, }, ]) /** * 对表格数据排序,生成表中内容 * @description * 置顶在前,非置顶在后,置顶项中最新的排在最前 * 创建副本 data = [...tableData.value] * 筛选出置顶项和未置顶项,按 createdAt 升序排列未置顶项 * * 按 pinTime 降序排列置顶项(最新置顶排最前) return */ const sortedTableData = computed(() => { // const data = [...tableData.value] const pinned = data.filter(item => item.isPinned) const unpinned = data.filter(item => !item.isPinned).sort((a, b) => b.createdAt - a.createdAt) return [ ...pinned.sort((a, b) => (b.pinTime || 0) - (a.pinTime || 0)), ...unpinned ] }) /** * 置顶 模拟突发重要消息置顶变色 * @param row * @description * 使用展开运算符 { ...item } 创建该对象的一个副本。 * 将副本中的 isPinned 设置为 true,表示此行已被置顶。 * 添加或更新 pinTime 字段为当前时间戳(Date.now()),用于后续排序时判断谁是最新的置顶项。 * :item 对于不是目标行的数据,不做任何更改,原样返回 */ const pinItem = (row: Info) => { tableData.value = tableData.value.map(item => item.createdAt === row.createdAt ? { ...item, isPinned: true, pinTime: Date.now() } : item ) } /** * 取消置顶 * @param row * @description * 设置 isPinned = false,并清除 pinTime * 与置顶方法同理 */ const unpinItem = (row: Info) => { tableData.value = tableData.value.map(item => item.createdAt === row.createdAt ? { ...item, isPinned: false, pinTime: undefined } : item ) } /** * 新增行 == 模拟插入新数据的情况 * @description */ const addNewRow = () => { const newRow: Info = { name: '新增用户', message: '这是一条新增的数据', createdAt: Date.now(), isPinned: false } // 插入到数组开头 tableData.value.unshift(newRow) // 如果超过10条,删除 createdAt 最小的一条,即最早加入的那条数据 if (tableData.value.length > 10) { const minIndexItem = tableData.value.reduce((prev, current) => prev.createdAt < current.createdAt ? prev : current ) tableData.value = tableData.value.filter( item => item.createdAt !== minIndexItem.createdAt ) } } </script> <style scoped> .table-container { height: 400px; /* 固定为 10 行的高度 */ opacity: 0.9; border-radius: 4px; background-color: #26436e; color: #fff; } /* 入场动画 */ .slide-enter-active { animation: slide-in 0.5s ease; } @keyframes slide-in { from { transform: translateY(-30px); opacity: 0; } to { transform: translateY(0); opacity: 1; } } /* 移动动画:其他元素下滑 */ .slide-move { transition: transform 0.5s ease; } /* 为置顶行设置背景颜色 */ .pinned { background-color: #a94d4d; } .custom-table { width: 100%; border-collapse: collapse; } .custom-table th, .custom-table td { padding: 7px; border-bottom: 1px solid #274877; } .message-cell { white-space: nowrap; overflow: hidden; text-overflow: ellipsis; width: 300px; max-width: 300px; text-align: left; } /* 进入动画 */ .list-enter-active { animation: slide-in 0.4s ease; transition: opacity 0.4s ease; } /* 移动动画 */ .list-move { transition: transform 0.4s ease; } /* 离开动画 */ .list-leave-active { position: absolute; animation: fade-out 0.3s ease; transition: all 0.3s ease; } @keyframes slide-in { from { transform: translateY(-20px); opacity: 0; } to { transform: translateY(0); opacity: 1; } } @keyframes fade-out { to { opacity: 0; } } /* 保持高度一致 */ .row { height: 40px; } </style>
前端 设置html原生表格实现斑马纹效果 1 2 3 4 5 6 7 8 tr :not (.pinned ):not (.mostImp ):nth-child (even) { background-color : #3a5f8c ; } tr :not (.pinned ):not (.mostImp ):nth-child (odd) { background-color : #2b4d76 ; }
div 中 img 和 span 同时水平居中解决方法: 在 img 和 span 中同时加上 vertical-align : middle 即可
1 2 3 4 <div style ="height: 35px;" > <img src ="./images/xxx.png" alt ="" style ="vertical-align: middle;" > <span style =" vertical-align: middle;" > xxxx</span > </div >
div中img居中显示1 2 3 4 5 6 7 8 9 10 <div class ="r" > <img src ="./images/kongjian.png" alt ="" > </div > .r { display: flex; justify-content: center; align-items: center; }
网页一直出现蓝色背景解决
写前端代码的过程中,经常会出现点击a标签,外面包裹的span标签或者其他标签会出现蓝色的背景
解决办法: 对html和body进行设置
注意:不建议使用,如果直接这样设置全局,就会出现文章内容无法被选中复制,可能在某些条件下并不是很好的解决方案。
1 2 3 4 5 6 7 body ,html { -moz-user-select: none; -webkit-user-select: none; -ms-user-select: none; -khtml-user-select: none; user-select: none; }
p标签内容超过一行(多行)自动省略 单行省略 1 2 3 4 5 6 // 单行显示省略号 p { overflow : hidden; text-overflow :ellipsis; white-space : nowrap; }
多行省略 -webkit-line-clamp: 3; 表示超出3行显示省略号,以此类推
1 2 3 4 5 6 7 // 多行显示省略号,数字3 为超出3 行显示, p { display : -webkit-box; -webkit-box-orient: vertical; -webkit-line-clamp: 3 ; overflow : hidden; }
鼠标悬浮使颜色平滑变换 1 2 3 4 5 6 7 8 9 10 11 12 13 14 15 16 17 18 19 20 21 22 23 24 25 26 27 28 29 30 31 32 33 34 35 36 37 38 39 40 41 42 43 44 45 46 47 48 49 50 51 52 53 54 55 56 57 58 59 60 61 62 63 64 65 66 67 68 69 70 71 72 73 74 75 76 77 78 79 80 81 82 83 84 85 86 87 88 89 90 91 92 93 94 95 96 97 98 99 100 101 102 103 104 105 106 107 108 109 110 111 112 113 114 115 116 117 118 119 120 121 122 123 124 125 126 127 128 129 130 131 132 133 134 135 136 137 138 139 140 141 142 143 144 145 146 147 148 149 150 151 152 153 154 155 156 157 158 159 160 161 162 163 164 165 166 167 168 169 170 171 172 173 174 175 176 177 178 179 180 181 182 183 184 <!DOCTYPE html > <html lang ="en" > <head > <meta charset ="UTF-8" > <meta name ="viewport" content ="width=device-width, initial-scale=1.0" > <meta http-equiv ="X-UA-Compatible" content ="ie=edge" > <title > 鼠标滑过</title > <style > .ul { display : flex; margin-top : 50px ; margin-left : 100px ; } .lis { width : 100px ; height : 50px ; line-height : 50px ; text-align : center; cursor :pointer; color : #333333 ; border : 1px solid #eeeeee ; position : relative; transition : 0.6s linear; } .lis :hover { color : #ffffff ; } .lis :after { width : 0 ; cursor :pointer; position : absolute; content : "" ; top : 0 ; bottom : 0 ; left : 0 ; z-index : -1 ; background : #2a68cc ; transition : 0.6s linear; } .lis :hover :after { width : 100px ; } .ul2 { display : flex; margin-top : 50px ; margin-left : 100px ; } .lis2 { width : 100px ; height : 50px ; line-height : 50px ; text-align : center; cursor :pointer; color : #333333 ; border : 1px solid #eeeeee ; position : relative; transition : 0.6s linear; } .lis2 :hover { color : #ffffff ; } .lis2 :after { width : 100px ; cursor :pointer; position : absolute; content : "" ; top : 0 ; bottom : 100% ; right : 0 ; left :0 ; z-index : -1 ; background : orangered; transition : 0.6s linear; } .lis2 :hover :after { bottom : 0 ; } .ul3 { display : flex; margin-top : 50px ; margin-left : 100px ; } .lis3 { width : 100px ; height : 50px ; line-height : 50px ; text-align : center; cursor :pointer; color : #333333 ; border : 1px solid #eeeeee ; position : relative; transition : 0.6s linear; } .lis3 :hover { color : #ffffff ; } .lis3 :after { width : 100px ; cursor :pointer; position : absolute; content : "" ; top : 50% ; bottom : 50% ; right : 0 ; left : 0 ; z-index : -1 ; background : darkcyan; transition : 0.3s linear; } .lis3 :hover :after { top : 0 ; bottom : 0 ; } .ul4 { display : flex; margin-top : 50px ; margin-left : 100px ; } .lis4 { width : 100px ; height : 50px ; line-height : 50px ; text-align : center; cursor :pointer; color : #333333 ; border : 1px solid #eeeeee ; position : relative; transition : 0.6s linear; } .lis4 :hover { color : #ffffff ; } .lis4 :after { width : 100px ; cursor :pointer; position : absolute; content : "" ; top : 100% ; bottom : 0 ; right : 0 ; left : 0 ; z-index : -1 ; background : brown; transition : 0.3s linear; } .lis4 :hover :after { top : 0 ; bottom : 0 ; } </style > </head > <body > <div class ="ul" > <div class ="lis" > 左到右</div > <div class ="lis" > 左到右</div > <div class ="lis" > 左到右</div > <div class ="lis" > 左到右</div > <div class ="lis" > 左到右</div > </div > <div class ="ul2" > <div class ="lis2" > 上到下</div > <div class ="lis2" > 上到下</div > <div class ="lis2" > 上到下</div > <div class ="lis2" > 上到下</div > <div class ="lis2" > 上到下</div > </div > <div class ="ul3" > <div class ="lis3" > 上下</div > <div class ="lis3" > 上下</div > <div class ="lis3" > 上下</div > <div class ="lis3" > 上下</div > <div class ="lis3" > 上下</div > </div > <div class ="ul4" > <div class ="lis4" > 下到上</div > <div class ="lis4" > 下到上</div > <div class ="lis4" > 下到上</div > <div class ="lis4" > 下到上</div > <div class ="lis4" > 下到上</div > </div > </body > </html >
网站变黑白 1 2 3 4 5 6 7 8 9 10 <style > body { -webkit-filter : grayscale (100% ); -moz-filter : grayscale (100% ); -ms-filter : grayscale (100% ); -o-filter : grayscale (100% ); filter : grayscale (100% ); filter : gray; } </style >
固定html中img的比例
最近修改的一个项目,要求轮播图固定不同比例大小图片的比例
解决方案:在css文件中添加如下代码(限制 宽/高)
设置a标签中超过长度显示省略号 1 2 3 4 5 6 width : calc (80% - 80px ); // 动态计算宽度line-height : 30px ;overflow : hidden;display : -webkit-box;-webkit-line-clamp: 2 ; // 设置行数 -webkit-box-orient: vertical;
前后端对接 动态生成表格
需求:后端传数据,前端ajax接收之后进行数据的处理,动态生成所需要的表格
1 2 3 4 5 6 7 8 9 10 11 12 13 14 15 16 17 18 19 20 21 22 23 24 25 26 $.ajax ({ type : "post" , url : "http://localhost:8080/getScore" , data : {"year" :year,"semester" :time}, dataType : "json" , success : function (response ) { let con = '' ; $.each (response,function (index,obj ){ con += '<tr>' ; con += '<td>' + obj.course_id +'</td>' ; con += '<td>' + obj.course_name +'</td>' ; con += '<td>' + obj.teacher_name +'</td>' ; con += '<td>' + obj.credit +'</td>' ; con += '<td>' + obj.credit_hour +'</td>' ; con += '<td>' + obj.stu_num +'</td>' ; con += '<td>' + obj.session_time +'</td>' ; con += '<td>' + obj.classroom +'</td>' ; con += '</tr>' ; }) $("#mytable" ).html (con) console .log ("1111" ) console .log (response) }, });
生成表格的地方,注释掉的地方是之前的静态数据。
1 2 3 4 5 6 7 8 9 10 11 12 13 14 15 16 <tbody id ="mytable" > </tbody >
动态生成的表格实现正常的点击功能
需求:动态生成表格之后,要对表格内的某一个元素设置点击事件
需要先获取静态的元素,然后设置里面的点击事件,然后根据$(this)进行元素的查找,从而实现点击事件
1 2 3 4 5 6 7 $("#mytable" ).on ('click' ,"button[id='edit1']" ,function ( let uu = $(this ).parents ("tr" ).find ("#course_name" ).text (); let te1 = uu.split ('[' )[1 ].split (']' )[0 ]; te1 = Number (te1); console .log (te1) })
jq设计跳转 1 2 3 4 5 6 7 8 9 $("#mytable" ).on ('click' ,"button[id='btnn2']" ,function ( let text1 = $(this ).parents ("tr" ).find ("#stu_id" ).text (); text1 = Number (text1) console .log (text1) let url = "/toAdminCourseUpdate/" +text1; location.href = url })
Springboot和Vue使用axios进行数据对接 Vue加载axios 在全局使用axios(在main.js中进行配置) 1 2 3 4 5 import axios from 'axios' axios.defaults .baseURL = "http://localhost:8080/api" Vue .prototype $axios = axios
设置跨域
打开vue.config.js,进行跨域请求的配置
1 2 3 4 5 6 7 8 9 10 devServer :{ proxy : { '/api' : { target : 'http://localhost:8081' , pathRewrite :{'^/api' :'' }, ws : true , changeOrigin : true }, } }
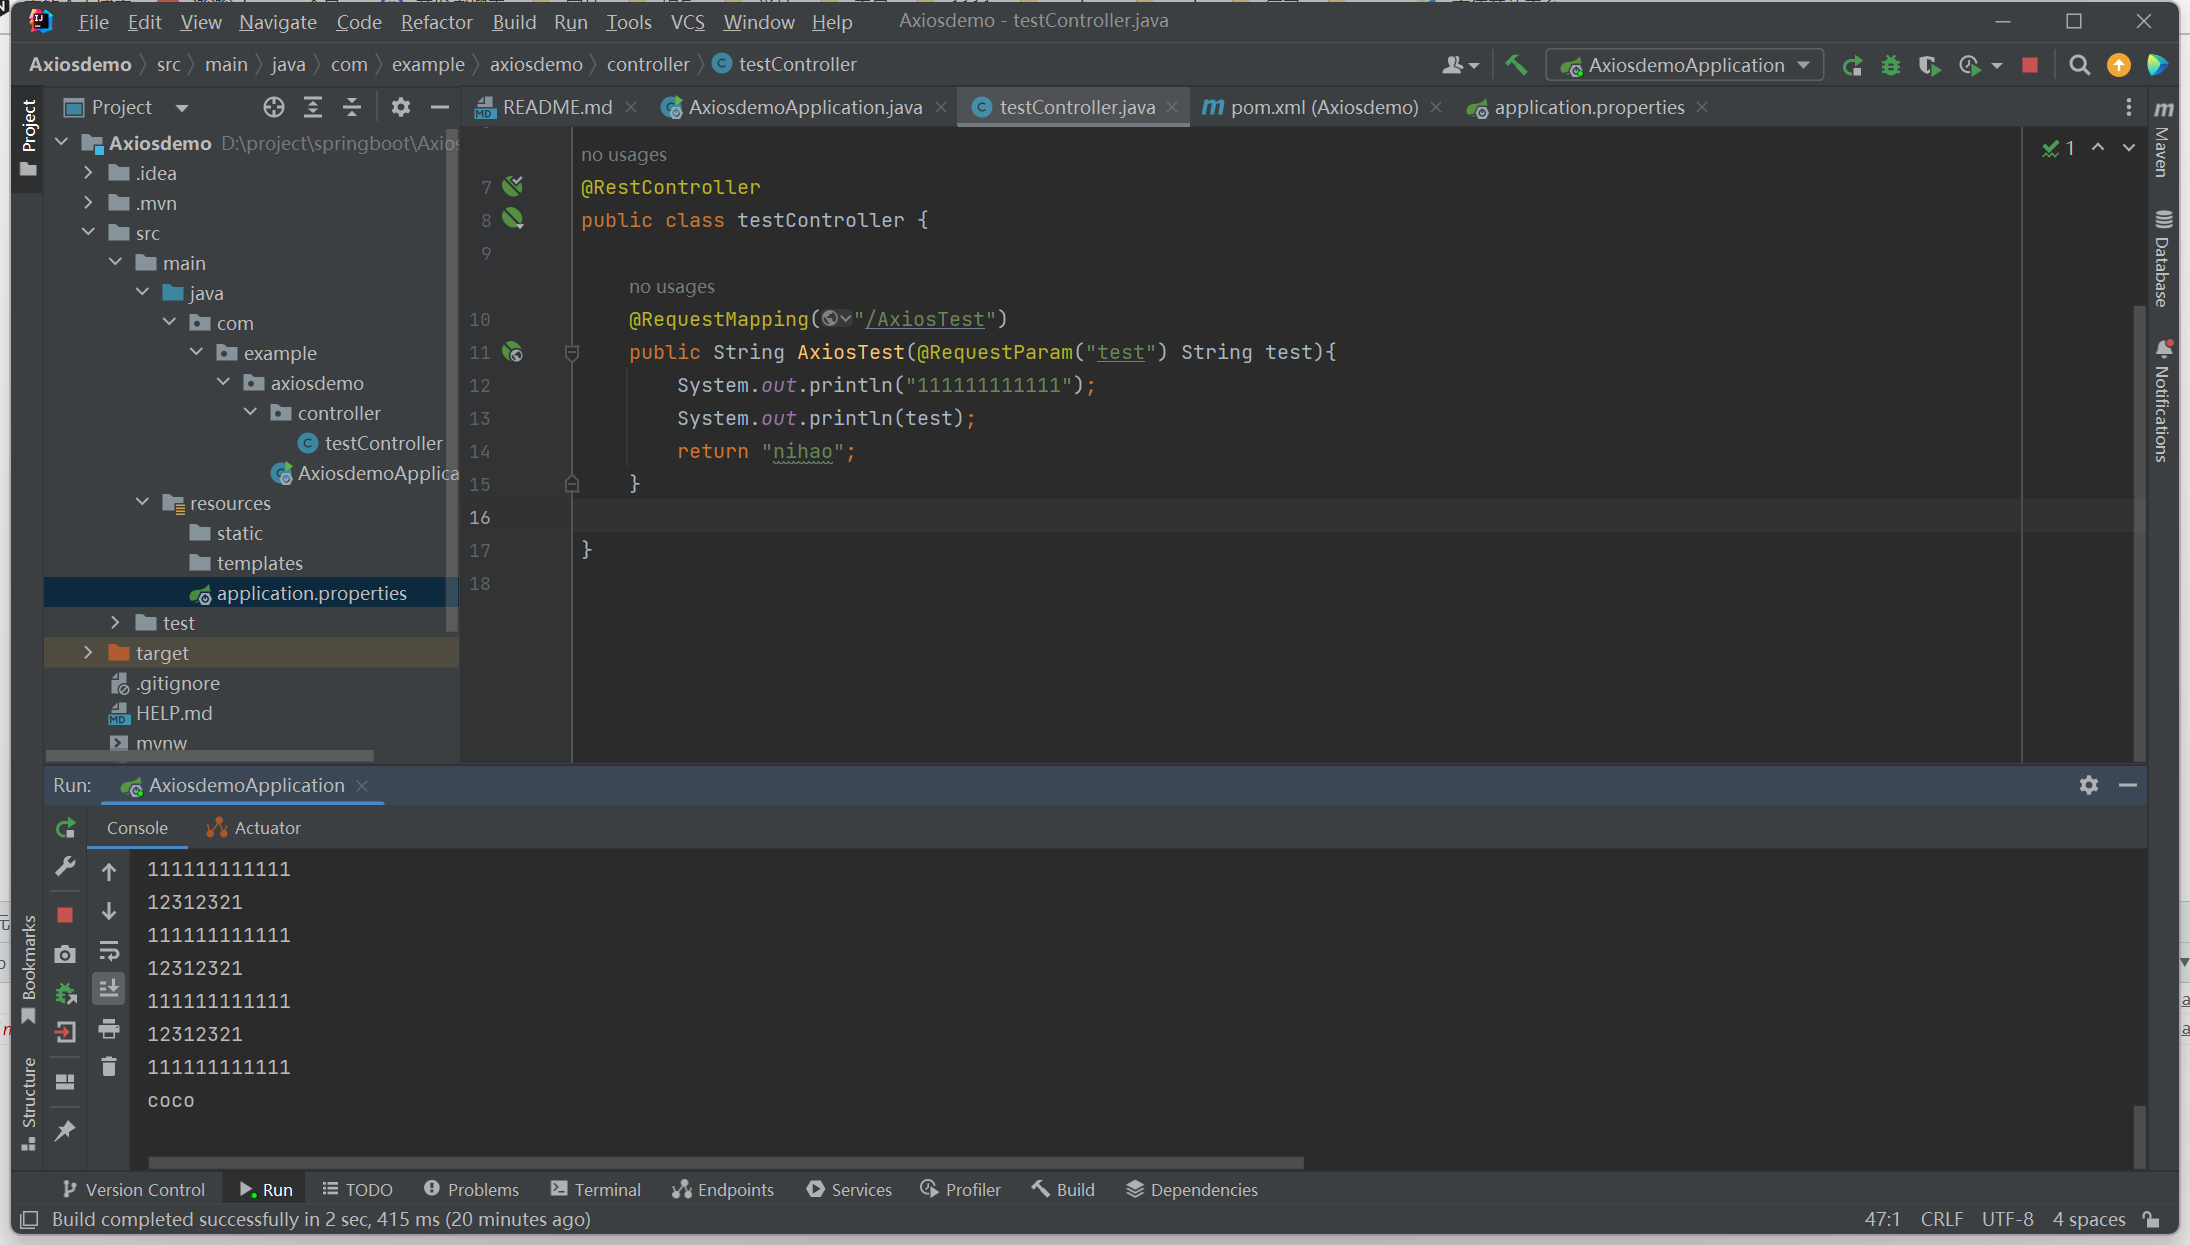
建一个简单的后端请求 1 2 3 4 5 6 @RequestMapping("/AxiosTest") public String AxiosTest (@RequestParam("test") String test) { System.out.println("111111111111" ); System.out.println(test); return "nihao" ; }
前后端交互 1 2 3 4 5 6 7 8 9 10 11 12 13 14 15 16 17 18 19 20 21 22 23 24 25 26 methods: { // 第一种方式 kk(){ this.$axios.get('/AxiosTest',{ params: { test: 'coco' } }) .then((response)=>{ console.log(response); }).catch((response)=>{ console.log(response); }) }, // 第二种方式 async tesst(){ const {data: res} = await this.$axios.get('/AxiosTest',{ params: { test: this.test } }) console.log(res); }, },
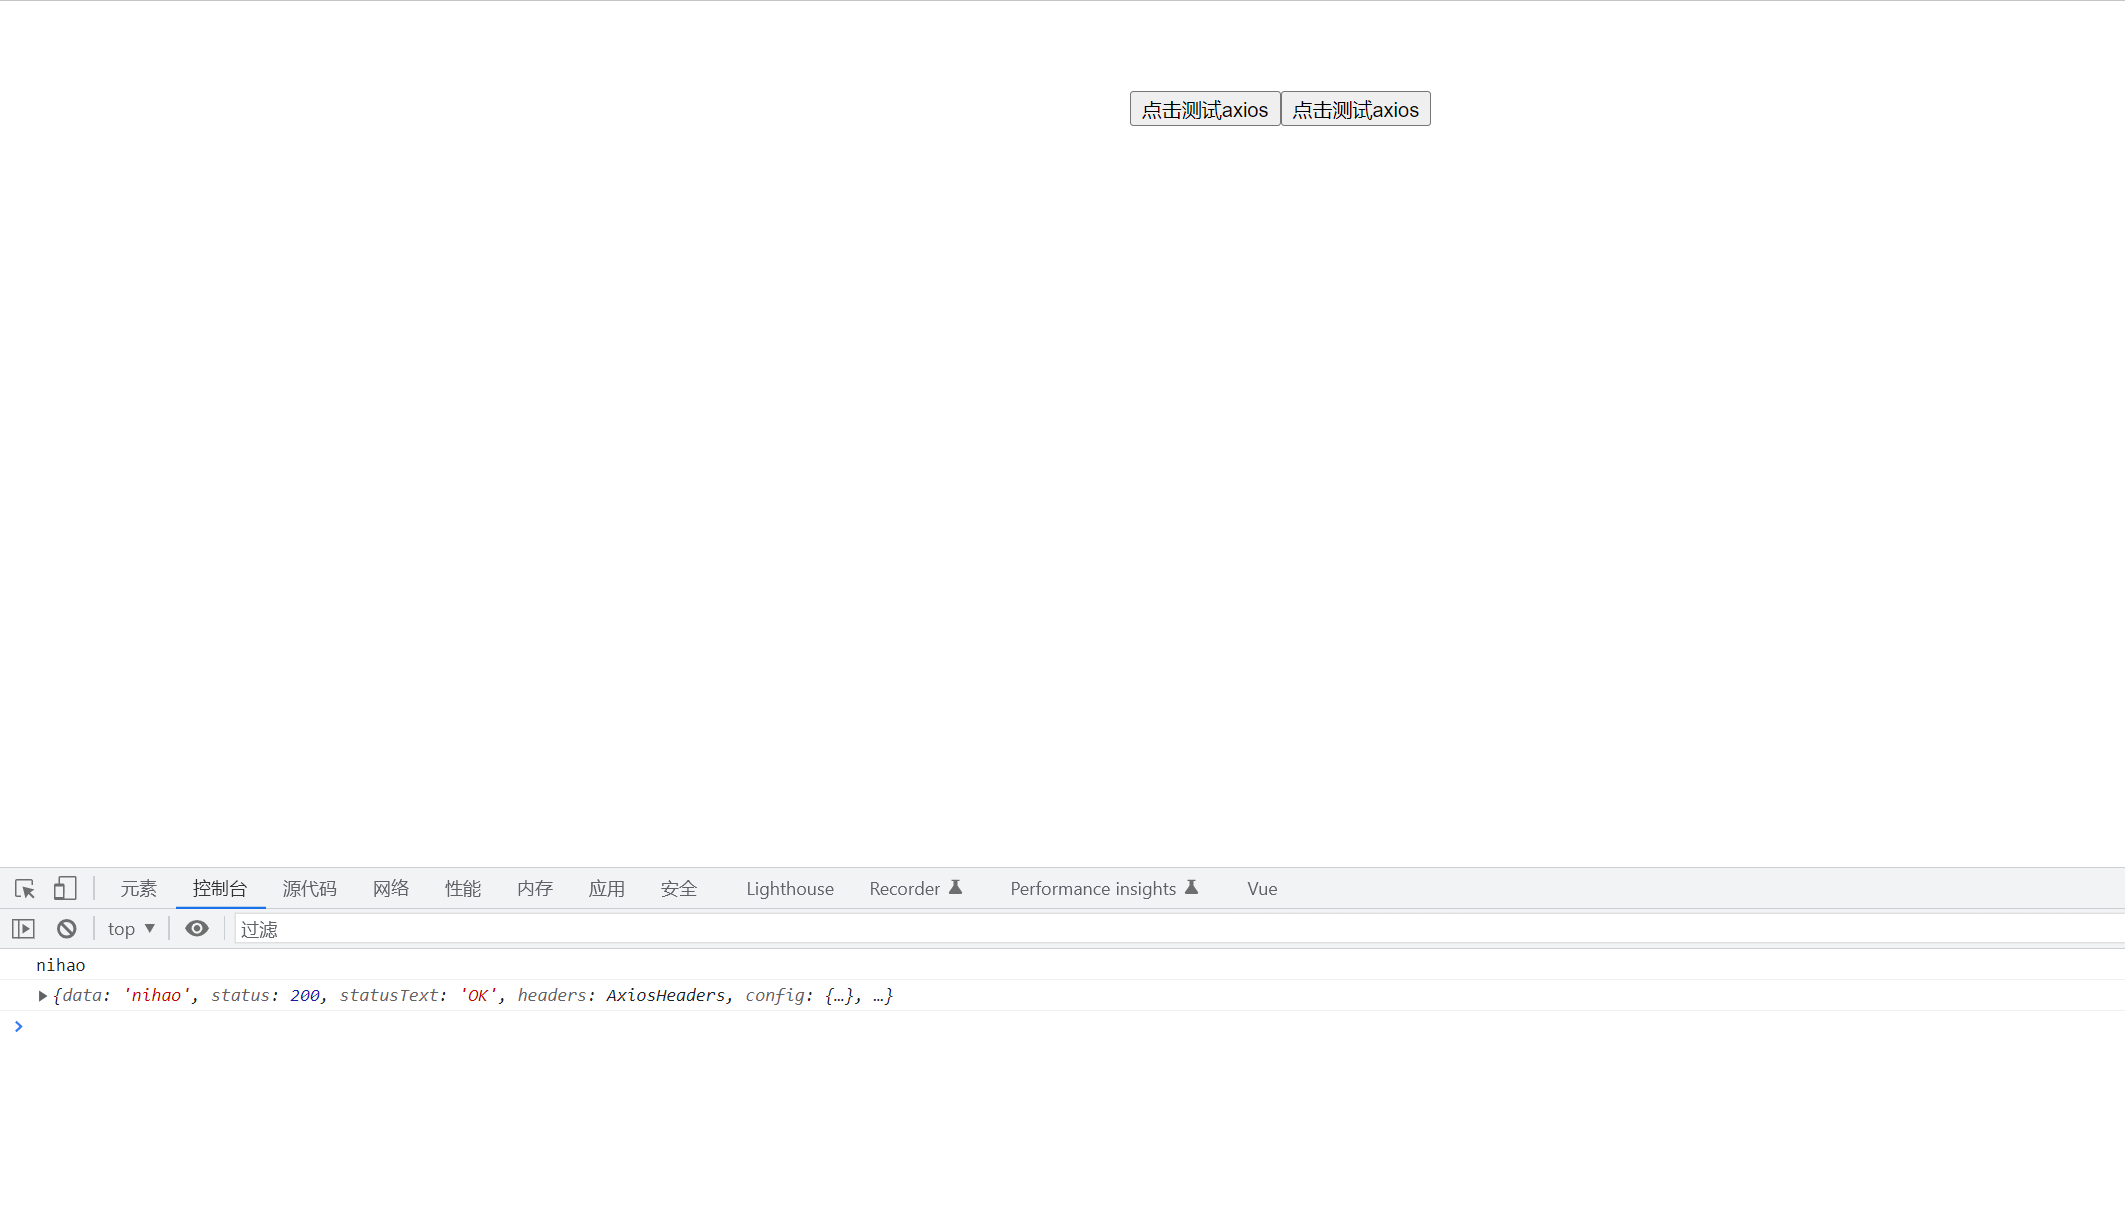
运行结果
