mongoDB和CouchDB的区别
| 特性 |
CouchDB |
MongoDB |
| 数据模型 |
它遵循面向文档的模型,数据以JSON格式表示。 |
它遵循面向文档的模型,但数据以BSON格式表示 |
| 接口 |
CouchDB使用基于HTTP/ REST的接口。它非常直观,设计非常好。 |
MongoDB在TCP/IP上使用二进制协议和自定义协议。 |
| 对象存储 |
在CouchDB中,数据库包含文档。 |
在MongoDB中,数据库包含集合,而集合包含文档。 |
| 速度 |
它的读取速度是关键的数据库,MongoDB比CouchDB快 |
MongoDB提供了更快的读取速度。 |
| 手机支持 |
CouchDB可以运行在苹果iOS和Android设备上,为移动设备提供支持。 |
没有提供移动支援 |
| 大小 |
数据库可以随着CouchDB而增长;当结构从一开始就没有明确定义时,MongoDB更适合快速增长。 |
如果我们有一个快速增长的数据库,MongoDB是更好的选择。 |
| 查询方法 |
查询使用map-reduce函数。虽然它可能是一种优雅的解决方案,但对于具有传统SQL经验的人来说,学习它可能更加困难。 |
MongoDB采用Map/Reduce (JavaScript)创建基于集合+对象的查询语言。对于有SQL知识的用户,MongoDB更容易学习,因为它更接近语法。 |
| 复制 |
CouchDB支持使用自定义冲突解决功能的主-主复制。 |
MongoDB支持主从复制。 |
| 并发性 |
它遵循MVCC(多版本并发控制)。 |
就地更新。 |
| 首选项 |
CouchDB支持可用性。 |
MongoDB支持一致性 |
| 性能的一致性 |
CouchDB比MongoDB更安全 |
|
| 一致性 |
CouchDB最终是一致的。 |
MongoDB是强一致性的。 |
| 编写语言 |
Erlang |
C++. |
| 分析 |
如果我们需要一个在移动设备上运行的数据库,需要主-主复制或单服务器持久性,那么CouchDB是一个很好的选择。 |
如果我们正在寻找最大的吞吐量,或者有一个快速增长的数据库,MongoDB是最好的选择。 |
mongodb的调研
mongodb是面向文档的nosql。
从总体上看
- mongodb是最亲和RDBMS的一个NoSQL,能解决大部分关系型数据库解决的问题。
- 跟面向列存储的HBase相比,面向文档存储的和面向行存储比较接近,比如在没有索引的情况下,扫描整个表内记录,同样是扫面全文档,及文档的每个字段。
- mongodb的索引同样也是B树,在一些索引的优化和设计上和MySQL比较相似。
- mongodb的查询中也有mysql的in,where,group等字段,而且向group那样的查询会比mysql更强大
mongodb的数据冗余机制
Mongodb的数据冗余机制分为两种,主从复制(Master-Slave)和副本集(ReplicaSet)的方式。这两种操作方式都是通过回放主节点操作日志的异步数据同步方式。
主节点会将操作日志记录到oplog中,从节点从主节点请求oplog日志,然后在节点上回放来构建数据;如果主节点和从节点数据超过oplog的范围,则需要从节点和主节点先进行sync后再反演oplog日志。
ReloicaSet是在Master-Salve同步机制的基础上加上了选举机制。一个ReplicaSet中的各个节点之间有心跳信息,当主节点失败时,从节点发起一轮主节点的选取过程,重新选出一个主节点。主节点的选取跟各个节点的配置优先级和数据的更新程度有关。选主节点先考虑优先级,再考虑拥有最新数据的节点,然后选出一个节点作为新的主节点。各个节点和主节点进行数据同步,旧的主节点重新加入ReplicaSet后,会作为从节点与新的主节点进行数据同步。
Mongodb通过这种操作日志回放进行数据同步的方式保证数据的最终一致性。主节点为了数据的安全性加入了journal机制,但是由于不同节点之间的数据是异步同步的,在主节点宕机或者网络故障时有可能丢失数据。
mongodb的数据分片机制
Nosql系统的水平拓展性依赖于其数据的分片机制和数据迁移机制。Mongodb集群通过自动分片机制来进行数据的分片和数据迁移。
mongodb的存储结构
Mongodb将数据按照数据库(database),集合(collection)和文档(document)的方式进行存储,分别对应RDBMS中的数据库,表和记录的概念。Mongodb为每个数据库建立一个namespace(.ns结尾)文件,存储该数据库的元信息,比如该数据都有那些collections,各个collcetions的数据文件,索引文件信息等。
MongoDB的记录是个文档,它是由字段对值的数据结构,类似JSON,同时字段的值可以包括其他文档,数组和文档数据,即文档的嵌套。
Mongodb每个db中有多个collection,相当于table,每个collection内是许许多多的document,Mongdb对数据格式要求宽松,因此document的schemaless的。
同时mongodb的所有数据都存放在文件中,Mongodb的文件采用预分配的方式来避免磁盘碎片化和保证操作性能。第一次分配数据文件是64M,后续分配文件的数据指数级递增,知道预分配的数据文件大小达到2G。
Mongodb通过mmap来操作所有磁盘文件,Mongodb启动时将所ns文件和所有数据文件通过mmap的方式全部映射到进程逻辑地址空间,后续通过内存的操作来操作物理文件。
Mongodb存储引擎的优缺点
Mongodb采用mmap将存储文件全部映射到进程逻辑地址空间,通过操作系统的page cache 和 缺页中断机制来实现数据在内存和磁盘之间的迁移。
这种实现结构是将系统的内存作为存储系统的缓存,而缓存的管理完全由操作系统的界面缓存机制来管理,大大简化了Mongodb的存储引擎设计和实现。
这样做的优点是在系统内存充足的时候,会将所有的数据和索引文件都放在内存中,读写速度会非常快。另外,由于将内存管理任务交给操作系统的界面缓存来完成,使得Mongodb的存储引擎实现简单明了。
缺点:
- 通过mmap的形式将索引和数据文件全部映射到进程地址空间,使用页缓存来管理内存,是的mongodb会占用大量的内存,随着数据的增加,系统内存都会被mongodb占用。
- mongodb再数据和索引的量超过系统内存时,会造成大量的缺页中断,导致数据在磁盘和内存之间频繁换入换出,增加磁盘的IO压力,增加访问延迟。
对mongodb单节点的性能测试
测试机器为:VMWare虚拟机CentOS6.4 CPU:4核 内存:8G
当数据量达到千万级的时候最大访问时间小于1ms,访问性能很好;
当数据量达到4亿级的时,多客户端访问时间最大达到6s,在数据集过大的时候,mongodb会造成大量的磁盘IO和频繁的内存换入换出,导致mongodb的性能下降。
考虑到使用mongodb的数据量不会很大,超过上亿级别,加上mongodb在千万级数据量的时候访问速度很好,所以选择使用mongodb。
MongoDB安装
windows 下载地址
一路直接安装即可,自行修改下载路径,下的时候选择自定义安装,安装完毕之后需要在server/bin/data目录下创建一个db文件夹
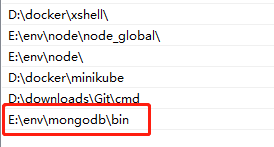
添加环境变量
找到下载mongodb的bin目录 E:\env\mongodb\bin将该目录添加到系统变量的path目录中。
运行mongoDB
打开一个cmd窗口
1
2
| mongod -dbpath "E:\env\mongodb\data\db"
# 运行此行命令运用一直开启mongoDB服务,但是命令行窗口不能关闭
|
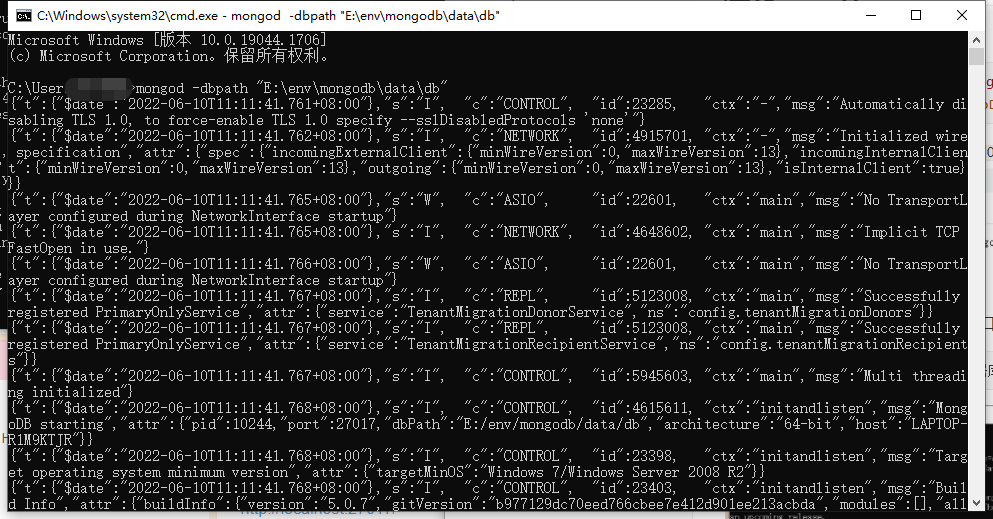
之后在浏览器上运行 localhost:27017

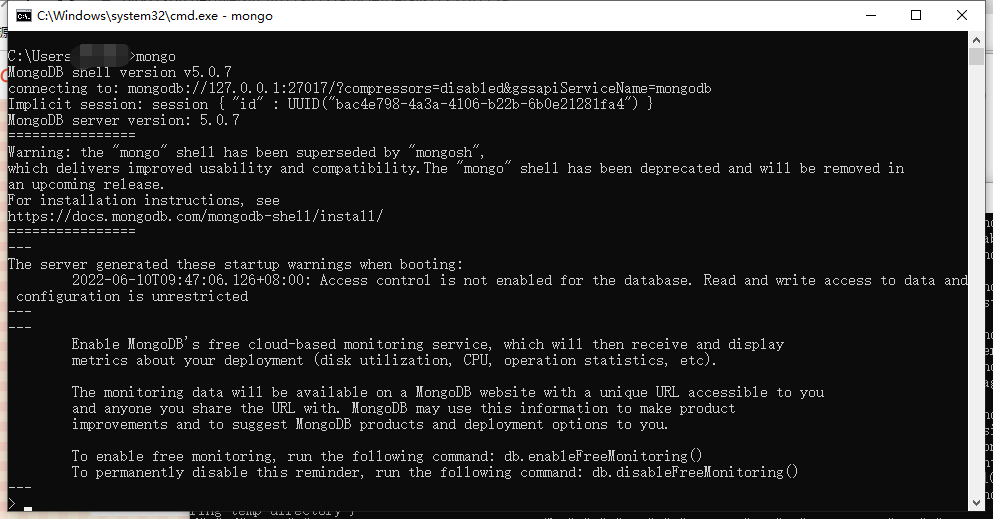
运行之后在重新打开一个cmd指令窗口
1
| 输入 mongo 即可对mongodb数据库进行操作
|
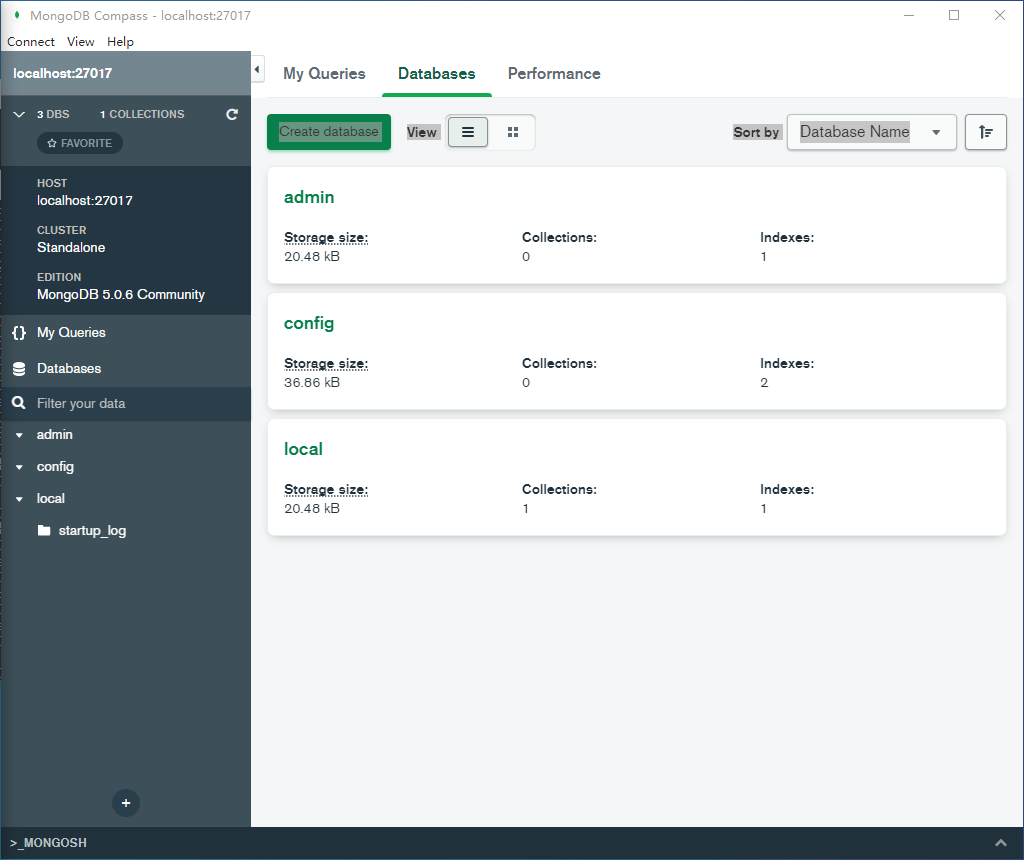
安装mongoDB compass 可视化界面
可视化界面
是一个压缩包,解压后,直接运行里面的exe即可打开界面,然后点击connect ,mongoDB默认的端口是:https://localhost:27017/ ,连接之后是如下界面
mongoDB的基本命令
1
2
3
| #
use DATABASE_NAME // 如果数据库不存在,就创建数据库,否则进入到指定的数据库
#
|

1
2
3
4
5
6
7
8
9
10
11
12
13
14
| 删除数据库
db.dropDatabase() #需要先进入数据库中在进行删除
删除数据库中的集合
db.collection.drop()
对数据库进行插入文档
db.COLLEECTION_NAME.insert(document
COLLECTION_NAME 是文档的名字。
查看已经插入的文档
db.COLLECTION_NAME.find()
db.COLLECTION_NAME.find().pretty() #出现的文档信息更有条理
|
还可以将数据变成一个变量再进行插入
1
2
3
4
5
6
7
| > document=({title: 'MongoDB 教程',
description: 'MongoDB 是一个 Nosql 数据库',
by: 'w3cschool',
url: 'http://www.w3cschool.cn',
tags: ['mongodb', 'database', 'NoSQL'],
likes: 100
});
|
执行后的结果是
1
2
3
4
5
6
7
8
9
10
11
12
| {
"title" : "MongoDB 教程",
"description" : "MongoDB 是一个 Nosql 数据库",
"by" : "w3cschool",
"url" : "http://www.w3cschool.cn",
"tags" : [
"mongodb",
"database",
"NoSQL"
],
"likes" : 100
}
|
进行插入操作
1
2
3
| > db.col.insert(document)
WriteResult({ "nInserted" : 1 })
>
|
数据库的备份导出
新打开一个cmd窗口
1
2
3
4
5
6
7
8
9
10
11
12
| mongodump -h dbhost -d dbname -o dbdirectory
## 备份整个数据库
- -h:
MongoDB 所在服务器地址,例如:127.0.0.1,当然也可以指定端口号:127.0.0.1:27017
- -d:
需要备份的数据库实例,例如:test
- -o:
备份的数据存放位置,例如:c:\data\dump,当然该目录需要提前建立,在备份完成后,系统自动在dump目录下建立一个test目录,这个目录里面存放该数据库实例的备份数据。
|
数据导出可能遇到的问题
uncaught exception: SyntaxError: unexpected token: numeric literal : @(shell):1:13
原因:下载mongodb的时候没有下载对应的mongodump的exe,所以会报错
解决办法:
下载文件的bin目录中所有文件, 复制到mongodb的bin目录, 就可以用命令导入了
https://www.mongodb.com/try/download/database-tools
springboot 整合 Mongodb
- 导入pom依赖
- 修改配置文件 properties
- 编写实体类 pojo
- 编写 dao层和dao的实现类
- 编写service层和service的实现
- 编写controller
- 测试
导入pom依赖
1
2
3
4
5
6
7
8
9
10
11
12
13
14
15
16
17
18
19
20
21
22
23
24
25
26
27
28
29
30
31
32
33
34
35
36
37
38
39
40
41
42
43
44
45
46
47
| <dependencies>
<dependency>
<groupId>org.springframework.boot</groupId>
<artifactId>spring-boot-starter-data-mongodb</artifactId>
</dependency>
<dependency>
<groupId>org.springframework.boot</groupId>
<artifactId>spring-boot-starter-web</artifactId>
</dependency>
<dependency>
<groupId>org.springframework.boot</groupId>
<artifactId>spring-boot-devtools</artifactId>
<scope>runtime</scope>
<optional>true</optional>
</dependency>
<dependency>
<groupId>org.springframework.boot</groupId>
<artifactId>spring-boot-configuration-processor</artifactId>
<optional>true</optional>
</dependency>
<dependency>
<groupId>com.alibaba</groupId>
<artifactId>fastjson</artifactId>
<version>2.0.2</version>
</dependency>
<dependency>
<groupId>org.projectlombok</groupId>
<artifactId>lombok</artifactId>
<optional>true</optional>
</dependency>
<dependency>
<groupId>org.springframework.boot</groupId>
<artifactId>spring-boot-starter-test</artifactId>
<scope>test</scope>
<exclusions>
<exclusion>
<groupId>org.junit.vintage</groupId>
<artifactId>junit-vintage-engine</artifactId>
</exclusion>
</exclusions>
</dependency>
</dependencies>
|
修改配置文件
1
2
|
spring.data.mongodb.uri=mongodb://localhost:27017/Test
|
编写实体类
1
2
3
4
5
6
7
8
9
10
11
12
13
14
15
| @Data
@AllArgsConstructor
@NoArgsConstructor
@Document(collection = "test1")
public class test1 {
@Id
private String _id;
private int id;
private String name;
private int age;
private List<test2> test2List;
}
|
1
2
3
4
5
6
7
8
9
10
11
12
| @Document(collection = "test2")
@Data
@NoArgsConstructor
@AllArgsConstructor
public class test2 {
@Id
private String _id;
private int id;
private String name;
}
|
编写dao层
dao层接口
1
2
3
4
5
6
7
8
9
10
11
12
13
14
15
16
17
18
| public interface SiteFlowDao {
public void add(test1 s1);
public void remove(int id);
public test1 findByName(String name);
public int update(test1 s1);
public List<test1> findListByTest();
}
|
dao层接口实现
1
2
3
4
5
6
7
8
9
10
11
12
13
14
15
16
17
18
19
20
21
22
23
24
25
26
27
28
29
30
31
32
33
34
35
36
37
38
39
40
41
42
43
44
45
46
47
48
49
50
51
52
53
54
55
56
57
| @Component
public class SiteFlowDaoImpl implements SiteFlowDao{
@Autowired
MongoTemplate mongoTemplate;
@Override
public void add(test1 s1) {
mongoTemplate.save(s1);
}
@Override
public void remove(int id) {
Query query = new Query(Criteria.where("id").is(id));
mongoTemplate.remove(query,test1.class);
}
@Override
public test1 findByName(String name) {
Query query = new Query(Criteria.where("name").is(name));
test1 one = mongoTemplate.findOne(query, test1.class);
return one;
}
@Override
public int update(test1 s1) {
Query query = new Query(Criteria.where("id").is(s1.getId()));
Update update = new Update();
update.set("name",s1.getName()).set("age",s1.getAge());
UpdateResult updateResult = mongoTemplate.updateMulti(query, update, test1.class);
if(updateResult.getModifiedCount()>0) return 1;
return 0;
}
@Override
public List<test1> findListByTest() {
LookupOperation lookupOperation = LookupOperation.newLookup()
.from("test2")
.localField("id")
.foreignField("id")
.as("test2List");
Criteria criteria = Criteria.where("test2List").not().size(0);
AggregationOperation match = Aggregation.match(criteria);
Aggregation aggregation = Aggregation.newAggregation(lookupOperation,match);
List<test1> deto = mongoTemplate.aggregate(aggregation, "test1",test1.class).getMappedResults();
return deto;
}
}
|
编写service层
service层接口
1
2
3
4
5
6
7
8
9
10
11
12
13
| public interface SiteFlowService {
public void add(test1 s1);
public void remove(int id);
public test1 findByName(String name);
public int update(test1 s1);
public List<test1> findListByTest();
}
|
service层接口实现
1
2
3
4
5
6
7
8
9
10
11
12
13
14
15
16
17
18
19
20
21
22
23
24
25
26
27
28
29
30
31
| @Service
public class SiteFlowServiceImpl implements SiteFlowService{
@Autowired
SiteFlowDao siteFlowDao;
@Override
public void add(test1 s1) {
siteFlowDao.add(s1);
}
@Override
public void remove(int id) {
siteFlowDao.remove(id);
}
@Override
public test1 findByName(String name) {
return siteFlowDao.findByName(name);
}
@Override
public int update(test1 s1) {
return siteFlowDao.update(s1);
}
@Override
public List<test1> findListByTest() {
return siteFlowDao.findListByTest();
}
}
|
controller层
1
2
3
4
5
6
7
8
9
10
11
12
13
14
15
16
17
18
19
20
21
22
23
24
25
26
27
28
29
30
31
32
33
34
35
36
37
38
| @RestController
public class testController {
@Autowired
SiteFlowService siteFlowService;
@RequestMapping("/add")
public String add(test1 ss1){
siteFlowService.add(ss1);
return "add";
}
@RequestMapping("/delete")
public String delete(int id){
siteFlowService.remove(id);
return "delete";
}
@RequestMapping("/delete/{id}")
public String delete(@PathVariable("id") int id){
siteFlowService.remove(id);
return "delete";
}
@RequestMapping("/update")
public String update(test1 ss1){
siteFlowService.update(ss1);
return "update";
}
@RequestMapping("/TwoList")
public String test(){
List<test1> listByTest = siteFlowService.findListByTest();
System.out.println("======================="+listByTest+"============================");
return "list";
}
}
|
springboot使用Mongodb进行CRUD
增加
1
2
3
4
5
6
7
8
9
10
11
12
| void add(){
test1 s1 = new test1();
s1.setId(3);
s1.setName("ff");
s1.setAge(18);
mongoTemplate.save(s1);
List<test1> all = mongoTemplate.findAll(test1.class);
for (test1 ss1 : all) {
System.out.println(ss1);
}
}
|
删除
1
2
3
4
5
6
| void delete(){
Query query = new Query(Criteria.where("siteflow_author").is("阿斯兰"));
mongoTemplate.remove(query,siteflow.class);
}
|
更新
1
2
3
4
5
6
7
8
9
10
11
12
13
14
15
16
17
18
19
20
21
22
23
24
25
| void update(){
Update update = new Update();
update.set("siteflow_author","李亚辉");
Query query4 = new Query(Criteria.where("id").gte(154));
UpdateResult updateResult = mongoTemplate.updateMulti(query4, update, siteflow.class);
System.out.println("=====>"+updateResult.getMatchedCount());
System.out.println("=====>"+updateResult.getModifiedCount());
List<siteflow> all = mongoTemplate.findAll(siteflow.class);
for (siteflow siteflow : all) {
System.out.println(siteflow);
}
}
|
查找
1
2
3
4
5
6
7
8
9
10
11
12
13
14
15
16
17
18
19
20
21
22
23
24
25
26
27
28
29
30
31
32
33
34
35
36
37
| void contextLoads() {
List<siteflow> all = mongoTemplate.findAll(siteflow.class);
for (siteflow siteflow : all) {
System.out.println(siteflow);
}
Query query1 = new Query(Criteria.where("id").gte(155).lte(155));
Query query2 = new Query(Criteria.where("siteflow_author").is("lks"));
Query query3 = new Query(Criteria.where("park").regex("廊"));
Criteria criteria = new Criteria();
Query query = new Query(criteria);
query.with(Sort.by(Sort.Order.desc("id")));
query.skip(0)
.limit(4);
List<siteflow> siteflows = mongoTemplate.find(query3, siteflow.class);
for (siteflow siteflow : siteflows) {
System.out.println("=======>"+siteflow);
}
}
|
模糊查询
1
2
3
4
5
6
7
8
9
10
11
12
13
14
15
16
17
18
19
| void test3(){
String siteflow_name = "北京站点456867";
String siteflow_author = "李亚辉";
String reges = String.format("%s%s%s","^.*",siteflow_name,".*$");
String reges2 = String.format("%s%s%s","^.*",siteflow_author,".*$");
Pattern pattern = Pattern.compile(reges,Pattern.CASE_INSENSITIVE);
Pattern pattern2 = Pattern.compile(reges2,Pattern.CASE_INSENSITIVE);
Criteria cr = new Criteria();
Query query = new Query();
if(siteflow_author!=null&&siteflow_author!=""){
cr.and("siteflow_author").regex(pattern2);
}
if(siteflow_name!=null&&siteflow_name!=""){
cr.and("siteflow_name").regex(pattern);
}
query.addCriteria(cr);
List<SiteFlow> siteflow = mongoTemplate.find(query, SiteFlow.class, "siteflow");
System.out.println(siteflow);
}
|
多表联查
1
2
3
4
5
6
7
8
9
10
11
12
13
14
15
16
17
18
19
20
21
22
23
24
25
26
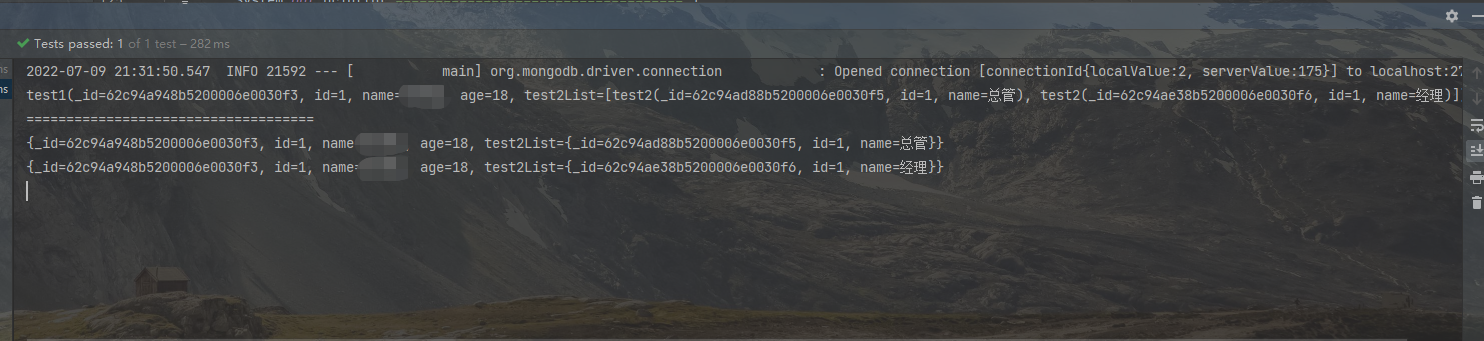
| void select(){
LookupOperation lookupOperation = LookupOperation.newLookup()
.from("test2")
.localField("id")
.foreignField("id")
.as("test2List");
Criteria criteria = Criteria.where("test2List").not().size(0);
AggregationOperation match = Aggregation.match(criteria);
UnwindOperation unwind = Aggregation.unwind("test2List");
Aggregation aggregation = Aggregation.newAggregation(lookupOperation,match);
Aggregation aggregation1 = Aggregation.newAggregation(lookupOperation,match,unwind);
List<test1> deto = mongoTemplate.aggregate(aggregation, "test1",test1.class).getMappedResults();
List<Map> deto1 = mongoTemplate.aggregate(aggregation1, "test1",Map.class).getMappedResults();
for (test1 test1 : deto) {
System.out.println(test1);
}
System.out.println("====================================");
for (Map map : deto1) {
System.out.println(map);
}
}
|
输出结果:
Mongodb两表联查
1
2
3
4
5
6
7
8
9
10
11
12
13
14
15
16
17
18
19
20
21
22
23
24
25
26
27
28
29
30
31
32
33
34
35
36
37
38
39
40
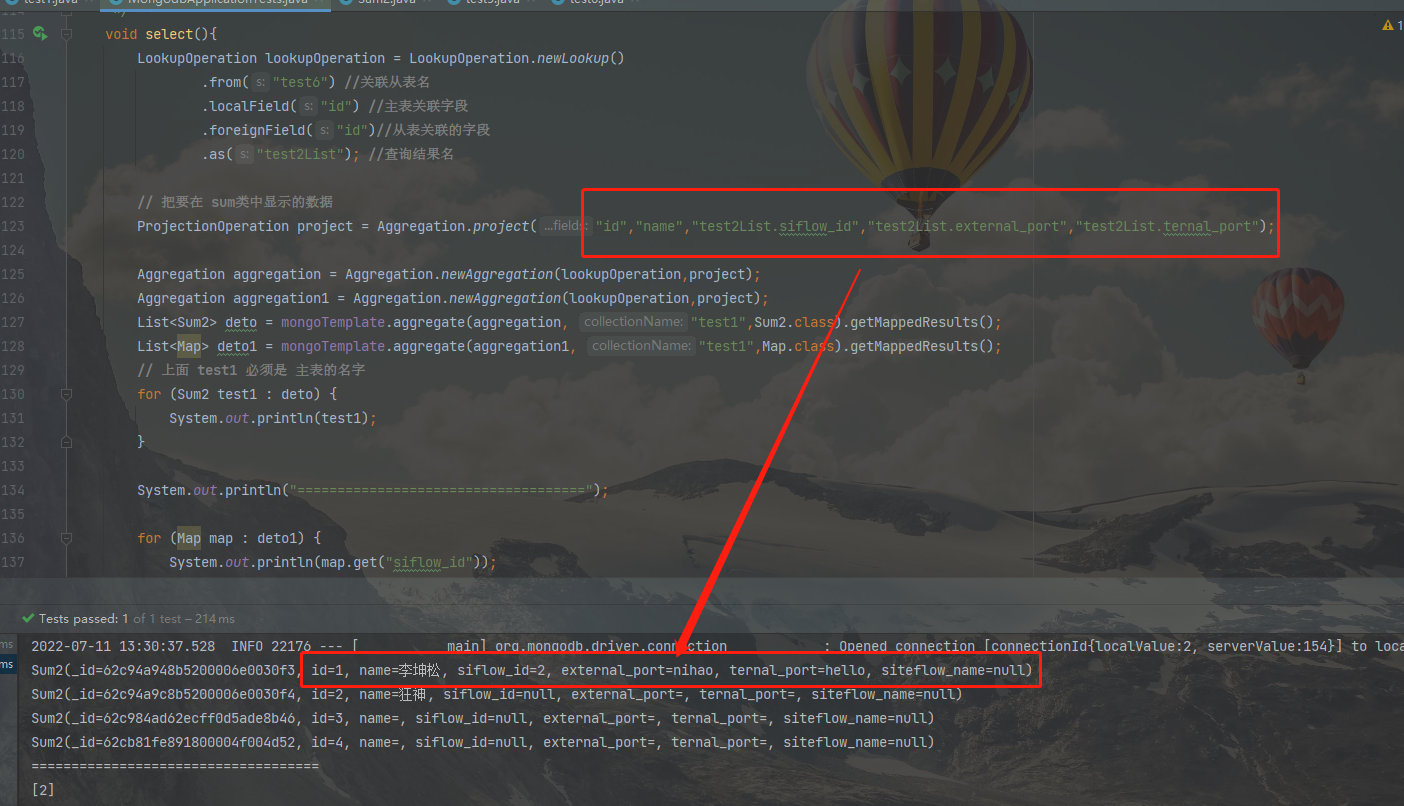
| @Test
void select(){
LookupOperation lookupOperation = LookupOperation.newLookup()
.from("test6")
.localField("id")
.foreignField("id")
.as("test2List");
ProjectionOperation project = Aggregation.project("id","name","test2List.siflow_id","test2List.external_port","test2List.ternal_port");
Aggregation aggregation = Aggregation.newAggregation(lookupOperation,project);
Aggregation aggregation1 = Aggregation.newAggregation(lookupOperation,project);
List<Sum2> deto = mongoTemplate.aggregate(aggregation, "test1",Sum2.class).getMappedResults();
List<Map> deto1 = mongoTemplate.aggregate(aggregation1, "test1",Map.class).getMappedResults();
for (Sum2 test1 : deto) {
System.out.println(test1);
}
System.out.println("====================================");
for (Map map : deto1) {
System.out.println(map.get("siflow_id"));
}
}
|
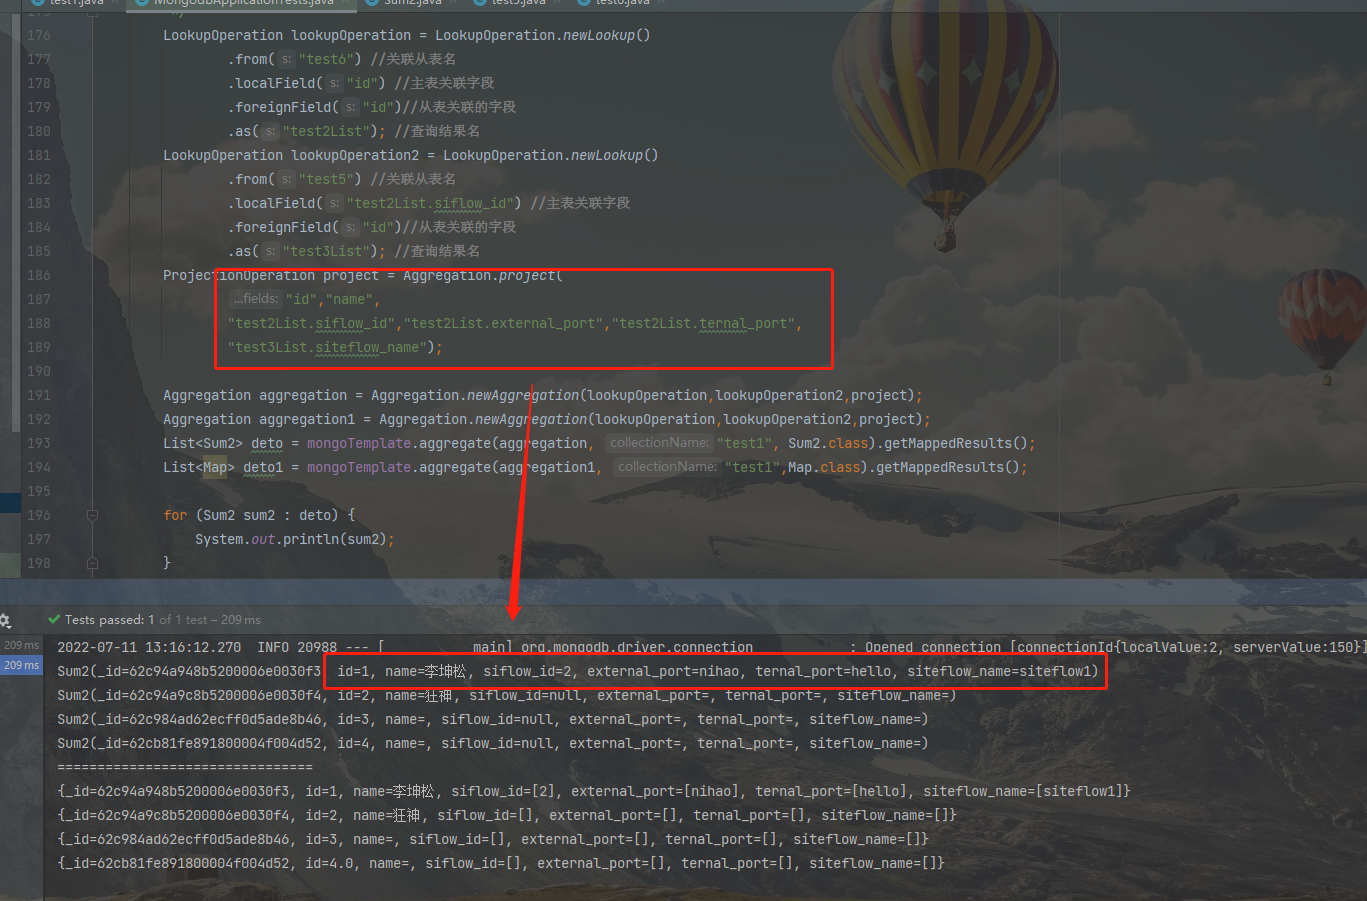
结果
三表联查
1
2
3
4
5
6
7
8
9
10
11
12
13
14
15
16
17
18
19
20
21
22
23
24
25
26
27
28
29
30
31
32
33
34
35
36
37
38
39
40
41
42
43
44
45
46
47
48
49
50
51
52
53
54
55
56
57
58
59
| void test2(){
Criteria criteria = new Criteria();
criteria.orOperator(Criteria.where("siteflow_name").is("北京站点456867"));
LookupOperation lookupOperation = LookupOperation.newLookup()
.from("server_configure")
.localField("id")
.foreignField("siteflow_id")
.as("ss");
LookupOperation lookupOperation2 = LookupOperation.newLookup()
.from("system_number")
.localField("id")
.foreignField("id")
.as("sa");
ProjectionOperation project = Aggregation.project("id");
ProjectionOperation project2 = Aggregation.project("id","sa.system_name","siteflow_id");
Map2Bean<SiteFlowSum> sumMap2Bean = new Map2Bean<>();
Aggregation aggregation = Aggregation.newAggregation(lookupOperation,Aggregation.unwind("ss")
,Aggregation.match(criteria),project);
Aggregation aggregation2 = Aggregation.newAggregation(lookupOperation2,Aggregation.unwind("sa")
,Aggregation.match(Criteria.where("sa").ne(null)),project2);
List<Map> siteflow1 = mongoTemplate.aggregate(aggregation, "siteflow", Map.class).getMappedResults();
List<Map> siteflow2 = mongoTemplate.aggregate(aggregation2, "server_configure", Map.class).getMappedResults();
List<Map> test = new ArrayList<>();
for (Map map : siteflow1) {
String i = map.get("id").toString();
Integer h = Integer.valueOf(i);
Query query = new Query(Criteria.where("siteflow_id").is(h));
List<SiteServerConfigure> siteServerConfigures = mongoTemplate.find(query, SiteServerConfigure.class);
for (SiteServerConfigure siteServerConfigure : siteServerConfigures) {
for (Map map1 : siteflow2) {
String ih = map1.get("id").toString();
if(siteServerConfigure.getId() == Integer.valueOf(ih)){
Map<String,Object> map2 = new HashMap<>();
map2.put("id",map.get("id"));
map2.put("system_name",map1.get("system_name"));
test.add(map2);
}
}
}
}
SiteFlowSum convert = sumMap2Bean.convert(test.get(0), SiteFlowSum.class,true,true);
System.out.println(convert);
System.out.println("=======================");
System.out.println(test);
}
|
结果